

64
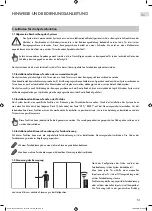
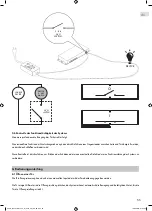
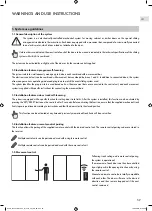
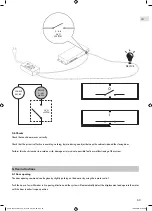
Alternatively, press the button on the radio control corresponding to the door to be opened and the system will receive the signal and
operate the motor until the door reaches its open position.
In the event that the opening of a door is obstructed by another previously opened door, both doors will move simultaneously to free the
opening.
4.2 Door closing
The door closing command can be given by slightly pushing on the door or by using the remote control.
Push the door a few millimetres in its closing direction and the system will automatically detect the displacement and operate the motor
until the door reaches its closed position.
Alternatively, press the button on the radio control corresponding to the door to be closed and the system will receive the signal and
operate the motor until the door reaches its closed position.
4.3 Close all doors with a single command
To close all open or partially open cabinet doors, long press (3 seconds) one of the active remote control buttons for the configuration in
use. The system will automatically bring all doors to their closed positions.
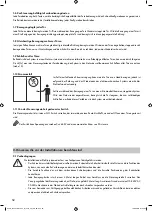
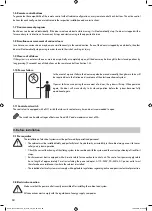
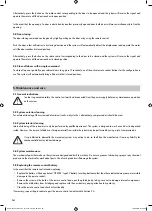
5.1 General indications
In order to guarantee safety, the control unit must be disconnected from the power supply before any maintenance operation
on the system.
5.2 System exterior cleaning
For external cleaning of the system and aluminium tracks, a dry cloth or, alternatively, compressed air should be used.
5.3 System interior cleaning
Internal cleaning of the system must only be performed by qualified personnel. The system is designed to work even if dust is deposited
inside. However, the removal of debris or foreign material from inside the system may be performed by using a jet of compressed air.
It is prohibited to dismantle the movement system. Any action to do so shall free the manufacturer from any liability for
consequential direct or indirect damage.
5.4 System maintenance
The mechanical parts that make up the system are designed and built to work dry. Do not use greases, lubricating sprays or any chemical
products on the electrical or mechanical parts. Use of such products will damage the system.
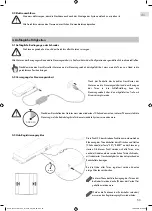
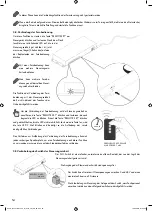
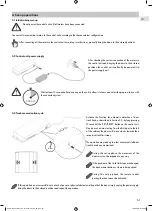
5.5 Replacing the remote control battery
In the event that the remote control needs replacing:
• Replace the battery with an equivalent ‘CR2032’ type 3V battery. Inserting batteries other than those indicated may cause irreversible
damage to the remote control;
• Remove the screw on the back of the remote control and open the plastic body, taking care not to damage internal components.
Remove the old battery from its lodging and replace with the new battery, paying attention to its polarity.
• Close the remote control and check its functionality.
If necessary, repeat the procedure to pair the remote control as indicated in Section 3.4.
5. Maintenance and care
A920_Schiebetürantrieb_für_Slido_Flat_60_FB.indd 64
19.08.2019 07:54:46
Содержание 400.50.038
Страница 15: ...15 3 A920_Schiebetürantrieb_für_Slido_Flat_60_FB indd 15 19 08 2019 07 54 26 ...
Страница 16: ...16 4 A920_Schiebetürantrieb_für_Slido_Flat_60_FB indd 16 19 08 2019 07 54 26 ...
Страница 18: ...18 Ø5 5 6 mm 5 6 A920_Schiebetürantrieb_für_Slido_Flat_60_FB indd 18 19 08 2019 07 54 27 ...
Страница 19: ...19 7 8 A920_Schiebetürantrieb_für_Slido_Flat_60_FB indd 19 19 08 2019 07 54 28 ...
Страница 20: ...20 10 9 A920_Schiebetürantrieb_für_Slido_Flat_60_FB indd 20 19 08 2019 07 54 29 ...
Страница 23: ...23 14 15 A920_Schiebetürantrieb_für_Slido_Flat_60_FB indd 23 19 08 2019 07 54 30 ...
Страница 24: ...24 16 17 18 19 A920_Schiebetürantrieb_für_Slido_Flat_60_FB indd 24 19 08 2019 07 54 31 ...
Страница 26: ...26 20 21 A920_Schiebetürantrieb_für_Slido_Flat_60_FB indd 26 19 08 2019 07 54 32 ...
Страница 29: ...29 35 17 35 25 70 24 A920_Schiebetürantrieb_für_Slido_Flat_60_FB indd 29 19 08 2019 07 54 33 ...
Страница 34: ...34 A 1 1 KONFIGURATION CONFIGURATION A920_Schiebetürantrieb_für_Slido_Flat_60_FB indd 34 19 08 2019 07 54 36 ...
Страница 35: ...35 A 1 1 1 1a A920_Schiebetürantrieb_für_Slido_Flat_60_FB indd 35 19 08 2019 07 54 37 ...
Страница 36: ...36 A 1 1 1 1b A920_Schiebetürantrieb_für_Slido_Flat_60_FB indd 36 19 08 2019 07 54 37 ...
Страница 37: ...37 A 1 1 EN 59 DE 51 A920_Schiebetürantrieb_für_Slido_Flat_60_FB indd 37 19 08 2019 07 54 37 ...
Страница 38: ...38 E KONFIGURATION CONFIGURATION 1 4 A920_Schiebetürantrieb_für_Slido_Flat_60_FB indd 38 19 08 2019 07 54 38 ...
Страница 39: ...39 E 1 1 1 1 A920_Schiebetürantrieb_für_Slido_Flat_60_FB indd 39 19 08 2019 07 54 38 ...
Страница 40: ...40 E 4 4 2 4 A920_Schiebetürantrieb_für_Slido_Flat_60_FB indd 40 19 08 2019 07 54 39 ...
Страница 41: ...41 E 1 4 EN 59 DE 51 A920_Schiebetürantrieb_für_Slido_Flat_60_FB indd 41 19 08 2019 07 54 39 ...
Страница 42: ...42 F KONFIGURATION CONFIGURATION 3 2 A920_Schiebetürantrieb_für_Slido_Flat_60_FB indd 42 19 08 2019 07 54 39 ...
Страница 43: ...43 F 2 2 2 1 A920_Schiebetürantrieb_für_Slido_Flat_60_FB indd 43 19 08 2019 07 54 40 ...
Страница 44: ...44 F 3 3 3 2 A920_Schiebetürantrieb_für_Slido_Flat_60_FB indd 44 19 08 2019 07 54 41 ...
Страница 45: ...45 F 3 2 EN 59 DE 51 A920_Schiebetürantrieb_für_Slido_Flat_60_FB indd 45 19 08 2019 07 54 41 ...
Страница 49: ...49 4 3 mm 3 A920_Schiebetürantrieb_für_Slido_Flat_60_FB indd 49 19 08 2019 07 54 44 ...
Страница 67: ...A920_Schiebetürantrieb_für_Slido_Flat_60_FB indd 67 19 08 2019 07 54 46 ...


