background image


13 

Application 

Operation Steps


In the following section the order in 
which  you should use the  device is 
described.  Additionally,  the  individ-
ual steps will be explained in detail. 
Read  the  complete  manual  before 
use. 
 
After  connecting  the  device  to  the 
power  press  the  standby  button  (9) 
to make it start rotating. Use the (3) 
and  (4)  buttons  to  select  a  rotation 
speed. Manufacturers often provide 
recommendations  for  optimal  rota-
tion  speeds.  However,  it  is  im-
portant  that  you  never  exceed  the 
maximum  recommended  rotation 
speed. 
 
You  can  now  choose  a  rotation 
direction  using  the  button  (6).  The 
most  commonly  used  direction  is 
clockwise.  Most  milling  instrument 
(steel instruments with steel cutters) 
are  optimized  for  clockwise  use. 
The  rotation  direction  is  irrelevant 
for  diamond  cutters  and  high-grade 
corundum  sanders  in  terms  of  effi-
ciency.  Working  anti-clockwise  can 
be  beneficial  if,  for  example,  the 
dust  obscures  your  field  of  vision 
when working clockwise. 
 
Press  the  button  (2)  to  activate  the 
suction.  Using  buttons  (1)  and  (2) 
you  can  adjust  the  intensity  of  the 
suction. 
 
After choosing a rotation speed and 
suction  power  you  can  start  work-
ing.  If  you  want  to  take  a  break  or 
finish  the  job,  press  the  standby 
button  (9).  The  handpiece  motor 

and  suction  will  turn  off.  The  hand-
piece  can  now  be  placed  in  its 
holder on the right of the unit. Alter-
natively,  you  can  switch  the  device 
to  standby  mode  by  pressing  the 
button on the foot switch. 
 
We recommend you disconnect the 
device from the mains power supply 
if is not going to be used for a while. 
This will save electricity. The mains 
plug must also be removed when it 
comes to retiring the device. 

Содержание Veloria Chrome

Страница 1: ...Art 0978 FB 04 299 Rev 1 Date 14 06 2019 Manual Veloria Chrome ...

Страница 2: ...1 Operation 11 Application 13 Operation Steps 13 Working Positioning 14 Suction 16 Exchange Micro Filter 16 Exchange Control Unit Filter 16 Clamping the Bur Tool 17 Adjusting the Speed 17 Foot Switch 17 Maintenance Care 18 Cleaning the Clamping System 18 Maintenance Overview 19 Handling Instructions 20 Troubleshooting 21 Technical Data 22 ...

Страница 3: ...give this product to someone else please include this document as it includes im portant information on how to correctly use the product Short description of functions The Veloria Chrome is a device for the treatment of callus and nails The handpiece is compatible with rotating tools such as diamond polishers steel cutters and ceramic cutters These can reach at speeds up to 40 000 rpm and therefor...

Страница 4: ...ccessible The power switch should also always be easily ac cessible Only switch on the unit if the handpiece rests secured in the handpiece holder or if you hold it safely in your hand Prevent any liquids from entering into the con trol unit since this could damage the electronic elements Clean the outside of the box only with a damped cloth Make sure that you have unplugged the unit before Only w...

Страница 5: ...erials being formed and used For safety reasons you must always wear dis posable gloves and protective glasses when operating this unit In addition a face mask conforming to EN 14683 type IIR or EN 149 FFP 2 must also be worn Ensure that the patient s foot and the hand piece are held firmly in place during the opera tion To prevent injury work with extreme cau tion on the foot of the patient and u...

Страница 6: ...use the speed required by the instru ment the tool is absolutely dry When changing the filter it is advisable to wear a face mask conforming to EN 14683 type IIR or EN 149 FFP 2 For safety reasons do not change the tool while the motor is running Switch off the unit immediately if the bur comes off during the treatment itself the motor blocks during the treatment While doing any foot care only ope...

Страница 7: ...nged by the manufacturer or an authorized specialist Maintenance records may be supplied to repair workshops and trained technicians upon re quest Never remove the housing especially not while the equipment is plugged into the socket since some components are under electric voltage Any unauthorized or improper handling e g trying to repair the unit of the equipment will immediately nullify the gua...

Страница 8: ...with re duced physical sensory or mental capabilities or lack of experience and knowledge if they have been given supervision or instruction concerning use of the appliance in a safe way and understand the hazards involved Children should be supervised not to play with the appli ance Cleaning and user maintenance shall not be made by children without supervision ...

Страница 9: ...vided be low After every treatment please carry out these steps Remove the rotating tool e g bur first To do so pay atten tion to the instructions of its manufacturer Remove tissue remains by wiping off the unit with a mildly moistened paper cloth Afterwards clean all surfaces with dis infection cloth e g Mikrozid AF Tücher of Schülke and Mayr There is no limit to the number of times this device c...

Страница 10: ...ease the suction level 3 reduce the speed 4 increase the speed 5 display of speed suction level 6 change direction of rotation 7 LED is ON during anti clockwise rotation 8 main switch 9 ON OFF button standby 10 connecting socket for foot switch 1 2 3 4 5 6 7 8 9 10 ...

Страница 11: ...ing scopes foot care milling trimming and polishing works manicure grinding milling and polishing works The devise is determined of operating rotating instru ments which will not penetrate the skin or murcous membrane if used appropriate but could evoke damages accidently Caution In the area of pedicure you have to work with suction techniques Operation The working area must conform to the conditi...

Страница 12: ...er are correctly fitted Ensure that the tool is fixed On the left side of the device you will find the main power switch Press this switch to turn the unit on Take up the handpiece Should the handpiece be twisted by the hose you can adjust that at the control unit To use the handpiece and suction function press the button 9 on the front of the unit ...

Страница 13: ...use The rotation direction is irrelevant for diamond cutters and high grade corundum sanders in terms of effi ciency Working anti clockwise can be beneficial if for example the dust obscures your field of vision when working clockwise Press the button 2 to activate the suction Using buttons 1 and 2 you can adjust the intensity of the suction After choosing a rotation speed and suction power you ca...

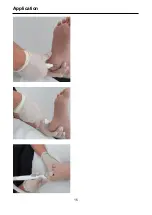
Страница 14: ... Application Work Positioning The following images are examples of how to work on various parts of the foot Always make sure that the foot is firmly gripped and that you can work freely and without strain ...

Страница 15: ...15 Application ...

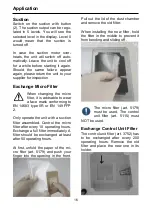
Страница 16: ... or EN 149 FFP 2 Only operate the unit with a suction filter assembled Control the micro filter after every 10 operating hours Exchange a full filter immediately A filter should be exchanged at least after 50 operating hours At first unfold the paper of the mi cro filter art 5179 and push your finger into the opening in the front Pull out the lid of the dust chamber and remove the old filter When ...

Страница 17: ...e control unit Switch on the unit with button 9 Now you can set the speed with buttons 3 and 4 Choose the direction of rotation with button 6 When the device is brought out of standby mode it will run with the rotation speed and suction power used last Take care to not start the mill at an overly high rotation speed Select the re quired rotation speed before chang ing the milling tool Foot Switch ...

Страница 18: ...of operation For this purpose screw off the pro tective sleeve of the handpiece Clean the inside of protective sleeve and the hull with a dry scrubber or brush Now insert care fully the provided special drill into the handpiece Turn the drill clockwise while you hold fast the white plastic part Apply only slight pressure when inserting the drill The stuck dust will come loose and by turning the dr...

Страница 19: ...by user changing the micro filter every 50 hours of operation by user check after each 10 hours changing the control unit filter every 200 hours of operation by user maintenance by repair workshop changing worn parts checking housing cleaning check leakage current every 500 hours of operation by repair workshop ...

Страница 20: ...he handpiece always remove the bur tool from it Always make sure that you do not let the handpiece fall down or exposes it to any shocks The ball bearings and the motor could be damaged by this Only work with tools which are flawless Do not work with tools which are bent are out of balance whose shaft is worn out or are rusty Working with faulty tools will cause a stronger vibration of the handpie...

Страница 21: ...he instructions in the manual Unit does not work at all Check if the main switch of the unit is turned on at the side of the unit Foot switch is used constant ly or faulty Pull out the socket of the foot switch to see if this is the cause Pull out the mains plug to reset the device The unit shows different sound levels at different sites of use The sound level varies ac cording to the surroundings...

Страница 22: ...ed for extend ed usage Ambient Conditions The device is intended for use in dry closed rooms Operation temp 10 C to 26 C rel humidity 25 to 75 not condensed air pressure 700 hPa to 1060 hPa Storage temp 5 C to 55 C rel humidity 10 to 95 not condensed air pressure 500 hPa to 1060 hPa Transport up to 4 weeks temp 5 C to 55 C rel humidity 10 to 95 not condensed air pressure 500 hPa to 1060 hPa Declar...

Страница 23: ...he class 2 in accordance with DIN 374 2 during the disassembling of the device Also wear a protective mask for your face according EN 14683 version IIR or EN 149 FFP2 Disposal of dust filter and coarse dust filter The filter bag and the coarse dust filter are considered low contami nated waste Dispose those in in transparent liquid tight resistant plastic sacks and do not dispose them compressed i...

Страница 24: ...hadewe GmbH Grambartstraße 10 30165 Hannover Germany info hadewe de www hadewe de ...

Отзывы:

Похожие инструкции для Veloria Chrome