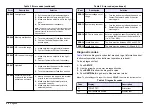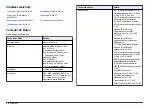
Table 3 Error codes (continued)
Error
Description
Solution
ERR03
Low light error
1.
Put the sample in the instrument again.
2.
Make sure that the lamp icon light is on.
3.
Make sure that an object is not in the light
path.
4.
Do sample dilution if necessary.
Note: If this error occurs when a filter assembly other
than the USEPA filter assembly is installed, the filter
assembly should not be used for turbidity
measurements.
ERR04
Memory malfunction
1.
Turn the instrument off and then back on.
2.
Contact Technical Support if the error
occurs again.
ERR05
A/D is over the range
1.
Make sure that the light shield is closed.
2.
Contact Customer Service if necessary.
ERR06
A/D is under the range
1.
Make sure that no object is in the light
path.
2.
Contact Customer Service if necessary.
ERR07
Light leak
1.
Make sure that the cover for the sample
cell compartment is closed.
2.
Turn the instrument off and then back on.
ERR09
Printer time out error
or paper in the internal
printer can not move
1.
Gently pull up on the paper in the internal
printer to remove the obstruction.
2.
Make sure that the external printer is
connected correctly.
3.
Make sure that the external printer is
selected (online).
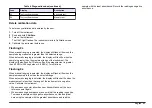
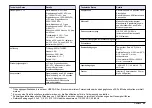
Table 3 Error codes (continued)
Error
Description
Solution
ERR10
System voltage out of
range
1.
Turn the instrument off and then back on.
2.
Contact Customer Service if the error
occurs again.
ERR11
System loop test error
1.
Turn the instrument off and then back on.
2.
Contact Customer Service if the error
occurs again.
ERR12
ASC units name error
Enter an application specific calibration (ASC)
unit name that is not one of the default units
(i.e., NTU or EBC).
ERR14
Invalid time error
The time must be between 00-00 and 23-59.
ERR15
Invalid date error
The date must be between 01-00 and 12-31.
Diagnostic codes
lists the diagnostic codes that are used to get information about
instrument operation when instrument operation is in doubt.
To do a diagnostic test:
1.
Push
SETUP
.
2.
Use the arrow keys to enter a diagnostic code.
3.
Push
ENTER
to show the diagnostic value.
4.
Push
UNITS/Exit
to go back to Measurement mode.
Note: To print a diagnostic report, hold down PRINT, then turn the instrument on.
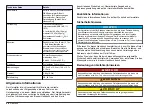
Table 4 Diagnostic codes
Code
Display
Description
21
"PRINT TST"
Printer test
22
Test results are shown.
Display test
20
English
Содержание Lange 2100AN
Страница 18: ...1 18 English...
Страница 39: ...1 Deutsch 39...
Страница 60: ...1 60 Italiano...
Страница 80: ...1 80 Fran ais...
Страница 102: ...1 102 Espa ol...
Страница 122: ...1 122 e tina...
Страница 142: ...1 142 Dansk...
Страница 162: ...1 162 Nederlands...
Страница 182: ...1 182 Polski...
Страница 202: ...1 202 Svenska...
Страница 222: ...1 222 Suomi...
Страница 241: ...1 Magyar 241...
Страница 261: ...1 Rom n 261...
Страница 281: ...1 T rk e 281...
Страница 288: ...12 2005 2002 96 IECS 003 A IECS IECS FCC 15 A 15 FCC 1 2 15 FCC 1 2 3 4 5 288...
Страница 292: ...1 Calibration Setup 1 NTU NEP EBC CU T Abs 292...
Страница 296: ...StablCal 1 302 2 USEPA 302 3 4 CAL Zero CAL Zero 00 NTU 5 0 1 NTU 6 296...
Страница 298: ...30 60 24 298...
Страница 299: ...1 30 mL 2 3 4 5 6 299...
Страница 300: ...7 RS232 PRINT RANGE MANUAL AUTO 40 NTU 268 nephelo 9 8 EBC 300...
Страница 302: ...1 2 3 1 2 3 302 4 5 1 2 3 30 60 302...
Страница 303: ...1 303...
Страница 306: ...1 SETUP 2 3 ENTER 4 UNITS Exit PRINT 4 21 PRINT TST 22 23 24 1 2 CAL Zero 3 CAL 4 40 NTU 268 nephelo 9 8 EBC 306...
Страница 307: ......


