


ES0755 rev A 1/11
28
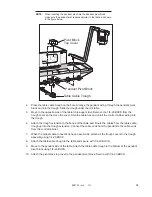
15. Using a caliper, measure between the same two surfaces described in Step 13. The measurement should
be the same, +/-.010” (.254 mm). Be sure that you are measuring the distance between the double arm and
the tool holder, not the spring-loaded slide and the tool holder. If adjustment is required, refer to “Setting
Parameter 64” in the Service Manual.
16. If no changes are needed, complete Tool Change Recovery.
17. Note that the same end of the double arm must be used for the caliper measurement. The two ends may
have different readings. This is normal and will not affect operation.
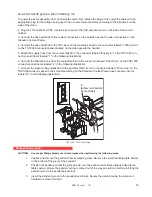
18. Load tools (VS maximum 30 lbs (13.6 kg) each, HS maximum 79.4 lbs (36 kg)) into machine, and perform
tool changes to verify proper operation. Protect the Z-axis way cover (closest to the column) in case a tool
is dropped from the spindle or tool changer arm. The tool changer should be operated at 100% rapid speed,
otherwise tool changer motion may jerk or be sluggish.
t
ool
c
hanGer
e
nclosure
i
nstallation
11
11
1
2
3
4
6
8
10
9
8
11
7
5
12
13
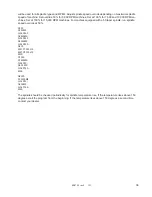
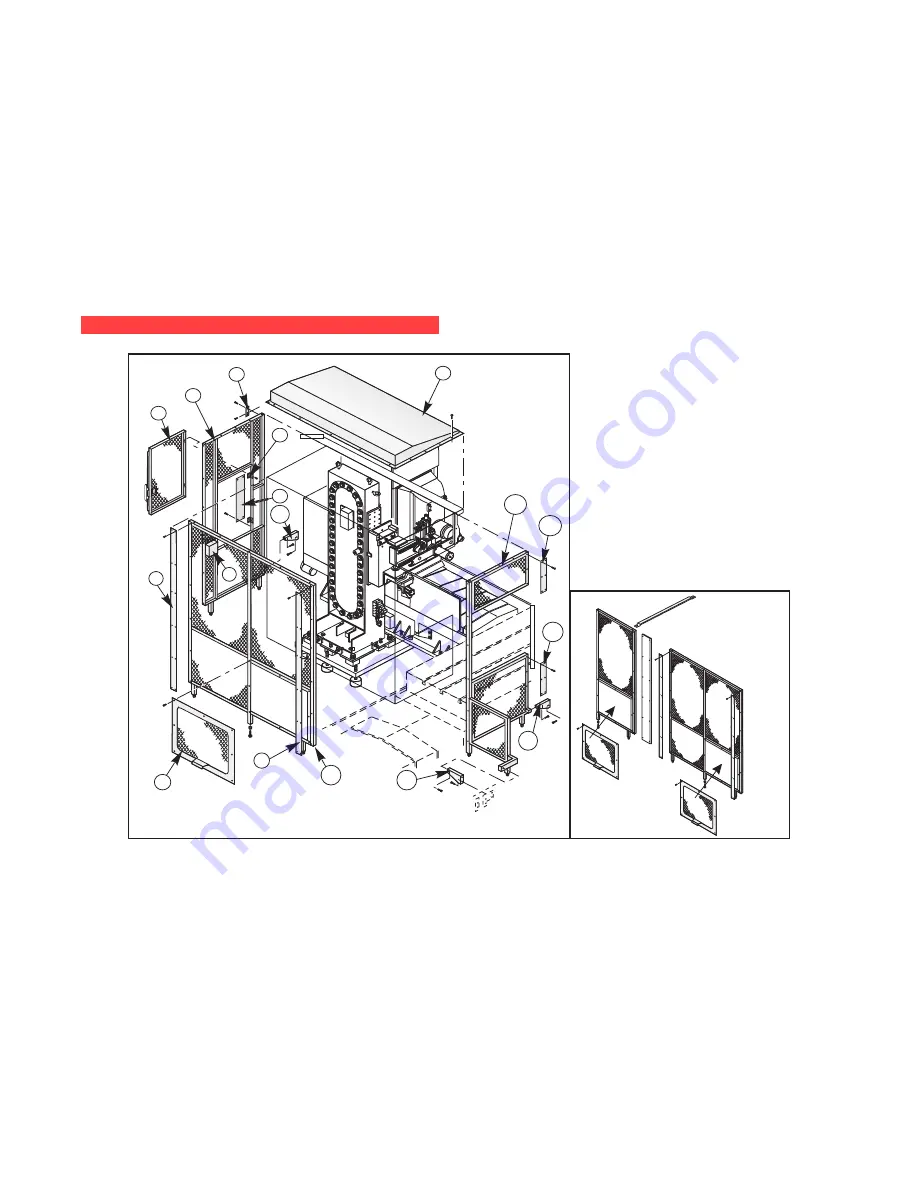
1. Top Cover
2. Angle Bracket
3. Rear Guard
4. Guard Door
5. Hinge
6. J-bolt Access Cover
7. Switch Box
8. Corner Panel
9. Cage Panel
10. Left Guard
11. Cage Bracket (x3)
12. Lower Tie Plate
13. Upper Tie Plate
14. Front Guard
14
60 and 120-tool
tool changer
guarding
1. Attach Front Guard to mill table and column base using Cage Brackets and Upper and Lower Tie Plates.
2. Attach the Left Guard to the Front Guard.
3. Attach Rear Guard to Left Guard. Attach Rear Guard to the column base sheetmetal using Angle Brackets.
4. Use adjusters on the bottom of the Rear, Left, and Front guards to level and square the tool changer cage.
5. Attach the Top Cover to the tool changer cage. Note that this piece (1) only covers the forward area (closest
to the spindle) area of the tool cage for the 60 and 120-tool tool changers.
6. Attach the Cage Panel, Guard Door, and remaining trim pieces.


