Installation Manual
H3C WA2200 Series WLAN Access Points
Chapter 5 Software Setting
5-2
5.1.2 Switching from the FAT Mode to the FIT Mode
Follow these steps to switch from the FAT mode to the FIT mode:
Step
Operation
1
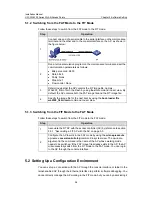
Connect one end of a serial cable to the serial interface on the maintenance
terminal and the other end to the console interface on the AP, as shown in
the figure below:
2
Run a terminal emulation program on the maintenance terminal and set the
communication parameters as follows:
z
Bits per second: 9600
z
Data bits: 8
z
Parity: None
z
Stop bits: 1
z
Flow control: None
3
Determine whether the AP contains the FIT image file, namely,
WA2200_fit.bin file in the Flash by using the
dir
command in user view. By
default, the AP contains both the FAT image file and the FIT image file.
4
Specify the image file for the next boot by using the
boot-loader file
wa2200_fit.bin main
command in user view.
5.1.3 Switching from the FIT Mode to the FAT Mode
Follow these steps to switch from the FIT mode to the FAT mode:
Step
Operation
1
Associate the FIT AP with the access controller (AC) by reference to section
5.3.1 “Associating a FIT AP with the AC on page 5-5.
2
Configure the AP to work in the FAT mode by using the
wlan
ap-execute
ap-name
conversion-to-fatap
command in system view. The
ap-name
argument in the command is the name of the AP whose working mode
needs to be switched. If the FAT image file already exists in the AP, the AP
will successfully switch from the FIT mode to the FAT mode. You can log in
to the AP through the console interface.
5.2 Setting Up a Configuration Environment
You can set up a connection with the AP through the console interface or telnet to the
telnet-enabled AP through the Ethernet interface to perform software debugging. You
cannot directly manage the AP working in the FIT mode, but you can by associating it

