2-14
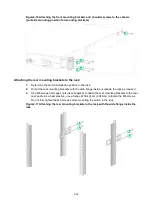
Figure2-5 Procedure for installing the switch in a 19-inch rack by using front and rear
mounting brackets
NOTE:
If a rack shelf is available, you can put the switch on the rack shelf, slide the switch to an appropriate
location, and then attach the switch to the rack by using the mounting brackets.
Rack-mounting the switch by using front mounting brackets
This installation method is applicable to all switches except for the S5120V3-30MS-UPWR-DP-EI
switch.
Attaching the front mounting brackets to the switch
1.
Place the wide flange of the front mounting bracket against the chassis side panel. Align the
mounting bracket installation holes with the screw holes in the chassis.
2.
Fasten the M4 screws to secure the mounting bracket to the switch. As a best practice, use a
torque of 12 kgf-cm (1.18 Nm) to fasten the M4 screws.
To attach mounting bracket A to the switch, see
To attach mounting bracket B to the switch, see
To attach mounting bracket C to the switch, see
To attach mounting bracket D to the switch, see
Figure2-6 Attaching mounting bracket A to the port-side mounting position
(S5120V3-52P-PWR-LI)
Attach the front
mounting
brackets to the
switch
Attach the
shoulder
screws to the
switch
Attach the
rear mounting
brackets to
the rack
Select an installation position
for the front mounting brackets
(near the port side or power
supply side)
Mount the
switch in the
rack


