ELECTRO FREEZE Shake Model CS704
185260
21
7 Assembly
— continued
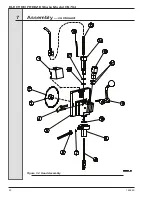
6. See figure 7-4 and o-ring chart
in the replacement parts section of this
manual. Install the head o-ring (2) into the
groove on the back of the dispense head
(5),
7. (Install the o-rings (17, 18) on the
plunger (14). Lubricate the o-rings.
8. Install the o-rings (12) onto the
pivot post (13). Lubricate o-rings lightly.
Insert pivot post into the head so the
holes are toward the back.
9. Install the mixer shaft bushing
(15) into the plunger (14).
10. Install the plunger (14) into the
head (5) just past the top o-ring with the
slot facing back. Turn slot slightly to the
left and hook handle (11) into the slot.
With handle in the slot turn the slot to the
back.
11. Place the keeper (4) through the
handle (11), pivot post (13) and head (5)
until it locks in place.
12. Lubricate the inside surface of
the beater bearing bushing (3) and place
in the head (5) making sure to align
bushing key into head slot, as shown in
figure 7-5.
Important:
Match the key on the bushing. Make
sure the key aligns with the slot.
Failure to install the bushing properly
in the dispensing head will damage
the head.
—continued
13. Install the dispensing head
onto the freezer by tilting the top of the
head towards you, aligning the studs
with the holes in the head, and sliding
toward the freezer. As you push the head
towards the freezer, carefully rock it into
place, and align the shaft with the drive
coupling.
14. Tighten the hand knobs
simultaneously, finger-tight only.
Important:
Excessive force will damage the head.
Do not use tools to tighten.
15. Insert mixing shaft (8) into the
bottom of the head (5) with mixer paddle
towards the bottom. Pull back the sleeve
on the end of the flexible spinner tube
in the switch box and insert mixing shaft
into tube, turning until it snaps into place.
16. Install the o-ring (10) by pushing
it into groove in the mixing chamber (9).
Lightly lubricate the o-ring. Install the mix
chamber on to the bottom of the head
by placing over bolts and turn to lock in
place.
17. Install the actuator rod (16) by
placing one end into hole in the bottom
of the switch box and the other end in
the indent in the plunger behind the flex
shaft.
18. Place flex shaft cover (1) on top
of head using bolts to lock in place.
Important:
The freezer will not dispense product
without the flex shaft cover in
place.
19. Install the five o-rings (7) on
quick connect fittings (6) on the mix
chamber. Lightly lubricate o-rings..
20. Push each syrup line quick
connect (6) onto fitting of the mixing
chamber (10).
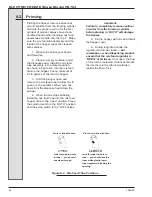
Figure 7-5 Head Bushing
Содержание Arby's Electro Freeze Compact Series
Страница 2: ......
Страница 7: ...ELECTRO FREEZE Shake Model CS704 Safety Decal Locations v 1 P N HC165126 2 P N HC165025...
Страница 10: ......
Страница 15: ...ELECTRO FREEZE Shake Model CS704 185260 5 3 5 Dimensions Figure 3 2 Electro Freeze Model CS704 Dimensions...
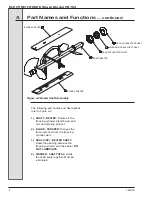
Страница 16: ...ELECTRO FREEZE Shake Model CS704 185260 6 4 Part Names and Functions Figure 4 1 Head Assembly 19 20...
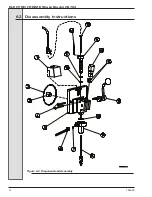
Страница 24: ...ELECTRO FREEZE Shake Model CS704 185260 14 Figure 6 2 Dispense Head Assembly 6 2 Disassembly Instructions...
Страница 30: ...ELECTRO FREEZE Shake Model CS704 185260 20 Figure 7 4 Head Assembly 7 Assembly continued...
Страница 53: ......
Страница 55: ......
Страница 65: ...ELECTRO FREEZE Shake Model CS704 185260 10 Figure 8 Panel View Sheet 1 of 2...
Страница 67: ...ELECTRO FREEZE Shake Model CS704 185260 12 Figure 9 Side View Sheet 1 of 2...
Страница 71: ...ELECTRO FREEZE Shake Model CS704 185260 16 ELECTRO FREEZE Shake Model CS704 16...


