9
INSTALLATION
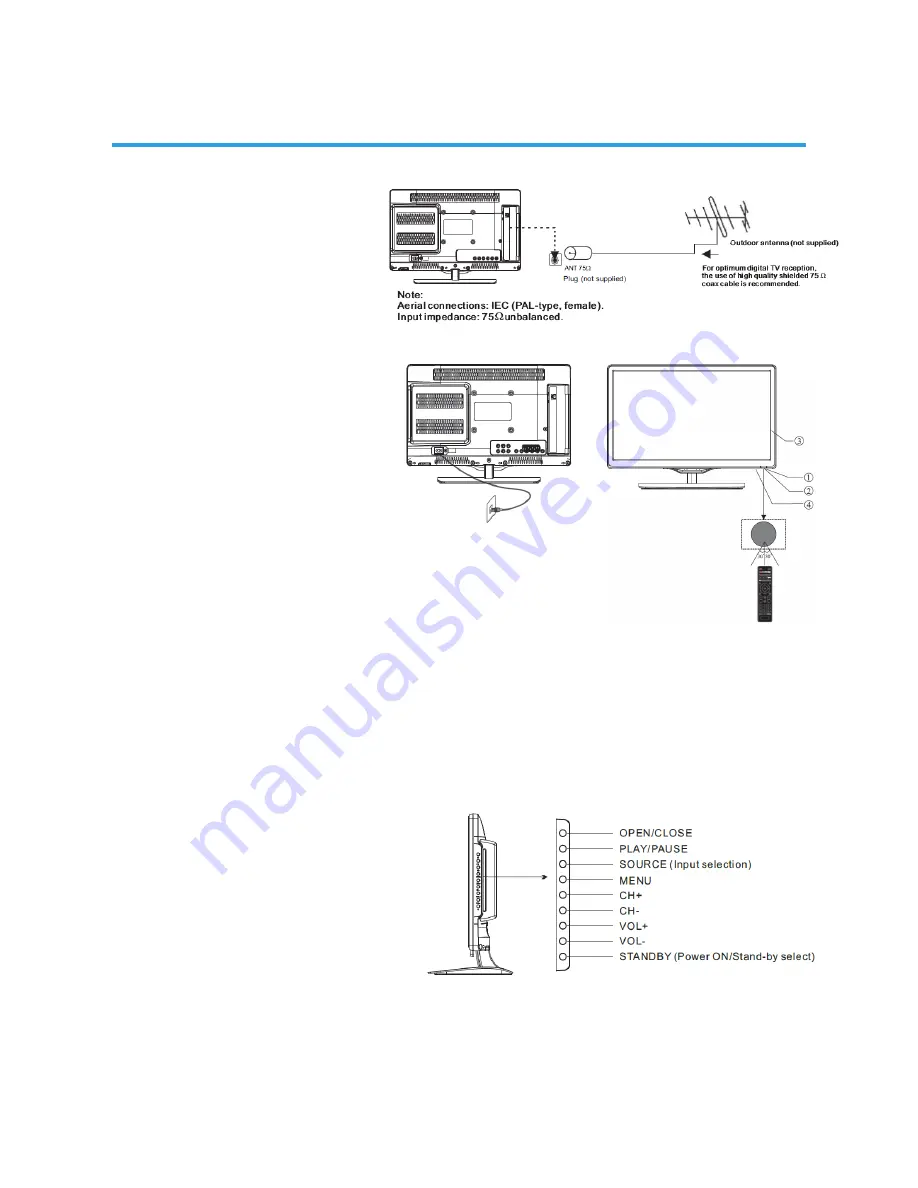
Antenna
AC Input
100-240V~ 50/60Hz 28W
N.B. Unwind the mains power cord
to its full length prior to initial use,
and locate it away from other cables
that will be connected to the TV
FRONT PANEL layout
1: Remote control sensor.
2: Power indicator LED:
RED = Stand-by.
3: Keyboard (on side of TV).
4: Main power switch (on bottom
right-hand panel of TV)
The remote control needs to be pointed directly,
/- 30 , of the sensor on the front of the
TV for reliable operation.
NB. There will be a 5-10 second delay between
the power indicator LED changing colour and the
TV responding.
KEYBOARD layout (side-panel)
This TV is most easily operated using the supplied Remote Control unit, but in the event that the
Remote is not available, there are various alternative controls for basic functions located on the
right-hand side panel of the TV (when viewed from the front of the TV).
1. OPEN/CLOSE
OPEN or CLOSE DVD slot (N.B. Read the DVD Operation
chapter for important usage warnings).
2. PLAY/PAUSE
PLAY or PAUSE playback.
3. SOURCE
Displays the input source Menu.
4. MENU
Displays the main MENU.
5. CH+/CH-
IN TV mode, press “CH+” or “CH-” to
change the channel up or down.
In MENU mode, press “CH+” or
“CH-” to select items.
6. VOL+/VOL-
Adjuststhe sound level.
In MENU mode, press “VOL+” or “VOL-” to adjust the item that you have selected.
7. STANDBY
Once the TV’s main power switch has been activated, press this button to turn the unit ON from
STANDBY mode. Press it again to return the set back to STANDBY. This Standby button performs the
same operation as the Power/Standby button on the Remote Control.
Содержание GVA18LEDC
Страница 1: ...INSTRUCTION MANUAL GVA18LEDC 18 5 47cm HD LED LCD TV with Built in DVD Player...
Страница 4: ...4 IMPORTANT SAFETY INSTRUCTIONS...
Страница 14: ...14 REMOTE CONTROL 33 37...
Страница 38: ...38 TROUBLE SHOOTING...
Страница 39: ...39 SPECIFICATIONS 160 H 150 V...
Страница 40: ...M E W Australia Pty Ltd 15 Vaughan St Essendon Fields VIC 3041 ACN 152 719 036 www gvaproducts com au...


