GSI Group 225 W x 225 T Скачать руководство пользователя страница 49

PNEG-1993

 CE Compliant E-Series Chain Conveyors - All Models

49

10. Warranty

GSI Group, LLC Limited Warranty

The GSI Group, LLC (“GSI”) warrants products which it manufactures to be free of defects in materials and workmanship 
under normal usage and conditions for a period of 12 months after sale to the original end-user or if a foreign sale, 
14 months from arrival at port of discharge, whichever is earlier. The end-user’s sole remedy (and GSI’s only obligation) 
is to repair or replace, at GSI’s option and expense, products that in GSI’s judgment, contain a material defect in materials 
or workmanship. Expenses incurred by or on behalf of the end-user without prior written authorization from the GSI 
Warranty Group shall be the sole responsibility of the end-user.

Warranty Extensions:

The Limited Warranty period is extended for the following products:

GSI further warrants that the portable and tower dryer frame and basket, excluding all auger and auger drive components, 
shall be free from defects in materials for a period of time beginning on the twelfth (12

th

) month from the date of purchase 

and continuing until the sixtieth (60

th

) month from the date of purchase (extended warranty period). During the extended 

warranty period, GSI will replace the frame or basket components that prove to be defective under normal conditions 
of use without charge, excluding the labor, transportation, and/or shipping costs incurred in the performance of this 
extended warranty.

Conditions and Limitations:

THERE ARE NO WARRANTIES THAT EXTEND BEYOND THE LIMITED WARRANTY DESCRIPTION SET FORTH 
ABOVE. SPECIFICALLY, GSI MAKES NO FURTHER WARRANTY OF ANY KIND, EXPRESS OR IMPLIED, 
INCLUDING, WITHOUT LIMITATION, WARRANTIES OF MERCHANTABILITY OR FITNESS FOR A PARTICULAR 
PURPOSE OR USE IN CONNECTION WITH: (I) PRODUCT MANUFACTURED OR SOLD BY GSI OR (II) ANY ADVICE, 
INSTRUCTION, RECOMMENDATION OR SUGGESTION PROVIDED BY AN AGENT, REPRESENTATIVE OR 
EMPLOYEE OF GSI REGARDING OR RELATED TO THE CONFIGURATION, INSTALLATION, LAYOUT, SUITABILITY 
FOR A PARTICULAR PURPOSE, OR DESIGN OF SUCH PRODUCTS.

GSI shall not be liable for any direct, indirect, incidental or consequential damages, including, without limitation, loss of 
anticipated profits or benefits. The sole and exclusive remedy is set forth in the Limited Warranty, which shall not exceed 
the amount paid for the product purchased. This warranty is not transferable and applies only to the original end-user. GSI 
shall have no obligation or responsibility for any representations or warranties made by or on behalf of any dealer, agent 
or distributor.

GSI assumes no responsibility for claims resulting from construction defects or unauthorized modifications to products 
which it manufactured. Modifications to products not specifically delineated in the manual accompanying the equipment at 
initial sale will void the Limited Warranty.

This Limited Warranty shall not extend to products or parts which have been damaged by negligent use, misuse, alteration, 
accident or which have been improperly/inadequately maintained. This Limited Warranty extends solely to products 
manufactured by GSI.

Prior to installation, the end-user has the responsibility to comply with federal, state and local codes which apply to the 
location and installation of products manufactured or sold by GSI.
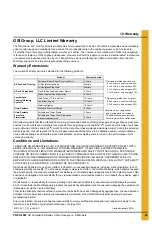
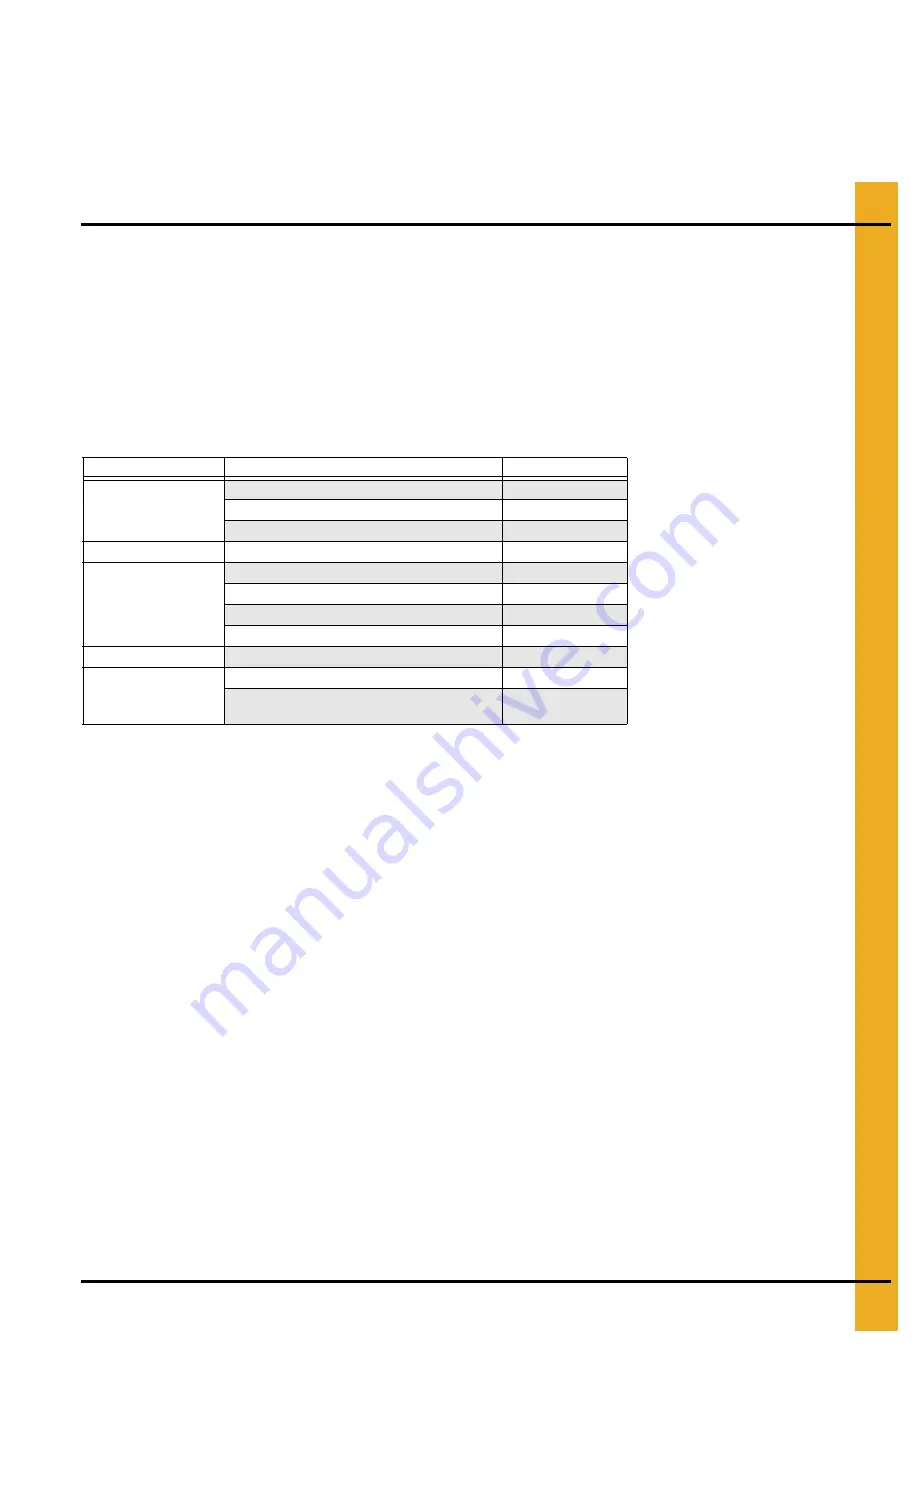
Product

Warranty Period

AP Fans and Flooring

Performer Series Direct Drive Fan Motor

3 Years

*  Warranty prorated from list price:

     0 to 3 years - no cost to end-user

     3 to 5 years - end-user pays 25%

     5 to 7 years - end-user pays 50%

     7 to 10 years - end-user pays 75%

** Warranty prorated from list price:

     0 to 3 years - no cost to end-user

     3 to 5 years - end-user pays 50%

† Motors, burner components 

and moving parts not included. 
Portable dryer screens included. 
Tower dryer screens not included.

All Fiberglass Housings

Lifetime

All Fiberglass Propellers

Lifetime

AP and Cumberland

Flex-Flo/Pan Feeding System Motors

2 Years

Cumberland 
Feeding/Watering 
Systems

Feeder System Pan Assemblies

5 Years **

Feed Tubes (1-3/4" and 2.00")

10 Years *

Centerless Augers

10 Years *

Watering Nipples

10 Years *

Grain Systems

Grain Bin Structural Design

5 Years 

Grain Systems
Farm Fans
Zimmerman

Portable and Tower Dryers

2 Years

Portable and Tower Dryer Frames and 
Internal Infrastructure †

5 Years

9101239_1_CR_rev8.DOC                                                                                                                             (revised January 2014)

Содержание 225 W x 225 T

Страница 1: ...PNEG 1993 CE Compliant E Series Chain Conveyors All Models Installation and Operation Manual Original Instructions PNEG 1993 Version 2 0 Date 04 26 16...

Страница 2: ...3 2 Risk of break up during operation 1 3 7 Risk related to moving parts 1 3 8 Choice of protection against risks arising from moving parts 1 3 8 1 Moving transmission parts 1 3 8 2 Moving parts invo...

Страница 3: ...ions but not inclusive of sub clause u 1 7 4 3 Sales literature This declaration applies only to the mechanical elements of the above machines and does not imply conformity by any other items of equip...

Страница 4: ...hain Conveyors All Models All information illustrations photos and specifications in this manual are based on the latest information available at the time of publication The right is reserved to make...

Страница 5: ...24 Chain Installation 28 Gear Motor Installation 30 Chapter 4 Electric Operated Gate Installation 31 Overall Head Gate and Intermediate Gate Dimensions 31 Cut Trough Bottom for Intermediate Gate 32 Mo...

Страница 6: ...fied persons must stay out of the work area at all times Alterations must not be made to the equipment Alterations can produce dangerous situations resulting in SERIOUS INJURY or DEATH This equipment...

Страница 7: ...ION NOTICE This symbol indicates an imminently hazardous situation which if not avoided will result in serious injury or death This symbol indicates a potentially hazardous situation which if not avoi...

Страница 8: ...up and back ST 0004 1 Follow Safety Instructions Carefully read all safety messages in this manual and safety signs on your machine Keep signs in good condition Replace missing or damaged safety sign...

Страница 9: ...ents cleaning or maintaining equipment ST 0027 2 Stay Clear of Hoisted Equipment Always use proper lifting or hoisting equipment when assembling or disassembling equipment Do not walk or stand under h...

Страница 10: ...ially toxic fumes and dust Hazardous fumes can be generated when paint is heated by welding soldering or using a torch Do all work outside or in a well ventilated area Dispose of paint and solvent pro...

Страница 11: ...ized access Make sure that hot surfaces have had adequate time to cool before working on or in the equipment Lock out and tag out power supplies and fuel supplies to all equipment Do not attach liftin...

Страница 12: ...s Safety Sign Off Sheet Below is a sign off sheet that can be used to verify that all personnel have read and understood the safety instructions This sign off sheet is provided for your convenience an...

Страница 13: ...ever be used with personnel inside the store or bin 5 Electrical control systems shall be designed to the requirements of the Machinery Directive 2006 42 EC risk assessment and should be in accordance...

Страница 14: ...grain bin 14 Keep hands and feet away from all moving parts 15 Always think before acting Never act impulsively around the equipment Correct Installation Final installation shall be in accordance wit...

Страница 15: ...of a fault 2 Lockable main safety disconnect a Disconnects all electrical power 3 Lockable motor service disconnect a Adjacent to each motor or group of motors b Disconnects all power to the motors 4...

Страница 16: ...ll include a Short circuit protection b Start stop controls labelled 1 and 0 respectively c Equipment shall not immediately re start following reestablishment of power d Motor circuits shall include o...

Страница 17: ...and on it It is recommended NEVER to walk on the surface of the stored material If grain has stopped flowing become bridged capped or crusted the only safe way to remedy this is from the outside of th...

Страница 18: ...ain Conveyors All Models 2 Safety Decals Below are the safety warning decals that should be fitted and visible legible at all times DC 2259M GSI Group 1 DC 2259M on head and tail section On side not v...

Страница 19: ...2 Safety Decals PNEG 1993 CE Compliant E Series Chain Conveyors All Models 19 DC 2258M on intermediate trough sections DC 2258M GSI Group DC 2258M GSI Group...

Страница 20: ...rmity and apply the CE mark in accordance with the EU Machinery Directive 2006 42 EC The rating plate supplied with the drive unit should be fitted Length 176 ft 53 7 m Max Chain Speed 167 FPM 0 85 m...

Страница 21: ...llation Preparation Arrange the conveyor components Provide suitable support for the conveyor items for assembly at ground level Layout the conveyor sections on supports assembly order starting with t...

Страница 22: ...3 Installation 22 PNEG 1993 CE Compliant E Series Chain Conveyors All Models Head and Tail Identification Figure 3A Head Section Figure 3B Tail Section...

Страница 23: ...ssembly 1 Assemble A 2 Install C 3 Check dimensions See Figure 3D 4 Leave B off Figure 3D Check Dimensions Ref Description Hardware A Bottom Plate M08 Flat Head Socket Cap Screw M08 Flange Nut B Cover...

Страница 24: ...ble Conveyor Sections 1 Side and bottom of sections are punched to emboss at both ends for connecting purpose See Figure 3E Figure 3E 2 Connecting bracket is punched in the same pattern as head tail B...

Страница 25: ...hain Conveyors All Models 25 Assemble Conveyor Sections Continued 3 Before connecting intermediate together bend down both the ends of rails slightly 1 4 mm to ensure smooth chain travel See Figure 3H...

Страница 26: ...in Conveyors All Models Assemble Conveyor Sections Continued Figure 3I Connecting Sections NOTE Head tail bypass inlet and intermediate all fit in a similar fashion Ref Description A M08 Flat Head Soc...

Страница 27: ...er 2 Remove 10 mm off edge 3 Repaint to prevent corrosion 4 Fit cover to tabs See Figure 3J 5 Caulk joint NOTE Modification is only in case of assembling BPI with intermediate Ref Description Hardware...

Страница 28: ...t E Series Chain Conveyors All Models Chain Installation Figure 3K Chain Travel Direction Bottom Run 1 Assemble and install in 5 m sections 2 1 5 m section used to adjust final length Ref Description...

Страница 29: ...eries Chain Conveyors All Models 29 Chain Installation Continued Figure 3L Adjust Chain Tension Figure 3M Check Correct Alignment Ref Description B Take Up Screws C Horizontal C Channel Ref Descriptio...

Страница 30: ...if necessary Figure 3N Clean the Conveyor Input Shaft Figure 3O Fit Gear Motor into Drive Figure 3P Lock the Motor into the Drive Figure 3Q Assembled View NOTE Before first run remove the locking rubb...

Страница 31: ...Gate Gate Size Conveyor Width Part A mm B mm C mm 225 W x 225 T Head gate ECHG225 ES 550 636 5 225 Intermediate gate ECCG225 ES 810 636 5 225 300 W x 225 T Head gate ECHG300 ES 550 786 5 300 Intermed...

Страница 32: ...te sections as shown in Figure 4B 2 The bottom of intermediate needs to be cut using appropriate template ECCGxxx TEMPLATE 3 Also drill the side holes C using given template ECCGxxx TEMPLATE 4 Remove...

Страница 33: ...Install the motor bracket C to the gate Then attach the motor A to the bracket C as shown in Figure 4C using the provided hardware F and G Figure 4C Motor Bracket Installation Ref Description Ref Des...

Страница 34: ...is completely open or closed J and K See Page 35 4 After switches B are securely fastened adjust plunger so they come in contact with tripper blocks on underneath side of slide plate 5 Disconnect the...

Страница 35: ...ertically When the switch target on the gate push in the limit switch arm vertically the motor will stop See Figure 4E and Figure 4F Figure 4E Closed Position Figure 4F Open Position Ref Description I...

Страница 36: ...tom of Intermediate Gate and Head Gate 1 Attach the gate A to the connection flanges and trough bottom using supplied hardware B and C See Figure 4G 2 Seal all connections with a silicon based caulk t...

Страница 37: ...4H 2 Remove bearing on the long side of the shaft B 3 Flip shaft B and re install bearing C 4 Tighten set screws A on shaft 5 On guard move filler plate to opposite side if applicable 6 If gate will b...

Страница 38: ...E to the cover as shown in Figure 4I by using bolt H and nut G Figure 4I Cover Installation 3 Install the limit switch I to the bracket J as shown in Figure 4J Figure 4J Limit Switch Installation Ref...

Страница 39: ...Series Chain Conveyors All Models 39 5 Electrical Installation Example electrical control with safety circuit See section electrical safety on Page 15 Figure 5A NOTE The parts pointed out on this pag...

Страница 40: ...or 3 Pole E Motor Over Current Relay F Motor Starter Contactor G Motor Service Disconnect H and I Control Transformer Primary Protection Fuses J Control Isolating Transformer K Control Transformer Sec...

Страница 41: ...PNEG 1993 CE Compliant E Series Chain Conveyors All Models 41 6 Reducer Lubrication Figure 6A...

Страница 42: ...0 0 90 1 20 0 95 0 95 SK2282 A 1 65 2 40 1 90 2 00 1 80 1 80 SK3282 A 3 15 4 10 3 25 4 10 3 15 3 15 SK4282 A 4 70 6 10 4 75 5 40 4 70 4 70 SK5282 A 7 50 8 80 8 80 8 80 7 20 7 20 SK6282 A 17 00 14 00 1...

Страница 43: ...4 WE 680 CLP PG 220 ISO VG 220 25 80 C Enersyn SG XP 220 Alphasyn GS 220 Alphasyn PG 220 Tribol 800 220 RENOLIN PG 220 Kl bersynth GH 6 220 Mobil Glygoyle 220 Omala S4 WE 220 Synthetic Oil Hydrocarbon...

Страница 44: ...see that the chain and its wear pads are not catching on flanges or rubbing on the trough sides due to the sprockets not being centered within the box 3 Ensure a break in period whereby the chain is...

Страница 45: ...bearing is re lubricated all other bearings should also be lubricated Do not over lubricate as this will destroy bearing seals 3 Check gearbox lubrication See lubrication table on Page 43 and manufact...

Страница 46: ...ion Sensor Figure 8A Whirlygig Motion Sensor Ref Description A 10 mm Screws Four 4 Supplied B 18 30 mm Bracket Supplied C Cylindrical Sensor D M800 Sensor E Whirligig F Cover G Tap Shaft for 1 2 12 mm...

Страница 47: ...make flush 3 Worn drive components 3 Check oil level and shaft seals belt misalignment loose belts 4 Worn sprocket 4 Replace 5 Return rail alignment 5 Check rail alignment Uneven UHMW paddle wear 1 Co...

Страница 48: ...48 PNEG 1993 CE Compliant E Series Chain Conveyors All Models NOTES...

Страница 49: ...SUCH PRODUCTS GSI shall not be liable for any direct indirect incidental or consequential damages including without limitation loss of anticipated profits or benefits The sole and exclusive remedy is...

Страница 50: ...be carefully followed in all cases Authorities having jurisdiction should be consulted before installations are made 1004 E Illinois St Assumption IL 62510 0020 Phone 1 217 226 4421 Fax 1 217 226 4420...

Отзывы: