Setting up
• If you want to set up your CD receiver on a shelf, in a cabinet or any other
type of enclosure, always ensure that sufficient ventilation is available. An
open space of at least 3 cm at the sides and the top, and 5 cm at the back of
your system is required.
• Place the power supply cable as far as possible from the sound signal lines
in order to avoid disturbing signal interference.
• When making connections, always note the identification markings on the
cables and sockets, as well as those on the back of the unit, in order to avoid
improper connections. Improper connections can considerably impair sound
quality.
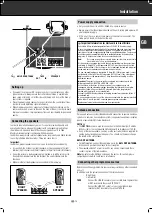
Connecting the speakers
In order to take full advantage of your unit´s superior play-back quality and
overall performance, only quality speakers with corresponding load ratings
should be used. Speakers should thus have an impedance of 4 to 16
Ω
.
Maximum receiver output is achieved with 4
Ω
speakers.
In addition, always make sure that speaker wires are properly and tightly twisted
to avoid protruding individual wires. These can cause shorts.
Important:
In addition, proper speaker connection is also important for sound quality.
• As seen from the listener, the right speaker must be connected to the right
terminal (right channel) and the left speaker to the left terminal (left channel).
• One of the wires of a loudspeaker cable is marked, e.g. with a colour or rib.
Connect the marked wire to the red terminal, the non-marked wire to the
black one.
• Make sure that all loudspeakers are connected in the same way.
Power supply connection
• Only connect the unit to a 230V~, 50/60 Hz a.c. power source.
• Always ensure that the voltage indicated on the unit's rating plate agrees with
you local power supply.
• If this is not the case, consult your dealer or customer service center. The
rating plate is found on the back of the unit.
Antenna connection
Only a good antenna system (broadband cable connection to your own antenna
system, or a common house antenna system) can guarantee optimum reception
quality, especially for FM stereo broadcasts.
FM 75
Ω
• The
FM 75
Ω
socket is used for connection to the Community or Cable An-
tenna System or to a roof-mounted FM antenna with an impedance of 75 Ohm.
• If non of these are available, you may use the cast (wire) antenna supplied for
nearby station (reception could be poor). You should not, however, change
the length of the cast antenna.
AM LOOP ANTENNA
• For AM reception, connect the supplied wires to the
AM LOOP ANTENNA
terminals and position the antenna for best reception.
• The elevated antenna
b
as well as earth
e
can also be connected to these
sockets in place of the frame antenna.
Note:
do not place the AM loop antenna on the unit, as this unit employs a
computing device which could cause interference.
Connecting other programme sources
Before connecting any programme sources, always switch any other connected
units off.
In addition, note the correct connection of the stereo channels:
R: right (red)
L: left (white).
TAPE
Connect the LINE IN sockets of your cassette deck, tape recorder
or DAT recorder to the sockets TAPE OUT.
Connect the LINE OUT sockets of your cassette deck, tape
recorder or DAT recorder to the sockets TAPE IN.
©
Important Information for Units sold in Great Britain
Units sold in GB are suitable for operation from a 230V AC, 50 Hz mains supply.
In case this appliance is supplied with a Safety Standard Approved mains lead fitted
with a non-rewireable 13 Amp mains plug which, if unsuitable for your socket,
should be cut off and an appropriat plug fitted by a qualified electrician. The fuse and
fuse holder must be removed from the plug as accidental insertion of the redundant
plug into a 13 Amp socket is likely to cause an electrical hazard.
Note:
The severed plug must be destroyed to avoid a possible shock hazard should
it be inserted into a 13 Amp socket
elsewhere.
If it is necessary to change the fuse in the non-rewireable plug, the correct type
and rating (5 Amp ASTA or BSI approved BS 1362) must be used and the fuse
cover must be refitted. If the fuse cover is lost or damaged the lead and plug must
not be used until a replacement is obtained from your dealer.
If a non-rewireable plug or a rewireable 13 Amp (BS 1363) plug is used, it must
be fitted with a 5 Amp ASTA or BSI approved BS 1362 fuse. If any other type of
plug is used it must be protected by a 5 Amp fuse either in the plug or at the
distribution board.
Important:
The wires in the mains lead are coloured in accordance with the
following code:BLUE - NEUTRAL, BROWN - LIVE
As the colours of the wires in the mains lead of your appliance may not
correspond with the coloured markings identifying the terminals in your plug,
proceed as follows: Connect the BLUE coloured wire to the plug terminal
marked with the letter 'N' or coloured black.
Connect the BROWN coloured wire to the plug terminal marked with a
letter 'L'
or coloured red.
In no circumstances must any of the wires be connected to the terminal
marked
with a letter 'E', earth symbol
e
, coloured green or green and yellow.
Replacement mains lead can be obtained from your dealer.
RIGHT
SPEAKER
LEFT
SPEAKER
SPEAKERS
4-16
L
R
L
R
TAPE
OUT IN
FM 75
AM LOOP ANTENNA
FM
TAPE
OUT IN
SPEAKERS
4-16
L
R
SPEAKERS
75
AM LOOP ANTENNA
©
15
Installation
GB


