background image

Index

DANSK

• Typemærkaten er placeret på bagsiden af apparatet.
• Bemærk: Netafbryderen er sekundært indkoblet og afbryder ikke strømmen

fra nettet. Den indbyggede netdel er derfor tilsluttet til lysnettet så længe
netstikket sidder i stikkontakten.

• Advarsel: Usynlig laserudstråling ved åbning når sikkerhetsafbrydere er ude

af funktion. Undgå udsættelse for stråling.

s

SVENSKA

• Typnumret återfinns på apparatens bakside.
• Observera! Strömbrytaren är sekundärt kopplad och inte bryter strömmen

från nätet. Den inbyggda nätdelen är därför ansluten till elnätet så länge
stickproppen sitter i vägguttaget.

• Klass 1 laserapparat

Varning! Om apparaten används på annat sätt än i denna bruksanvisning
specificerats, kan användaren utsättas för osynlig laserstrålning, som
överskrider gränsen för laserklass 1.

ß

SUOMI

• Tyyppikilpi on laitteen takaosassa.
• Huom. Toiminnanvalitsin on kytketty toisiopuolelle, eikä se kytke laitetta irti

sähköverkosta. Sisäänrakennettu verkko-osa on kytkettynä sähköverkkoon
aina silloin, kun pistoke on pistorasiassa.

• Luokan 1 laserlaite

Varoitus! Laitteen käyttäminen muulla kuin tässä käyttöohjeessa mainitulla
tavalla saattaa altistaa käyttäjän turvallisuusluokan 1 ylittävälle
näkymättömälle lasersäteilylle.

n

NORGE

• Typeskilt finnes på apparatens bakside.
• Observer : Nettbryteren er sekundert innkoplet. Den innebygde netdelen er

derfor ikke frakoplet nettet så lenge apparatet er tilsluttet nettkontakten.

3

Deutsch

......................................

Seite 4

D

English

......................................

page 15

GB

Français

...................................

page 26

F

Italiano

..................................

pagina 37

Português

............................

página 48

P

I

Español

..................................

página 59

E

Dansk

..........................................

side 81

Nederlands

.........................

pagina 70

Svenska

.....................................

sida 92

Suomi

........................................

sivu 103

NL

DK

S

FIN

CLASS 1

LASER PRODUCT

Содержание RCD 400

Страница 1: ...HIFI CD RECEIVER RCD 400...

Страница 2: ...o 49 Display 50 Telecomando 50 Amplificador 51 R dio 52 54 CD 55 56 Fun o hor rio e timer 57 Informa es importantes 58 Espa ol Instalaci n 59 Elementos de mando 60 Display 61 Telemando 61 Amplificador...

Страница 3: ...tas f r osynlig laserstr lning som verskrider gr nsen f r laserklass 1 SUOMI Tyyppikilpi on laitteen takaosassa Huom Toiminnanvalitsin on kytketty toisiopuolelle eik se kytke laitetta irti s hk verkos...

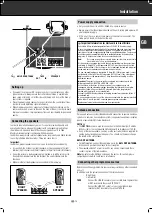
Страница 4: ...elevated antenna b as well as earth e can also be connected to these sockets in place of the frame antenna Note do not place the AM loop antenna on the unit as this unit employs a computing device wh...

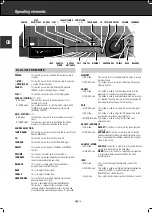
Страница 5: ...button is used to omit individual tracks from the programme or to delete the complete programme In TUNER mode This button is used to delete individual memory locations or if desired the entire memory...

Страница 6: ...tain individual functions can no longer be carried out you should replace the batteries Two 1 5 Volt LR06 size AA are required To change the batteries open the compartment on the back of the remote co...

Страница 7: ...ding volume level as only the speakers are muted The click you hear when you press the button comes from the relay which mutes the speakers The MUTING function can be deactivated by pressing the butto...

Страница 8: ...name of the programme in the 8 place display e g BAYERN 3 SDR 3 If you are tuned to an RDS station the name of the station will be indicated after a short time For more information please see page 21...

Страница 9: ...free memory location Now select position 6 your favourite station and then press MEMORY Your station is now stored on memory location 1 Calling up a stored station When you want to call up a stored s...

Страница 10: ...shows NONE What is meant by programme types NEWS News service Programmes that usually give brief reports on current events and statements that are of public interest Also weather and traffic reports...

Страница 11: ...ck press 9 STOP Changing the display You can call up various information in the display by pressing the INFO button on the unit or the button on the remote control The displays changes according to th...

Страница 12: ...to add this track to your programme press MEMORY again The track number stops blinking If you wish to add a track to your programme other than the one currently being played press the O or P button S...

Страница 13: ...creases the displayed number by one Holding the button down increases the setting at high speed Press the SKIP STATION P button to prepare for setting the stop time Adjust the stop time with the Q SEA...

Страница 14: ...tion The receiver switches The transformer could be overheated off Pull the plug from the mains socket and remove all objects that may cover the ventilation slots on the top cover of the unit Let the...

Страница 15: ...GRUNDIG AUDIO INTERNACIONAL 0 4701 BRAGA 0 PORTUGAL 0 1 2 3 4 5 6 7 8 9 YS 895...

Отзывы: