GPS 3
Allgemeiner Teil / General Section
GRUNDIG Service
1 - 21
Operating Instructions
This chapter contains excerpts from the operating instructions. For further particulars please refer to the appropriate user manual the part number of which is indicated in the spare parts list.
Warning:
Entries made in the device, such as destination, route selection, etc.,
should be done when the vehicle is stopped.
As the driver, you alone are responsible for the safe operation of
your vehicle and for the safety of your passengers.
Road conditions, including possible driving restrictions (no left turn,
blocked road, etc.), change frequently. Therefore, before
you follow an instruction of the system, make sure you can do so
safely and legally.
Note
If the position of your vehicle is indicated incorrectly or on another
street, the system will correct this as soon as the vehicle receives a
GPS signal again.
If your destination is large (more than 300 m wide), the route
guidance may not be able to stop even after you have reached your
parking space. Delete the destination manually.
A route guidance of a 180° turn may be indicated or announced.
When you turn around at a crossing, it is possible that the route gui-
dance is briefly interrupted.
The route guidance may instruct you to turn onto a road that you
are not allowed to turn on (due to a temporary prohibition).
The system will not guide you through non-throughfare streets so as
not to disturb those areas unnecessarily.
In automatic route guidance mode, the Voice guidance may not be
able to say whether you should turn right or left at the next crossing.
If your destination is large and the car park or the building are
more than 300 m away, the route guidance may not be able to stop
even though you have reached the car park. Delete the destination
manually.
Route guidance is not possible if there are no roads within a radius
of 1.5 km around the vehicle.
SAFETY INFORMATION
___________________
Display attachment
Look for suitable place which you can view at an angle of ± 20 degrees.
Stick one of the included velcro strips on the auto part.
Stick the other part on the rear of the display.
Press the display onto the strip on the dashboard.
As an alternative, you can use a custom mounting foot made by ARAT
special holders. This is a good idea for the time when you sell the
vehicle and want to remove the navigation system.
In this case, mount the display on the installation base using M4 screws
(max. length 10 mm).
Remote control holder
Attach the included metal plate to the rear of the remote control.
Stick the magnet to a suitable place (middle console etc.). Attach the
remote control so that flying objects do not pose any danger to vehicle
occupants.
Language selection
You have the possibility to set your navigation in different languages or
to the language you want.
Press
MENU
to call up the NAVIGATION menu. You can select from
among the following languages:
D
»
EINSTELLUNGEN
« and »
SPRACHE
«
GB
»
CONFIGURATION
« and »
LANGUAGE
«
F
»
CONFIGURATION
« and »
LANGUE
«
I
»
IMPOSTAZIONE
« and »
LINGUA
«
NL
»
INSTELLINGEN
« and »
TAALKEUZE
«
1
Select »
SETTINGS
« from the NAVIGATION menu and press
OK
.
2
Select »
LANGUAGE
« from the SETTINGS menu and press
OK
.
GENERAL HINTS
_______________________________
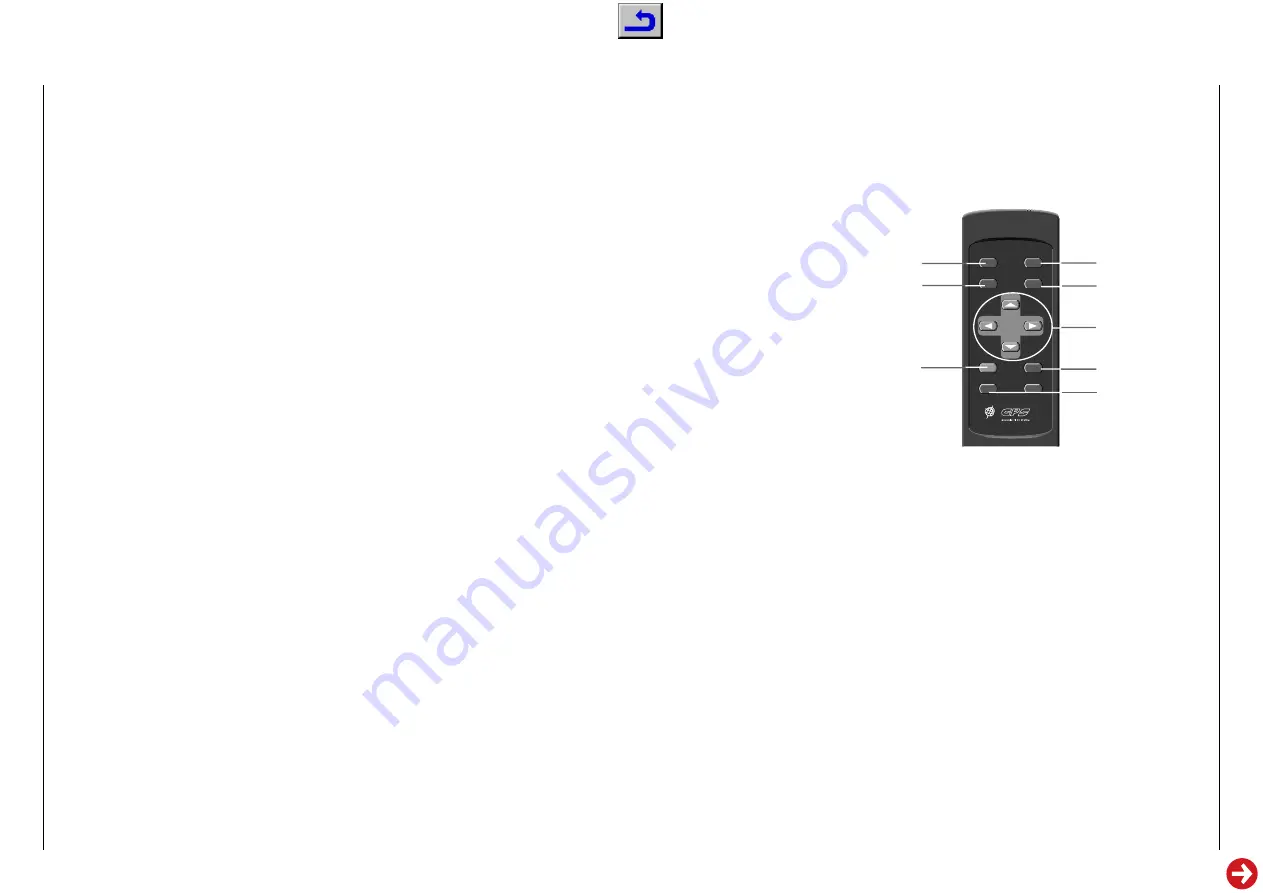
1
REROUTE button
Press this button for route calculation or to look for an alternative-
route.
2
BACK button
Press this button to: return to the previous menu; to undo an incor-
rect entry; to switch between the enlarged crossings display to the
normal display; to end the demonstration mode. If the button is
pressed for more than 4 seconds, the current position is registered
as a memory point.
3
OK button
Press this button to: enter or select a letter; to confirm a number or a
button; to activate a selected menu item; to confirm the current desti-
nation during destination selection.
4
88
ON/OFF button
Switches the display on or off respectively. Meanwhile the route
guidance continues.
5
MENU button
Press this button to call up the NAVIGATION menu.
6
Arrow keys
Use the arrow keys to move the cursor up/down/left/right.
7
VOICE button
Press this button to receive the respective current message.
8
VOLUME buttons - +
Setting the volume for the voice guidance.
THE REMOTE CONTROL
___________________
8
ReRoute
BACK
MENU
–
+
VOLUME
OK
VOICE
3
7
1
3
5
6
2
4
8


