background image

20

INITIAL SETUP

______________________________________

Switching on the DVD recorder

1

Press »

Ǽ

« to switch on the DVD recorder.

– The red indicator in the 

ON/OFF 

Ǽ

button goes out.

Initial setup

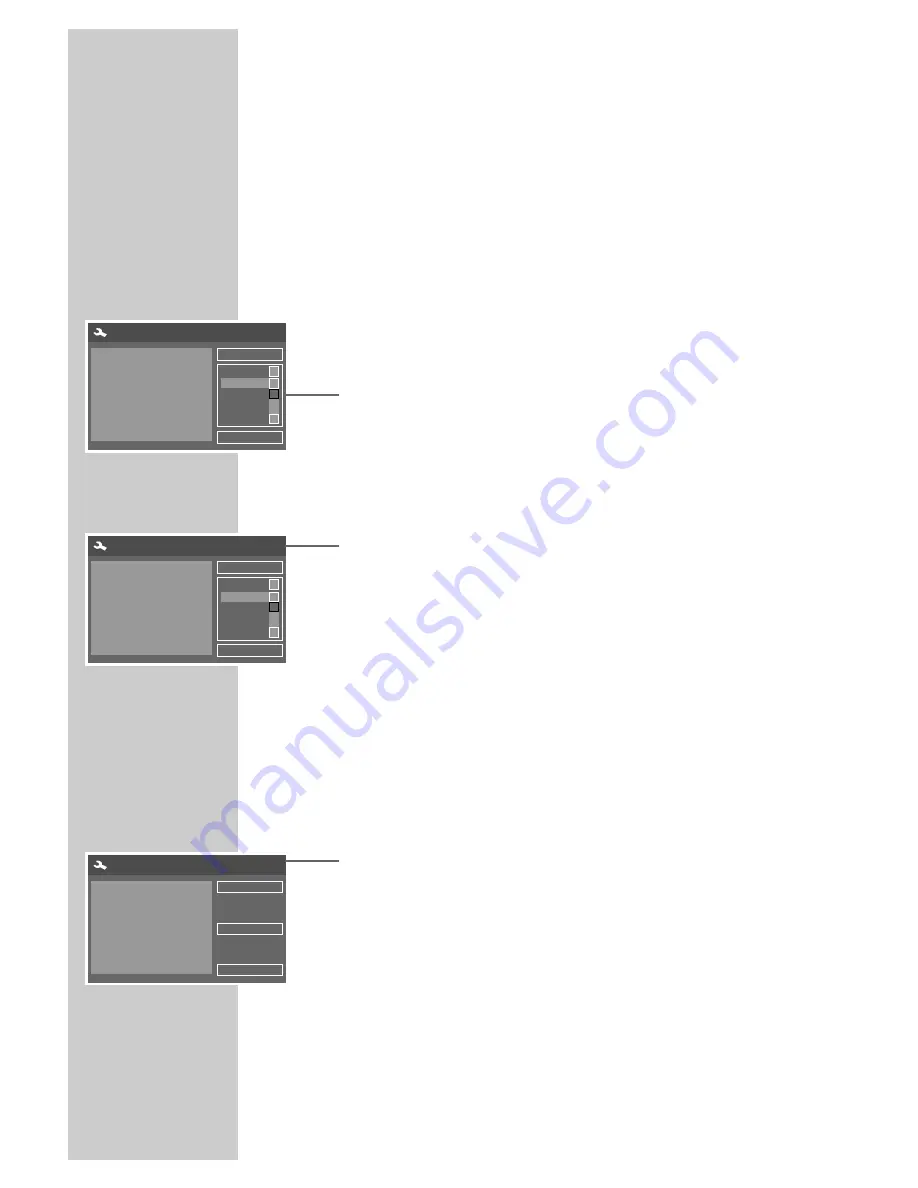
When you first switch on the DVD recorder, the »Initial Setup« menu
always appears.
This guides you step by step through each setting.

Selecting the screen menu language

With this you set the language of the DVD recorder’s screen menu.

1

Select your language using »

A

« or »

S

« and press »

OK

« to

confirm.

2

Select »NEXT« by pressing »

OK

«.

Selecting the country (location)

This setting determines the sort order of the TV stations.

1

Press »

S

« or »

A

« to select the country and press »

OK

« to

confirm.

Notes: 

If your country is not shown in the menu, select »Other coun-
tries«.

2

Select »NEXT« by pressing »

OK

«.

Tuning television stations

The DVD recorder has its own receiver unit. It can receive and
record from television stations independently of the television. This
means the TV channels have to be tuned on the DVD recorder.
During this setting, the clock is automatically updated. However, this
is only possible if channel position 1 is occupied by a station with
teletext.

1

Select »SCAN« with »

S

« or »

A

« and press »

OK

« to start

the search.
– The DVD recorder searches all channels for television stations,

then sorts and saves them. The automatic search may take
several minutes.

2

Select »Next« by pressing »

OK

«.

Initial setup

CANCEL

Select OSD language

English

English

Français
Español
Deutsch

NEXT

S

S

A

Initial setup

PREV

Select country.

English

English

Français
Español
Germany

NEXT

S

S

A

Initial setup

PREV

This step will scan for TV signals.
Please check an antenna or
cable has been connected
correctly.

NEXT

SCAN

Содержание GDR 5400/1

Страница 1: ...DVD RECORDER GDR 5400 1 ENGLISH...

Страница 2: ...etup 20 Switching on the DVD recorder 20 21 Initial setup 22 Setting the TV system video output format 22 Selecting the screen format of your television set 23 Before playback 23 Preparation 23 Insert...

Страница 3: ...ding 42 Checking modifying or deleting recording information 43 51 Managing recording data 43 45 Edit title 45 Editing the names of recordings 46 Deleting titles recordings from the disc 46 47 Overwri...

Страница 4: ...ning television channels automatically 61 62 Assigning channel positions manually 62 Sorting television stations 63 Setting the time and date 63 Resetting the DVD recorder to its original condition 64...

Страница 5: ...and audio CDs Disc formats DVD RWs and DVD Rs are suitable for recording and playback Due to the difference in quality of the recording media and the quality of the recording itself it can occasional...

Страница 6: ...tenna cable 8 Digital cable audio 9 Cinch cable audio and video 10 Operating manual GDR 5400 1 DVD RECORDER__________ DVD RECORDER A B 3 2 1 6 5 4 7 8 9 0 I P CL MENU Tele Pilot Recorder DISPL DISC OP...

Страница 7: ...order as they may spill liquid thus presenting a safety risk Thunderstorms are a danger to all electrical devices Even if the DVD recorder is switched off it can be damaged by a lightning strike to th...

Страница 8: ...ding quality PROG Select TV channels up down MENU Opens and closes the main menu of the DVD recorder 5 6 Press briefly to select the previous or next title or section during playback Select menu funct...

Страница 9: ...AL REC Recording REC Timer recording ANGLE The DVD provides various camera angles PROGRAM Function is activated AM 12 hour time display selected before midday PM 12 hour time display selected after mi...

Страница 10: ...for PCM Dolby digital DTS signals For connecting to a digital multi channel audio video amplifier or AV receiver OVERVIEW____________________________________________ ANTENNA IN ANTENNA OUT TV VIDEO O...

Страница 11: ...ight analogue channel for connecting a video recorder DVD player or an audio system EURO AV1 TV Euro AV Scart socket input output for the television EURO AV2 DECODER Euro AV Scart socket input for an...

Страница 12: ...titles to the favourites list 1 0 Number buttons for entering various data 0 Selects channels Selects a search by title chapter or time b Selects various repeat functions A B For marking sections fro...

Страница 13: ...Switches up one menu level MENU Opens the disc menu of a DVD during playback TOP MENU Opens the DVD title menu during playback P P Select TV channels P up P down Starts the recording and enters the sw...

Страница 14: ...ient quality is to connect the VIDEO OUT socket and AUDIO OUT sockets using cinch cables Note Connect the DVD recorder directly to the television or flat screen If you connect a video recorder in betw...

Страница 15: ...sockets on the DVD recorder and the corresponding sockets AUDIO IN on the television flat screen or projector ANTENNA IN ANTENNA OUT TV VIDEO OUT VIDEO OUT S VIDEO OUT Y Pb Cb Pr Cr VIDEO IN AUDIO IN...

Страница 16: ...TENNA IN ANTENNA OUT TV VIDEO OUT VIDEO OUT S VIDEO OUT Y Pb Cb Pr Cr VIDEO IN AUDIO IN VIDEO IN S VIDEO IN L R AUDIO OUT DIGITAL AUDIO OUT AUDIO OUT L R EURO AV 1 TV EURO AV 2 DECODER Apparatus Claim...

Страница 17: ...AL AUDIO OUT AUDIO OUT L R EURO AV 1 EURO AV 2 ANTENNA IN ANTENNA OUT TV VIDEO OUT VIDEO OUT S VIDEO OUT Y Pb Cb Pr Cr VIDEO IN AUDIO IN VIDEO IN S VIDEO IN L R AUDIO OUT DIGITAL AUDIO OUT AUDIO OUT L...

Страница 18: ...O OUT Y Pb Cb Pr Cr VIDEO IN AUDIO IN VIDEO IN S VIDEO IN L R AUDIO OUT DIGITAL AUDIO OUT AUDIO OUT L R EURO AV 1 EURO AV 2 ANTENNA IN ANTENNA OUT TV VIDEO OUT VIDEO OUT S VIDEO OUT Y Pb Cb Pr Cr VIDE...

Страница 19: ...he DVD recorder no longer reacts properly to remote control commands the batteries may be flat Always remove used bat teries The manufacturer accepts no liability for damage result ing from leaking ba...

Страница 20: ...es 2 Select NEXT by pressing OK Tuning television stations The DVD recorder has its own receiver unit It can receive and record from television stations independently of the television This means the...

Страница 21: ...line with S or A and press OK to activate it 5 Enter the time as six digits using 1 0 and press OK to confirm the setting 6 Select NEXT by pressing OK Ending initial setup 1 Select FINISHED by pressin...

Страница 22: ...he DVD If you have a 4 3 format television or flat screen the following set tings are available 4 3 P S for wide screen playback with the left and right edges of the picture cropped depending on the D...

Страница 23: ...Insert the disc you want to play in the disc compartment with the label facing upwards 3 Press on the DVD player or 8 on the remote control Display LOADING the disc tray retracts again The DVD recorde...

Страница 24: ...u prefer Many DVDs are recorded by the manufacturer with subtitles in sever al languages This enables you to select the subtitles you prefer Playback 1 After the disc compartment closes and the DVD is...

Страница 25: ...lised Playback 1 After the compartment is closed and the DVD RW DVD R is scanned playback starts automatically if the disc is write pro tected or finalised Note If playback does not start automaticall...

Страница 26: ...aying time Note Depending on the type of S VCD VCD used you may have to press s 6 or 5 a or 1 0 to select the disc title from a list Press x to return to the previous menu 2 To pause playback freeze f...

Страница 27: ...ecordings They can be played in the normal manner on an audio system The digital signals transmitted during MP3 playback are PCM encoded regardless of the audio output setting The signals are output w...

Страница 28: ...sequence in a slide show press 8 Displaying pictures on a JPEG CD 1 After the disc compartment has closed and the JPEG CD has been scanned the file browser contents menu of the JPEG CD is displayed 2...

Страница 29: ...the KODAK picture CD is scanned the slide show starts automatically Adjusting the picture display The pictures can be rotated or reversed 1 During playback press a or s to rotate the pictures by 90 2...

Страница 30: ...can open the playback menu by pressing DISPL Under Mode you can select the repeat function Selecting titles directly with the number buttons 1 During playback press 1 0 to enter the one or two digit t...

Страница 31: ...egins Selecting a section to the minute 1 During playback press to open the time display 2 Enter the playing time in five digits hours minutes and seconds using 1 0 and press OK to confirm The DVD rec...

Страница 32: ...back Selecting camera angles for scenes Some DVDs contain scenes or passages which were filmed several times from different camera angles You can choose from among these different angles 1 Press n dur...

Страница 33: ...ring playback Display For example SUBTITLE 02 10 GER 2 Press y to select the subtitle language Notes To switch off the subtitles keep pressing y until Off appears in the display The structure of the D...

Страница 34: ...peated or To repeat the entire disc press b during playback until Repeat disc appears in the display The disc is repeated 2 To quit the function keep pressing b until Normal appears in the display Rep...

Страница 35: ...m Once they have been finalised they can no longer be recorded on If you want to play them on your DVD recorder you do not have to finalise them You can add more recordings and delete them as necessar...

Страница 36: ...lity 360 minutes on a 4 7 GB blank DVD SEP Longest recording time 480 minutes on a 4 7 GB blank DVD The quality and recording time are interdependent The better the quality the more memory the recordi...

Страница 37: ...ple Monitor P001 ARD the current TV station is shown 2 Press P P or A S to select the station 3 Press Q SET until the recording quality you require appears in the display 4 Press to start recording Th...

Страница 38: ...es off The switch off time depends on the playing time left on the disc The DVD recorder automatically switches off the recording after this time The info line can be hidden by pressing x 6 Press to p...

Страница 39: ...connected satellite receiver press S or A to select the EURO AV 2 chan nel and select the TV station on the satellite receiver The satel lite receiver must be switched on at the selected recording ti...

Страница 40: ...on the screen again Note If you do not want to save the timer data select Cancel with S or A and press OK to confirm 10 Repeat from step 3 if you want to make more recordings or press TIMER to quit t...

Страница 41: ...ammed recording is due to start shortly Press OK There is no disc in the compartment or the disc is unsuitable for recording Put in another disc Failed to start recording Disc is not ready The disc in...

Страница 42: ...er list menu appears displaying the current data 2 Press S or A to select the timer item and OK to confirm 3 Press S or A to select the recording data press OK and then S or A or 1 0 to edit the data...

Страница 43: ...is described in the following sections starting from step 1 Adding chapter markers You can add chapter markers within a title to allow you to find scenes quickly during playback You can add up to 124...

Страница 44: ...The chapter is skipped during playback Note If you want to see the chapter again select it with 1 0 select Show chapter with S or A and press OK to confirm 3 Press EDIT to quit the function Creating...

Страница 45: ...ppears 3 Select Rename title with S or A and press OK to confirm 4 Press a or s to select the input position and S to switch to the keyboard 5 Press S A a or s to select letters and numbers and OK to...

Страница 46: ...itle This function allows you to use free recording space on the disc Note that only the playing time of the title to be overwritten is available for recording 1 Put a DVD R or DVD RW in the disc comp...

Страница 47: ...ppear press 8 2 Select any title with S or A and press s to open the title menu The title menu appears 3 Select Overwrite disc with S or A and press OK to confirm 4 Press SOURCE to select the input so...

Страница 48: ...n and S to switch to the keyboard 5 Press S A a or s to select letters and num bers and OK to confirm Notes The keys at the bottom of the keyboard are function keys Press Caps to switch between upperc...

Страница 49: ...new title is added to the disc 1 Put a DVD R or DVD RW in the disc compartment The index screen appears Note If the index screen does not appear press 8 2 Select the disc information with S or A and...

Страница 50: ...displayed on a DVD player Note Depending on the length of the title this can take some time Lock disc This protects the disc from being accidentally recorded over 1 Put a DVD R or DVD RW in the disc...

Страница 51: ...or it is a DVD RW 1 Put a DVD R in the disc compartment The index screen appears Note If the index screen does not appear press 8 2 Select the disc information with S or A and press s to confirm The...

Страница 52: ...N L R AUDIO IN DV IN VIDEO IN L R AUDIO IN S VIDEO OUT VIDEO OUT Pr Cr Y Pb Cb ANTENNA IN ANTENNA OUT TV VIDEO OUT VIDEO OUT S VIDEO OUT Y Pb Cb Pr Cr VIDEO IN AUDIO IN VIDEO IN S VIDEO IN L R AUDIO O...

Страница 53: ...he DVD recorder Select SOURCE EURO AV 2 for a video recorder DVD player or set top box or VIDEO IN for a camcorder or DV DV for a digital camcorder 2 Press Q SET until the recording quality you requir...

Страница 54: ...S VIDEO IN L R AUDIO OUT DIGITAL AUDIO OUT AUDIO OUT L R EURO AV 1 TV EURO AV 2 DECODER Apparatus Claims of U S patent Nos 4 631 603 4 577 216 4 819 098 and 4 907 093 licensed for limited viewing uses...

Страница 55: ...t source for example TV Display for example Monitor P001 ARD the current TV station is shown 2 Press P P or S A to select the pay TV station 3 Press Q SET until the recording quality you require appea...

Страница 56: ...o select the rating level and OK to confirm 8 Press SETUP to finish the setting Changing the access code password 1 Press SETUP to open the main menu 2 Select with S or A and press OK to confirm 3 Sel...

Страница 57: ...1 Press SETUP to open the main menu 2 Select with S or A and press OK to confirm 3 Select Digital audio output with S or A and press OK to confirm 4 Select the mode RAW or LPCM by pressing S or A and...

Страница 58: ...irm 2 Select your language using S or A and press OK to confirm Selecting the dubbing language If several languages are available on the current DVD the sound is played back in the language you have s...

Страница 59: ...les Y Pb Cb and Pr Cr of the DVD recorder you must set the video output correctly so that the tele vision receives the video signal and therefore the picture 1 Press SETUP to open the main menu 2 Sele...

Страница 60: ...e g Tuner for recording TV programmes 1 Select Default source with S or A and press OK to confirm 2 Select the input source with S or A and press OK to confirm Selecting the recording quality The fun...

Страница 61: ...ut position with a or s enter letters or numbers with S or A and press OK to confirm 6 If you want to search by channel special channel or frequency select Scan mode with S or A and press OK to confir...

Страница 62: ...elevision stations You can sort the TV stations in any order you like 1 Press SETUP to open the main menu 2 Select with S or A and press OK to confirm 3 Select Sort channel order with S or A and press...

Страница 63: ...SETUP to finish the setting Resetting the DVD recorder to its original condition All custom settings are restored to the original status 1 Press SETUP to open the main menu 2 Select with S or A and p...

Страница 64: ...nel DTS Digital Surround decoder must be connected to the digital output S PDIF of the DVD recorder Manufactured with permission from Dolby Laboratories The Dolby label and the double D logo are trade...

Страница 65: ...e Press I P on the remote control to switch to Interlace Distorted picture Make sure that there are no fingerprints on the DVD CD follow the cleaning instructions on the next page The DVD CD cannot be...

Страница 66: ...the DVD recorder This operating software is available from specialist dealers or will be available shortly on the Grundig web sites www grundig com and www grundig de Any instance of operating softwa...

Страница 67: ...Grundig Multimedia B V De Boelelaan 7 NL 1083 HJ Amsterdam http www grundig com 44 04 72011 603 8100...

Отзывы: