
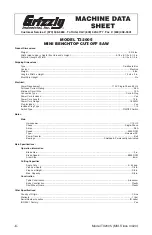


Model T32005 (Mfd. Since 04/20)
-18
-
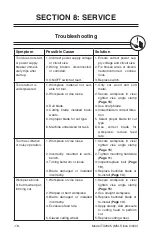
SECTION 8: SERVICE
Troubleshooting
Symptom
Possible Cause
Solution
Tool does not start,
or power supply
breaker immedi-
ately trips after
startup.
1. Incorrect power supply voltage
or circuit size.
2. Wiring broken, disconnected,
or corroded.
3. ON/OFF switch at fault.
1. Ensure correct power sup-
ply voltage and circuit size.
2. Fix broken wires or discon-
nected/corroded connec-
tions.
3. Replace switch.
Tool stalls or is
underpowered.
1. Workpiece material not suit-
able for tool.
2. Workpiece or vise loose.
3. Dull blade.
4. Cutting blade installed back-
wards.
5. Improper blade for cut type.
6. Machine undersized for task.
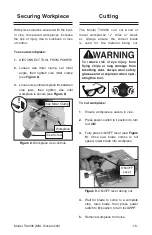
1. Only cut wood and soft
metal.
2. Secure workpiece in vise/
tighten vise angle clamp
(
Page 15).
3. Use sharp blade.
4. Install blade in correct direc-
tion.
5. Select proper blade for cut
type.
6. Use correct blade for
workpiece; reduce feed
rate.
Tool has vibration
or noisy operation.
1. Workpiece or vise loose.
2. Incorrectly mounted to work-
bench.
3. Timing belt worn or loose.
4. Blade damaged or installed
incorrectly.
1. Secure workpiece in vise/
tighten vise angle clamp
(
Page 15).
2. Tighten mounting hardware
(
Page 11).
3. Inspect/replace belt (
Page
19).
4. Replace bent/dull blade or
re-install (
Page 14).
Workpiece binds
or burns when per-
forming cut.
1. Workpiece or vise loose.
2. Warped or bent workpiece.
3. Blade damaged or installed
incorrectly.
4. Excessive feed rate.
5. Glazed cutting wheel.
1. Secure workpiece in vise/
tighten vise angle clamp
(
Page 15).
2. Use straight workpiece.
3. Replace bent/dull blade or
re-install (
Page 14).
4. Apply steady, slow pressure
to cutting head to perform
cut.
5. Replace cutting wheel.
Содержание T32005
Страница 22: ...Model T32005 Mfd Since 04 20 20...
Страница 24: ......