Grizzly T32005 Скачать руководство пользователя страница 13

Model T32005 (Mfd. Since 04/20)

-11

-

Mounting

The  Model  T32005  must  be  secured  to 
prevent  it  moving  during  operation  and 
causing accidental injury or damage. The 
table  has  mounting  holes  that  allow  the 
saw to be fastened to a workbench, and a 
table clamp is included for when mounting 
is not an option.

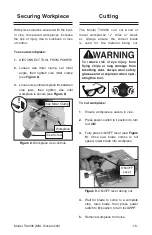
To secure saw with table clamp:

1.  Place saw at edge of workbench.

2.  Place top bar of clamp in groove on top 

of saw table (see 

Figure 4).

Figure 4. Table clamp holding cut-off saw 

in place.

Using Table Clamp

Materials Needed 

Qty

Flat Hd Screws 8-32 ................................. 4
Hex Nuts 8-32 ........................................... 4
Lock Washers #8 ...................................... 4
Flat Washers #8 ....................................... 4
Phillips Screwdriver #2 ............................. 1
Hand Drill .................................................. 1
Drill Bit #8 ................................................. 1

Tool

Workbench

Flat Head 

Screw

Flat Washer

Lock Washer

Hex Nut

Figure 3. Example of through mounting.

To through mount the saw:

1.  Use saw table as a template to drill (4) 

holes in workbench.

2.  Mount  saw  to  workbench  with  (4)  flat 

head screws, flat washers, lock wash-
ers, and hex nuts.

Through Mounting

The  strongest  mounting  option  is  a 
"Through Mount" (see below) where holes 
are  drilled  all  the  way  through  the  work-
bench—and  flat  head  screws,  washers, 
and  hex  nuts  are  used  to  secure  the  tool 
in place.

If  the  cut-off  saw  is  being  used  in  a  non-
permanent  location,  or  if  drilling  into  the 
workbench  is  not  an  option,  the  table 
clamp  can  be  used.  Always  ensure  the 
tool  is  secure  before  making  any  cut.  If 
the table clamp alone does not secure the 
saw, do not perform the operation.

3.  Tighten  clamp.  Ensure  saw  does  not 

slide  or  rotate  on  table  when  pushed 
with moderate pressure.


IMPORTANT:  If  saw  cannot  be 
secured with one clamp, try clamping it 
to a different surface or with a second 
clamp,  or  through-mount  the  saw.  Do 
not operate the saw unsecured.

Groove

Hold-Down

Clamp

Содержание T32005

Страница 1: ...RNING NO PORTION OF THIS MANUAL MAY BE REPRODUCED IN ANY SHAPE OR FORM WITHOUT THE WRITTEN APPROVAL OF GRIZZLY INDUSTRIAL INC AI20914 PRINTED IN CHINA MODEL T32005 MINI BENCHTOP CUT OFF SAW OWNER S MA...

Страница 2: ...g grinding tool integrity and the usage of personal protective equipment The manufacturer will not be held liable for injury or property damage from negligence improper training machine modifications...

Страница 3: ...ON 3 POWER SUPPLY 8 SECTION 4 SETUP 10 Unpacking 10 Inventory 10 Mounting 11 Test Run 12 SECTION 5 OPERATIONS 13 Operation Overview 13 Changing Blade 14 Securing Workpiece 15 Cutting 15 SECTION 6 ACCE...

Страница 4: ...ctions for Power Tools OWNER S MANUAL Read and under stand this owner s manual BEFORE using machine TRAINED OPERATORS ONLY Untrained operators have a higher risk of being hurt or killed Only allow tra...

Страница 5: ...er while carrying FORCING TOOLS Use right tool for job and do not force it It will do job safer and better at rate for which it was designed SECURING WORKPIECE When required use clamps or vises to sec...

Страница 6: ...s DULL DAMAGED SAW BLADES Dull blades require more effort to perform cuts Broken saw blade teeth can become deadly projectiles Do not operate with damaged cracked or badly worn blades Inspect for dama...

Страница 7: ...support for help For your convenience we post all avail able manuals and manual updates for free on our website at www grizzly com Any updates to your model of tool will be reflected in these document...

Страница 8: ...Cord Gauge 18 AWG Plug Included Yes Included Plug Type 1 15 Switch Type ON OFF Switch Motor Main Horsepower 1 10 HP Phase Single Phase Amps 0 9A Speed 6000 RPM Type Universal DC Power Transfer Belt Be...

Страница 9: ...dur ing operations Pivots in table to set angle of cut between 0 45 Vise Screw Clamps workpiece in vise Vise Miter Clamp Secures miter angle ON OFF Lever Press lever while power switch is in ON posit...

Страница 10: ...he maximum amount of amps that the machine will draw If the machine is overloaded it will draw additional amps beyond the full load rating If the machine is overloaded for a sufficient length of time...

Страница 11: ...re the cords are rated for outdoor use Outdoor use cords are marked with a W A or a W to signify their rating Always check to make sure that the exten sion cords are in good working order and free of...

Страница 12: ...inventory the contents If any non proprietary parts are missing e g a nut or a washer we will gladly replace them or for the sake of expedi ency replacements can be obtained at your local hardware sto...

Страница 13: ...rough mount the saw 1 Use saw table as a template to drill 4 holes in workbench 2 Mount saw to workbench with 4 flat head screws flat washers lock wash ers and hex nuts Through Mounting The strongest...

Страница 14: ...perly connected to power and safety components are working properly If you find an unusual problem during the test run immediately stop the tool discon nect it from power and fix the problem BEFORE op...

Страница 15: ...before contacting workpiece 5 While keeping hands and fingers away from blade pushes handle down to cut the workpiece 6 Releases ON OFF lever and waits for blade to stop lifts handle so blade is not c...

Страница 16: ...with an arbor screw and flange Tools Needed Qty Hex Wrench 2 5mm 1 To change blade 1 DISCONNECT TOOL FROM POWER 2 Pull blade guard straight up to remove it see Figure 5 Figure 5 Removing blade guard B...

Страница 17: ...w Workpiece The Model T32005 can cut wood or metal workpieces 3 8 thick or small er Always ensure the correct blade is used for the material being cut 4 Wait for blade to come to a complete stop raise...

Страница 18: ...own Protector 7 T20503 Face Shield Window T20451 Kirova Clear Safety Glasses T20452 Kirova Anti Reflective Glasses T20456 DAKURA Safety Glasses Figure 12 Basic eye protection T20502 T20452 T20451 T204...

Страница 19: ...wing items and repair or replace as necessary Loose mounting bolts Damaged saw blade Damaged timing belt Cracked or broken parts Worn or damaged wires Any other unsafe condition Monthly Check Timing b...

Страница 20: ...gle clamp Page 15 3 Use sharp blade 4 Install blade in correct direc tion 5 Select proper blade for cut type 6 Use correct blade for workpiece reduce feed rate Tool has vibration or noisy operation 1...

Страница 21: ...k ten sion If belt deflects more than 1 4 repeat Step 6 If belt deflects 1 4 or less proceed to Step 9 9 Push belt cover in place over timing belt If the timing belt is loose or worn it can be removed...

Страница 22: ...Model T32005 Mfd Since 04 20 20...

Страница 23: ...property or for incidental contingent special or consequential damages arising from the use of our products The manufacturers reserve the right to change specifications at any time because they const...

Страница 24: ......

Отзывы: