


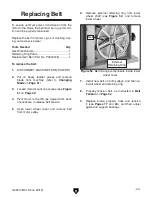


G0803
(Mfd. Since 09/15)
-45-
8. Perform previous Checking Wheel
Alignment procedure. If necessary to make
the wheels parallel, repeat this procedure.
9. The first time you get the wheels coplanar,
place a mark on each wheel where you held
the straightedge, then use this position again
in the future if you need to repeat the proce-
dure. This assures repeated accuracy every
time you adjust the wheels.
10. Close wheel covers.
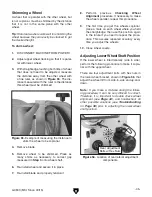
Shimming a Wheel
A wheel that is parallel with the other wheel, but
is not coplanar, must be shimmed by the distance
that it is not in the same plane with the other
wheel.
Tip: Standard washers work well for shimming the
wheel because they can easily be stacked to get
the desired height.
To shim a wheel:
1. DISCONNECT MACHINE FROM POWER!
2. Adjust upper wheel tracking so that it is paral-
lel with lower wheel.
4. Remove blade.
5. Remove wheel to be shimmed. Place as
many shims as necessary to correct gap
measured in
Step 3 onto wheel shaft.
6. Re-install wheel and secure it in place.
7. Re-install blade and properly tension it.
Figure 55. Example of measuring the distance to
shim the wheel to be coplanar.
3. With straightedge touching both rims of wheel
that does not need to be adjusted, measure
the distance away from the other wheel with
a fine ruler, as shown in
Figure 55. The dis-
tance measured with the ruler is the distance
this wheel must be shimmed.
Adjusting Lower Wheel Shaft Position
If the lower wheel is tilted laterally (side to side),
perform the following procedure to make it copla-
nar with the upper wheel.
There are four adjustment bolts with hex nuts in
the lower wheel bracket, shown in
Figure 56, that
adjust the wheel tilt from side-to-side and up-and-
down.
Note: If you make a mistake during the follow-
ing procedure, it can be very difficult to correct.
Therefore, it is important to double check wheel
alignment (see
Page 44), and troubleshoot all
other possible solutions (see
Troubleshooting
on
Page 39) prior to adjusting the lower wheel
shaft position.
Figure 56. Location of rear lateral adjustment
components.
Rear Adjustment
Bolts w/Hex Nuts
Содержание G0803
Страница 56: ...54 G0803 Mfd Since 09 15...
Страница 60: ......