Model G0787 (Mfd. Since 09/14)
-17-
Disc Sanding
Only sand workpiece on side of sanding
disc that is rotating down toward work table.
This will keep workpiece from flying out of
your hands from rotational force of disc.
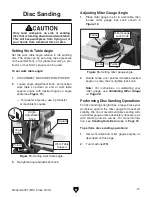
Set the work table angle relative to the sanding
disc. The angle can be set using the angle scale
on the sander body, or for greater accuracy, a pro-
tractor or machinist's square can be used.
Setting Work Table Angle
Adjusting Miter Gauge Angle
To set work table angle:
1. DISCONNECT MACHINE FROM POWER!
2. Loosen angle adjustment knob, and position
work table so pointer on end of work table
support aligns with desired angle on angle
scale (see
Figure 15).
— For greater accuracy, use a protractor
or machinist's square.
Performing Disc Sanding Operations
For disc sanding straight lines, always brace your
workpiece against the miter gauge for maximum
stability. We do not recommend disc sanding with-
out a miter gauge unless absolutely necessary, as
with sanding outside curves. For more informa-
tion, see
Sanding Outside Curves on Page 18.
To perform disc sanding operations:
1. Set work table and miter gauge angles, as
described on this page.
2. Turn machine ON.
1. Place miter gauge in slot in work table, then
loosen miter gauge lock knob shown in
Figure 16.
Figure 16. Setting miter gauge angle.
2. Rotate fence until pointer indicates desired
angle on scale, then re-tighten lock knob.
Note: For instructions on calibrating your
miter gauge, see
Calibrating Miter Gauge
on
Page 28.
Miter Gauge
Lock Knob
Pointer
Scale
Fence
Work Table
Support
Pointer
Figure 15. Setting work table angle.
3. Re-tighten angle adjustment knob.
Angle
Scale
Square
Angle
Adjustment
Knob
Содержание G0787
Страница 40: ......


