Grizzly G0510Z Скачать руководство пользователя страница 40

G0510Z 3⁄4 HP Shaper

-37-

REF

PART #

DESCRIPTION

REF

PART #

DESCRIPTION

201

P0510Z201

SIDE PANEL

246

PRP42M

ROLL PIN 3 X 20

202

P0510Z202

TIE BAR

247

P0510Z247

FENCE BODY LEFT

203

P0510Z203

TAPER NUT M8-1.25

248

P0510Z248

CLAMP STUD

204

P0510Z204

RUBBER FOOT

249

PN09M

HEX NUT M12-1.75

205

PW05M

FLAT WASHER 4MM

250

P0510Z250

MOUNTING BRACKET

206

PN04M

HEX NUT M4-.7

251

PB26M

HEX BOLT M8-1.25 X 30

207

PTLW02M

EXT TOOTH WASHER 5MM

254

P0510Z254

RUB COLLAR 1/2 X 1-3/16 X 3/16

208

PN06M

HEX NUT M5-.8

255

P0510Z255

RUB COLLAR 1/2 X 1-3/16 X 1/4

209

PCB02

CARRIAGE BOLT 5/16-18 X 1/2

256

P0510Z256

RUB COLLAR 1/2 X 1-3/16 X 3/8

210A

P0510Z210A

SHELF V2.07.07

257

P0510Z257

STAR KNOB BOLT M10-1.5 X 28

211

PN02

HEX NUT 5/16-18

258

P0510Z258

GUARD MOUNTING POST

212

PS08M

PHLP HD SCR M5-.8 X 12

262

P0510Z262

GUARD ATTACHMENT BAR

213

PB06M

HEX BOLT M8-1.25 X 12

263

PS02M

PHLP HD SCR M4-.7 X 12

214

P0510Z214

TABLE SUPPORT

264

P0510Z264

SAFETY GUARD

215

P0510Z215

SPINDLE PULLEY GUARD

265

P0510Z265

HOUSING BRACKET

216

PLW07

LOCK WASHER 1/2"

266

PB27M

HEX BOLT M12-1.75 X 30

217

PB49M

HEX BOLT M12-1.75 X 20

267

P0510Z267

CLAMP SLEEVE RIGHT

218

P0510Z218

TABLE LEG

268

P0510Z268

CLAMP SLEEVE LEFT

219

PW01

FLAT WASHER 1/2"

269

P0510Z269

STUFF RING

220

PB25M

HEX BOLT M12-1.75 X 25

270

P0510Z270

LOCK BAR

221

PW02

FLAT WASHER 3/8"

272

P0510Z272

STAR KNOB 12MM, PINNED

223

P0510Z223

BELT GUARD

274

P0510Z274

SPINDLE NUT

224

P0510Z224

WORKING TABLE

275

P0510Z275

SAFETY WASHER

225

P0510Z225

TABLE INSERT 1-3/4"

276

P0510Z276

SPINDLE CARTRIDGE

226

P0510Z226

TAPER PIN

277

P0510Z277

CUTTER SPINDLE

227

P0510Z227

CLAMP STUD

278-1

P0510Z278-1

ROUTER BIT COLLET NUT

228

PW07

FLAT WASHER 5/16"

278-2

P0510Z278-2

ROUTER BIT COLLET 1/2"

229

P0510Z229

STAR KNOB (FEMALE) M8-1.25

278-3

P0510Z278-3

ROUTER BIT COLLET 1/4"

230

P0510Z230

FENCE BODY RIGHT

279

PLABEL-26

UNPLUG MACHINE LABEL

231

P0510Z231

WOODEN FENCE

280

PR25M

INT RETAINING RING 47MM

232

PW01M

FLAT WASHER 8MM

281

P6204

BALL BEARING 6204

233

PS04M

PHLP HD SCR M8-1.25 X 20

282

P0510Z282

SPINDLE HOUSING

234

PW07

TABLE INSERT 1-3/8"

283

P0510Z283

BEARING CONE

235

PS18M

PHLP HD SCR M4-.7 X 25

284

P0510Z284

COIL SPRING

236

P0510Z236

COMPLETE MITER GAUGE

285

PSS20M

SET SCREW M8-1.25 X 8

236-1

P0510Z236-1

MITER BAR

286

P0510Z286

SPRING COLLAR

236-2

P0510Z236-2

MITER GAUGE BODY

287

P0510Z287

STUD M12-1.75 X 355

236-3

PW03M

FLAT WASHER 6MM

288

P0510Z288

DRAWBAR M8-1.25 X 160

236-4

P0510Z236-4

STAR KNOB M6-1 X 16

289

P0510Z289

SLIP-ON HANDLE 12MM

236-5

P0510Z236-5

POINTER

290

P0510Z290

BEARING SLEEVE

236-6

PS07M

PHLP HD SCR M4-.7 X 8

291

PLW05M

LOCK WASHER 12MM

237

P0510Z237

CARTRIDGE NUT M18-1.5

292

P0510Z292

SPINDLE PULLEY

238

PLW04

LOCK WASHER 3/8"

293

PK48M

KEY 4 X 4 X 20

239

P0510Z239

LOCK HANDLE M12-1.75

294

PLABEL-12

READ MANUAL LABEL

240

PS14M

PHLP HD SCR M6-1 X 12

295

P0510Z295

ID/WARNING LABEL

241

PN01M

HEX NUT M6-1

296

PLABEL-11

SAFETY GLASSES LABEL

242

P0510Z242

HALF COLLAR

297

P0510Z297

FLAT BELT 690 X 10MM

243

PS14M

PHLP HD SCR M6-1 X 12

298

P0510Z298

MOTOR PULLEY

244

P0510Z244

ADJUSTING SCREW STUD

299

PSS01

SET SCREW M6-1 X 10

245

P0510Z245

STAR KNOB 8MM, PINNED

Содержание G0510Z

Страница 1: ...anged to reflect an improved tool set now included with the Model G0510Z All page references made on this insert refer to the pages in the original Model G0510Z manual MODEL G0510Z 3 4 HP SHAPER MANUAL UPDATE REF PART DESCRIPTION 321 PWR810 WRENCH 8 X 10 322 PWR1214 COMBO WRENCH 12 14MM 323 P0510Z323 WRENCH 27 30MM 324 P0510Z324 FLAT WRENCH 27MM Additional Inventory Breakdown Parts List Use this b...

Страница 2: ...TRUCTION MANUAL COPYRIGHT JUNE 2004 BY GRIZZLY INDUSTRIAL INC WARNING NO PORTION OF THIS MANUAL MAY BE REPRODUCED IN ANY SHAPE OR FORM WITHOUT THE WRITTEN APPROVAL OF GRIZZLY INDUSTRIAL INC TR6235 PRINTED IN CHINA REVISED JULY 2007 ...

Страница 3: ...als are Lead from lead based paints Crystalline silica from bricks cement and other masonry products Arsenic and chromium from chemically treated lumber Your risk from these exposures varies depending on how often you do this type of work To reduce your exposure to these chemicals work in a well ventilated area and work with approved safety equipment such as those dust masks that are specially des...

Страница 4: ...CTION 4 OPERATIONS 17 Shaper Cutters or Router Bits 17 Installing Cutters 18 Installing Router Bits 18 Changing Rotation 19 Spindle Height 19 Fence Adjustments 20 Straight Shaping 21 Partial Face Removal 22 Perimeter Cutting 22 Rub Collars 23 Irregular Shaping 24 Pattern Work 25 Shop Made Accessories 26 SECTION 5 ACCESSORIES 27 SECTION 6 MAINTENANCE 29 General 29 Schedule 29 Lubrication 29 Table 2...

Страница 5: ...nt to customer satisfaction We are pleased to provide this manual with the Model G0510Z It was written to guide you through assembly review safety considerations and cover general operating procedures It repre sents our effort to produce the best documenta tion possible A number of shaper cutters for the Model G0510Z are available through Grizzly Please refer to Section 5 Accessories on Page 27 th...

Страница 6: ...uard B Fence C Spindle D Spindle Elevation Handle E ON OFF Switch F Spindle Elevation Lock G Fence Lock H Fence Adjustment Knob I Forward Reverse Switch Figure 1 Model G0510Z front view controls and features Figure 2 Model G0510Z rear view controls and features A B C E F G H D I Read the manual before assembly and operation Become familiar with the machine and its opera tion before beginning any w...

Страница 7: ... x 3 8 Deep Max Cutter Diameter 27 8 Spindle Speed 8500 RPM Spindle Bearings Shielded Permanently Lubricated Ball Construction Table Ground Cast Iron Fence Assembly Cast Iron Body Assembly Cast Iron Base Pre formed Steel Motor Type TEFC Capacitor Start Induction Horsepower 3 4 HP Phase Voltage Single Phase 110 V Switch Reversible Amps 10 Cycle at RPM 60 Hertz at 3450 RPM Bearings Sealed Permanentl...

Страница 8: ... can cause cancer and severe respiratory illnesses For Your Own Safety Read Instruction Manual Before Operating this Machine The purpose of safety symbols is to attract your attention to possible hazardous conditions This manual uses a series of symbols and signal words which are intended to convey the level of importance of the safety messages The progression of symbols is described below Remembe...

Страница 9: ...ies 16 MAKE SURE GUARDS ARE IN PLACE AND WORK CORRECTLY BEFORE USING MACHINERY Safety Instructions for Machinery 17 REMOVE ADJUSTING KEYS AND WRENCHES Make a habit of checking for keys and adjusting wrenches before turn ing machinery ON 18 CHECK FOR DAMAGED PARTS BEFORE USING MACHINERY Check for binding and alignment of parts broken parts part mounting loose bolts and any other conditions that may...

Страница 10: ...ore starting the machine 9 DEPTH OF CUT Never remove too much material in one pass Several light passes are safer and produce a cleaner finish 10 SHAPING CONTOURED WORK Always use a rub collar and a template DO NOT start out at a corner See the rub collar sec tion further on in the manual 11 FEEDING THE WORKPIECE Always feed the workpiece against the rotation of the cut ter Never force materials t...

Страница 11: ...g codes in your area or you plan to connect your machine to a shared circuit consult a qualified electrician 110V Circuit 15 Amp Plug Type The Model G0510Z is supplied with a 5 15 plug similar to Figure 3 Figure 3 Typical type 5 15 plug and receptacle This machine must have a ground prong in the plug to help ensure that it is grounded DO NOT remove ground prong from plug to fit into a two pronged ...

Страница 12: ...with the controls and opera tions before starting the machine About this Section The Model G0510Z is a heavy machine 167 lbs shipping weight DO NOT over exert yourself while unpacking or mov ing your machine get assistance The Model G0510Z was carefully packed when it left our warehouse If you discover the machine is damaged after you have signed for delivery please immediately call Customer Servi...

Страница 13: ... 16 Flat Washers 3 8 16 Hex Nuts 5 16 18 16 P Fence Guard Hardware Bag Star Knobs M8 1 25 2 Large Diameter Flat Washers 8mm 2 Hex Bolts M8 1 25 x 12 2 Phillips Head Screws M8 1 25 x 20 4 Flat Washers 8mm 6 Phillips Head Screws M4 7 x 10 2 Hex Nuts M4 7 2 Q Router Table Spacer Kit Spacers 1 2 7 Hex Bolts M12 1 75 x 40 5 Hex Bolts M12 1 75 x 30 2 Lock Washers 12mm 7 R Wrenches 8 14mm 1 Each In the e...

Страница 14: ...G0510Z 3 4 HP Shaper 11 Hardware Recognition Chart ...

Страница 15: ...ources when dealing with sol vents Use care when dis posing of waste rags and towels to be sure they do not create fire or environ mental hazards Site Considerations Working Clearances Working clearances can be thought of as the distances between machines and obstacles that allow safe operation of every machine with out limitation Consider existing and anticipated machine needs size of material to...

Страница 16: ...stand assembly should now look like Figure 7 3 Place the shaper table upside down on the two 4x4 blocks as shown in Figure 8 Make sure the spindle DOES NOT touch the ground or the weight of the shaper may damage the spindle 4 Place the stand assembly on the shaper and attach it with the remaining eight carriage bolts washers and hex nuts as shown in Figure 8 5 Have an assistant help you turn the s...

Страница 17: ...s and star knobs to tighten the fence assembly to the table 3 Mount the fence faces to the fence assembly with the Phillips head screws and flat wash ers as shown in Figure 9 Note Make sure that the Phillips head screws are beyond the outer surface of the fence faces Figure 9 Mounting fence faces to fence assembly To check the fences for being aligned straight with each other 1 Place the straighte...

Страница 18: ...t is designed to help protect the opera tor from flying wood chips and accidental contact with the cutter router bit Once setup the safety guard height can be adjusted by loosening the star knob that secures the mounting post Use this safety guard as low to the cutter as possible without interfering with your work To attach the guard 1 Insert the mounting post into the bracket that is bolted to th...

Страница 19: ... Drawbar Nut Rub Collars Once assembly is complete and your assembled shaper looks like Figure 12 you are ready to test run the machine Test Run To test run the shaper 1 Plug the shaper into the power source 2 Press the START button making sure that your finger is poised on the STOP button just in case there is a problem The shaper should run smoothly with little or no vibration or rubbing noises ...

Страница 20: ...s Shaper Cutters Pros Shaper cutters are larger more durable and generally last longer than router bits If you plan on cutting many linear feet of a certain pro file then shaper cutters are the best choice Cons Shaper cutters are more expensive than router bits and are generally larger which makes them less compatible for small projects The Model G0510Z is ready to use shaper cutters when shipped ...

Страница 21: ...cutter and thread on the locknut 6 Tighten the locknut while holding the spindle stationary Use a wrench on the notches at the top of the spindle for leverage as shown in Figure 13 Figure 13 Tightening spindle lock nut Installing Router Bits Components and Hardware Needed Qty Flat Wrench 26mm 1 Wrench 30mm 1 In order to use router bits you must first convert the shaper to a router table Refer to t...

Страница 22: ...ny shaping operation Your shaper is equipped with a FWD REV for ward and reverse switch as shown in Figure 15 In most cases the shaper should be run in the FWD direction If you are using router bits always run the shaper in the FWD direction Router bits are not designed to run backwards In some instances it will be necessary to flip the cutter over and reverse the cutter rotation Whenever possible...

Страница 23: ...test piece that most closely resembles your actual workpiece 4 Lock the infeed fence in position with the locking handle to prepare to make a test cut 5 Turn the shaper ON and advance a 36 or longer test sample of the desired cut about 8 then stop Swing the test piece away from the cutter and turn the machine OFF 6 When the cutter comes to a complete stop adjust the outfeed fence to support the ne...

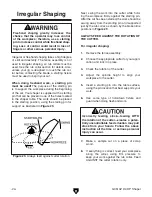
Страница 24: ...ld down or other safety device see Figures 21 22 and put on your safety glasses and dust mask respirator 7 Make a sample cut on a scrap piece of wood to check your adjustments 8 If everything is correct run your stock through the shaper using your left hand to support the workpiece against the fence and your right hand to feed if the rotation is counter clockwise as shown in Figure 23 Switch hands...

Страница 25: ...e plane as the infeed fence and lock the outfeed fence in place 3 Set the right and left wood faces to barely clear the cutter This allows the maximum support possible for the workpiece while passing the cutter Remember to tighten down the wood facing before starting the shaper 4 Run a test piece through the shaper see Figure 24 Figure 25 Proper cutting sequence If an edge around the perimeter of ...

Страница 26: ...amaging your work and creating a dangerous situa tion We DO NOT recommend using the rub collar in this position Figure 26 Cutting with rub collar below cutter 2 Above the cutter When the rub collar is used above the cutter the cut cannot be seen see Figure 27 This offers some advantage the stock is not affected by slight variations in thickness and accidental lifting will not damage the workpiece ...

Страница 27: ...cut Your shaper is supplied with a starting pin that can be placed in one of the holes located in the shaper table The work should be placed in the starting position using the starting pin for support as illustrated in Figure 29 Next swing the work into the cutter while hold ing the workpiece firmly against the starting pin After the cut has been started the work should be swung away from the star...

Страница 28: ...lars instead of solid col lars See Section 5 Accessories on Page 27 the current Grizzly catalog or www grizzly com for listings of ball bearing rub collars Figure 31 Rub collar determines depth of cut Pattern Rub Collar Pattern Work When using a pattern the rub collar can be posi tioned either above below or between cutters The pattern is usually used when the entire edge is to be shaped or when m...

Страница 29: ...le and the workpiece must be firmly secured NOTICE Use care in designing and making fixtures Clamps and screws cannot touch the cut ter and the fixtures must be stable in use with the workpiece resting on the shaper table not on the fixture The workpiece must be fixed securely to the jig Many experienced shaper users regularly use proven shop made fences and safety guards to augment their shaping ...

Страница 30: ... 1 4 1 2 Quarter Round 1 2 Bore 2 1 8 Diameter 7 8 Cutting Length C2007 1 Straight 1 2 Bore 2 Diameter 1 Cutting Length C2008 1 4 Rabbet 1 2 Bore 2 Diameter 1 4 Cutting Length C2009 1 2 Rabbet 1 2 Bore 2 Diameter 1 2 Cutting Length C2013 Drop Leaf Cove 1 2 Bore 2 1 8 Diameter 7 8 Cutting Length C2014 Glue Joint 1 2 Bore 2 Diameter 1 Cutting Length C2015 Screen Mould 1 2 Bore 2 1 8 Diameter 1 Cutti...

Страница 31: ...are a must Rub collars are used for shaping curved work such as cathedral doors as well as many custom shapes They are also used for limiting depth of cut like guide bearings on router bits Buy them in a set or individually Figure 33 Ball bearing rub collars H5542 President s Super 66 pc 1 4 Router Bit Set Includes just about all the finest quality bits you ll ever need in one super set These carb...

Страница 32: ...ity metal protectants such as those available from Grizzly Disconnect power from the machine when per forming any maintenance Failure to do this may result in serious personal injury V Belt Tension You should be able to deflect the V belt 1 4 with moderate finger pressure This may seem tight compared to most other belts but since the V belt is small and runs fast this much tension is necessary The...

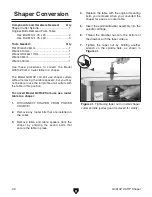
Страница 33: ... use as a router table 1 DISCONNECT SHAPER FROM POWER SOURCE 2 Remove the spindle lock nut and any cutters or rub collars installed on the spindle 3 Remove table from the shaper by undoing the seven bolts that secure it in place 4 Loosen and remove the taper nut see Figure 37 while holding the top of the spindle with a wrench This section is designed to help the operator with adjustments that were...

Страница 34: ...the collet is flush with the top of the collet nut as shown in Figure 39 Figure 38 Collet snapped into collet nut 9 Place the table spacers over the table mount ing holes on the shaper 10 Place the table on the spacers and secure it to the shaper with the hex bolts from the router table spacer kit see Figure 40 Figure 39 Collet flush with top of collet nut 11 Save the removed table bolts for when ...

Страница 35: ...s position To convert Model G0510Z from use as a router table to a shaper 1 DISCONNECT SHAPER FROM POWER SOURCE 2 Remove any router bits that are installed in the collet 3 Remove table and table spacers from the shaper by undoing the seven bolts that secure the table in place 4 Replace the table with the original mounting bolts you removed when you converted the shaper for use as a router table 5 ...

Страница 36: ...pulley by loosening the setscrews and tapping the pulley into the desired position with a dead blow hammer 5 Tighten the setscrews and replace the spin dle pulley cover after the pulley is aligned Truing the Fence To ensure that the fence is parallel with itself and square with the table 1 Ensure that the bolts through the wood fac ing on each side are tight and adequately countersunk 2 To align t...

Страница 37: ...ement spindle cartridge assemblies Part P0510Z317 as whole units which makes replace ment very simple The whole procedure can be accomplished in 15 20 minutes To replace the spindle cartridge assembly 1 DISCONNECT SHAPER FROM POWER SOURCE 2 Remove the spindle and drawbar from the spindle cartridge assembly Remove tapered drawbar nut and tap the drawbar up to knock it loose Figure 44 Loosening spin...

Страница 38: ...G0510Z 3 4 HP Shaper 35 G0510Z Electrical Components Wiring ...

Страница 39: ...313 241 242 243 244 245 246 246 246 247 248 249 250 251 254 255 256 257 258 262 263 264 265 266 291 266 318 319 320 267 268 269 270 272 274 275 276 277 278 1 278 2 278 3 279 280 281 281 282 283 284 285 286 287 288 289 290 291 292 293 317 294 295 296 297 298 299 300 300 1 300 2 300 3 300 4 300 5 300 6 300 7 301 302 304 306 307A 307A 2 307A 1 308 309 310 211 211 221 221 213 221 221 221 221 312 213 3...

Страница 40: ...R 225 P0510Z225 TABLE INSERT 1 3 4 276 P0510Z276 SPINDLE CARTRIDGE 226 P0510Z226 TAPER PIN 277 P0510Z277 CUTTER SPINDLE 227 P0510Z227 CLAMP STUD 278 1 P0510Z278 1 ROUTER BIT COLLET NUT 228 PW07 FLAT WASHER 5 16 278 2 P0510Z278 2 ROUTER BIT COLLET 1 2 229 P0510Z229 STAR KNOB FEMALE M8 1 25 278 3 P0510Z278 3 ROUTER BIT COLLET 1 4 230 P0510Z230 FENCE BODY RIGHT 279 PLABEL 26 UNPLUG MACHINE LABEL 231 ...

Страница 41: ...of of purchase must accompany the merchandise The manufacturers reserve the right to change specifications at any time because they constantly strive to achieve better quality equipment We make every effort to ensure that our products meet high quality and durability standards and we hope you never need to use this warranty Please feel free to write or call us if you have any questions about the m...

Страница 42: ...2 Which of the following magazines do you subscribe to ___American Woodworker ___Practical Homeowner ___Cabinetmaker ___Shop Notes ___Family Handyman ___Today s Homeowner ___Fine Homebuilding ___WOOD ___Fine Woodworking ___Wooden Boat ___Home Handyman ___Woodshop News ___Journal of Light Construction ___Woodsmith ___Old House Journal ___Woodwork ___Popular Mechanics ___Woodworker ___Popular Scienc...

Страница 43: ...INDUSTRIAL INC P O BOX 2069 BELLINGHAM WA 98227 2069 Place Stamp Here TAPE ALONG EDGES PLEASE DO NOT STAPLE Name_______________________________ Street_______________________________ City______________State______Zip______ Send a Grizzly Catalog to a friend ...

Страница 44: ......

Страница 45: ...zly Trusted Proven and a Great Value OR SECURE ORDERING ORDERS SHIPPED WITHIN 24 HOURS E MAIL RESPONSE WITHIN ONE HOUR Visit Our Website Today And Discover Why Grizzly Is The Industry Leader Call Today For A FREE Full Color Catalog ...

Отзывы: