


G0501 Sliding Table Saw
-25-
Figure 27.
Sliding table shipping brace.
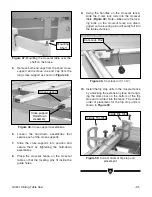
Figure 29.
Sliding table handles.
Figure 28.
Access panel removed (one side
shown).
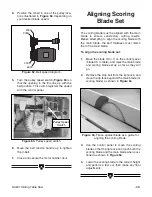
Figure 30.
Sliding table end cap attachment
screws.
8.
Remove the shipping brace, shown in
Figure
27
, from the end of the sliding table.
9.
From the end of the sliding table, look inside
the sliding table and locate the three attach-
ment blocks. These need to be positioned
over the attachment holes. The scale bar is
an excellent tool for inserting into the table
and positioning the blocks.
10.
Starting at the middle hole, reach through the
dust port opening and stick your finger in the
attachment hole. Have your third assistant
use the scale bar to push or pull the middle
attachment block so that you can align it with
your finger.
11.
Once aligned, thread one of the large cap
screws from the base into the attachment
block, but DO NOT completely tighten with
the hex wrench until instructed later in this
manual.
12.
Remove the two access panels from the
back of the base unit (
Figure 28
) so that you
can access both of the remaining attachment
holes.
13.
Utilizing the same procedures from
steps 10
& 11
, thread the remaining two cap screws
from the base into the sliding table attach-
ment blocks.
14.
Install the sliding table handles and end cap
(shown in
Figure 29 & 30
) with two flat head
screws per each, securing from the top of the
table.
Содержание G0501
Страница 9: ... 8 G0501 Manual Update G0501 Machine Table Assemblies ...
Страница 11: ... 10 G0501 Manual Update G0501 Blade Guard Assembly ...
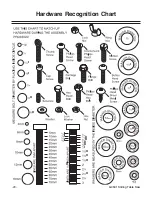
Страница 35: ... 20 G0501 Sliding Table Saw Hardware Recognition Chart ...
Страница 66: ...G0501 Sliding Table Saw 51 Maintenance Performed Approximate Hours Of Use Maintenance Log Date ...
Страница 87: ... Ha Y c IVWaZ HVl 3LIDING 4ABLE AND ITER ENCE SSEMBLIES ...
Страница 108: ......