NOTE
When correctly installed, the teeth on the depth stop rod
must be aligned with the teeth indicator on the depth stop
rod clamp.
8.5
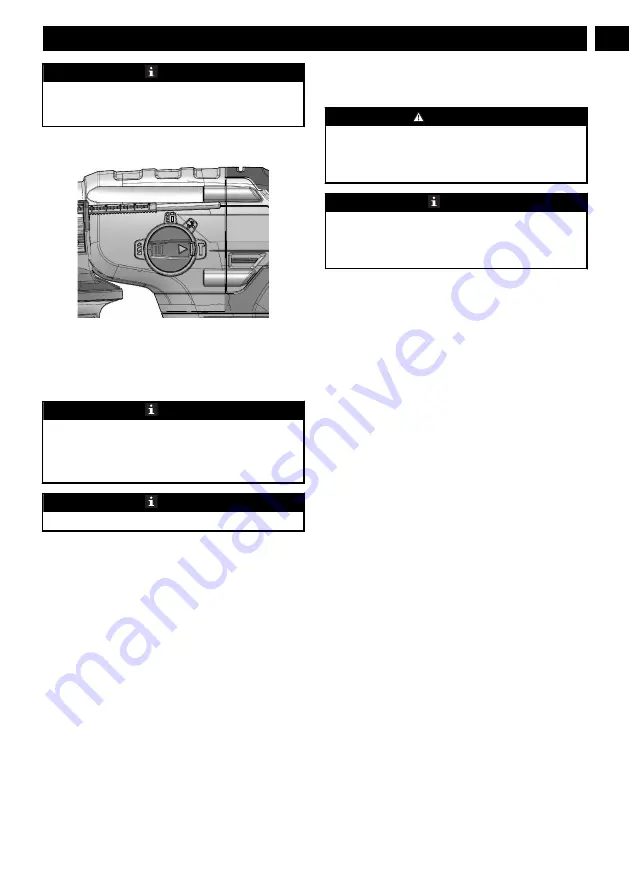
SELECT THE MODE
To change the operation mode, push the release button and
turn the mode selection switch to the correct position until it
clicks.
The machine is used for four functions: dri
ll
, hammer,
hammer drill, chisel, vari-lock and rotation stop
.
NOTE
Hammer drilling mode can destroy the structure of the
machine when used for fastening or drilling without SDS
Plus bits.
Use bits only with hard metal and SDS Plus shaft only.
NOTE
When hammer drilling, do not apply too much pressure.
8.6
DRILL
1. Examine the direction of rotation selector for the correct
setting (forward or reverse).
2. Attach the material to be drilled in a vise or with clamps
to keep it from turning.
3. Hold the drill tightly and put the bit at the correct
position.
4. Push the trigger to start the drill.
5. Move the drill bit into the workpiece and apply only
sufficient pressure to keep the bit cutting. Do not force
the drill or apply side pressure to elongate a hole.
6. When drilling on hard or smooth surfaces, use a center
punch to identify the necessary hole location. This can
prevent the drill bit from moving from the center.
7. When drilling metals, use a light oil on the drill bit to
keep it from overheating. The oil can prolong the life of
the bit and increase the drilling action.
8. If the bit jams in the workpiece or if the drill stalls, stop
the machine immediately. Remove the bit from the
workpiece and determine the reason for jamming.
WARNING
Drills have a tendency to grab and kick opposite to the
direction of rotation and could cause loss of control when
breaking through material. If not prepared, this loss of
control can result in possible serious injury.
NOTE
This drill has an electric brake. Release the trigger to stop
the chuck from turning. When the brake is working
correctly, sparks can be seen through the exhaust slots on
the housing. This is normal and is the action of the brake.
8.7
DRILL MATERIALS
WOOD DRILLING
For maximum performance, use high speed steel bits for
wood drilling.
1. Operate the machine at a very low speed to prevent the
bit from slipping off the starting point. Increase the speed
as the drill bit bites into the material.
2. When drilling through holes, put a piece of wood behind
the workpiece to prevent ragged or splintered edges on
the rear side of the hole.
METAL DRILLING
For maximum performance, use high speed steel bits for
metal or steel drilling.
1. Operate the machine at a very low speed to prevent the
bit from slipping off the starting point.
2. Hold a speed and pressure which let cut without
overheating the bit. Apply too much pressure can:
Overheat the drill; Wear the bearings; Bend or burn bits;
and Produce off-center or irregular-shaped holes.
3. When drilling large holes in metal, start with a small bit,
then complete with a large bit. Also, lubricate the bit with
oil to improve drilling action and increase bit life.
MASONRY DRLLING
For maximum performance, use carbide-tipped masonry
impact bits when drilling holes in brick, tile, concrete, etc..
1. Move adjustment button on hammer drill left for hammer
mode.
2. Apply light pressure and medium speed for best results in
brick.
3. When drilling holes in tile, practice on a scrap piece to
find the best speed and pressure. Operate the machine at a
very low speed to prevent the bit from slipping off the
starting point.
9
English
EN
Содержание HM24L00
Страница 3: ......
Страница 22: ...No Qt Description 1 1 Poign e auxiliaire Inclut le r glage de la profondeur avec la poign e 21 Fran ais FR...
Страница 33: ......


