


C3 Auto Whip Clad Cable Cutter
Greenlee Tools, Inc.
4455 Boeing Dr. • Rockford, IL 61109-2988 USA • 815-397-7070
14
Figure 11
Note: Notch depth is the distance the notch cutting
blade will advance from its home position. See Cable
Reference Guide for approximate notch depth for
different diameter sizes of MC cable.
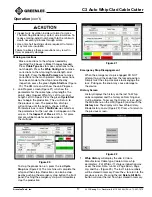
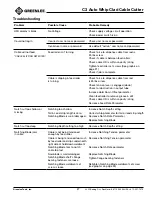
A total of 48 different cable types can be stored in
memory. Cable types can also be imported from the
USB port by touching the
Import from USB
box (see
instructions for Import from USB). The
Load Selection
box enters the selected cable type into Operation
screen. The < will return to the previous screen. To
select the cable type, touch the
Cable #
box adjacent to
the desired cable type and press
Load Selection
. The
Cable #
box will turn yellow and the
Load Selection
box will momentarily turn yellow to indicate the
selection. Press the < to return to the previous screen.
• Inspect wire insulation inside cut armor for nicks.
The Notching Blade may contact wire insulation. To
reduce nicking, adjust notch depth to the minimum
depth necessary to break through armor.
• Use anti-short bushings where required. Cut armor
may nick wire insulation.
Failure to observe these precautions may result in
injury or property damage.
Note: For FMC cable, the cable type box must end with
"FMC". This will notch the cable at the end of the whip.
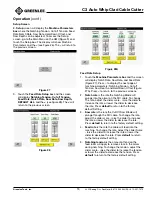
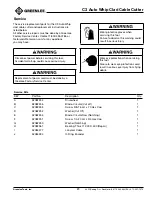
Whip Config
b. Touch the
Whip Config
box to enter the Whip
Length, Lead Length, Tail Length, and Whip
Quantity or select a whip configuration in
memory (Figure 12).
Operation
(con’t)
Figure 12
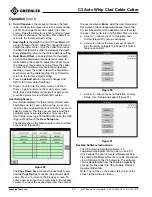
A total of 96 whip configurations can be stored
in memory. A whip configuration can also be
imported from the USB port by touching the
USB Import
box (see instructions for USB
Import). The
Page Down
box accesses the next
eight whip configurations and the
Page Up
box
accesses the previous eight whip configurations.
To select one whip configuration, touch the
Single Job
box and the
Job #
box adjacent to
the desired whip configuration and touch the
Load Jobs
box. Both boxes will turn yellow and
the
Load Jobs
box will momentarily turn yellow
to indicate the selection (Figure 12).
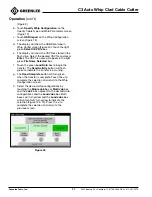
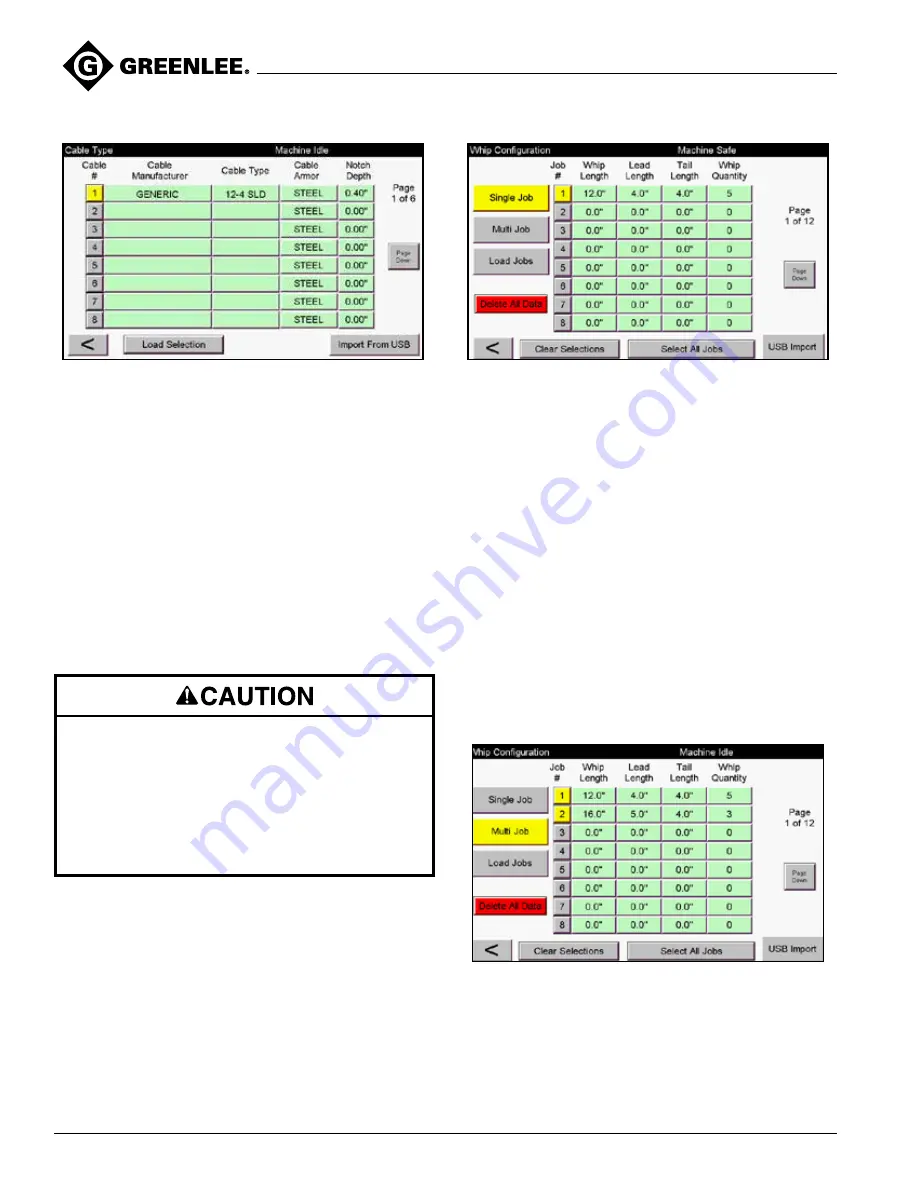
To select multiple whip configurations of the
same cable type, touch the
Multi Job
box and
the
Job #
boxes adjacent to the desired whip
configurations and press the
Load Jobs
box.
The Multi Job
and all the
Job #
boxes will turn
yellow and the
Load Jobs
box will momentarily
turn yellow to indicate the selections (Figure 13).
Figure 13
The
Multi Job
selection will produce in
numerical order by
Job #
after the whip quantity
is completed. The
Clear Selections
box clears
the selection. The
Select All Jobs
box will select
all (96) whip configurations that have proper data
entered in each field of the whip configuration.
Delete All Data
deletes all 96 whip