


45
Air to Water Heat Pump
Service Manual- Versati II Series
INSTALLATION
After confirming that there is no leakage from the system, when the compressor is not in operation
charge additional R410A working fluid with specified amount to the unit through the filling opening of the liquid
pipe valve of the outdoor unit.
1) Be sure to charge the specified amount of refrigerant in liquid state to the liquid pipe:
Since this refrigerant is a mixed refrigerant, adding it in gas form may cause the refrigerant composition to
change, preventing normal operation.
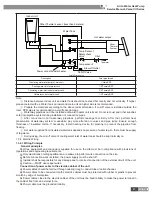
2) Before charging, check whether the refrigerant cylinder is equipped with a siphon tube or not.
With siphon tube
No siphon tube
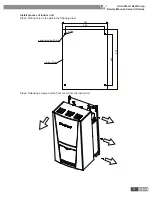
1�6 Connection of Pipeline
(1) Connection of Outlet Pipe for Indoor & Outdoor Unit
Align the expansion end of copper pipe with the center of threaded joint. Tighten the flaring nuts with your
hands.
Tighten the flaring nuts with torque wrench until you hear a “click”.
Bend of fitting pipe shall not be too low; otherwise the fitting pipe might crack. Please use pipe bender
when bending the fitting pipe.
When connecting outdoor and indoor unit, never pull the big and small joint of indoor unit with force, so
as to prevent the tubes of indoor unit from cracking and causing leakage.
Connecting pipe shall be supported by a rack without transmitting its weight to other units.
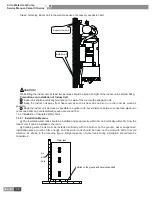
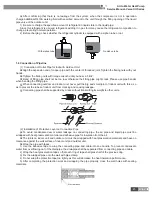
(2) Installation of Protective Layer on Connection Pipe
To avoid condensate dew or water leakage on connecting pipe, the air pipe and liquid pipe must be
wrapped with heat preservation material and adhesive pipe for insulation from the air.
The joints on indoor unit and outdoor unit must be wrapped with heat preservation materials and have no
clearance against the wall surface of indoor unit and outdoor unit.
Wrap the pipe with tapes.
1) Use the adhesive tape to wrap the connecting pipe and cable into one bundle. To prevent condensate
water from overflowing out of the drainpipe, the drainpipe shall be separated from connecting pipe and cable.
2) Wrap the heat preservation tape so that each ring of tape shall press half of the previous ring.
3) Fix the wrapped pipe onto the wall with pipe clamp.
4) Do not wrap the protective tape too tightly, as this will decrease the heat insulation performance.
5) After completing the protection work and wrapping the pipe properly, close the wall holes with sealing
materials.
No clearance
Содержание Versati II
Страница 1: ...AIR TO WATER HEAT PUMP SERVICE MANUAL Versati T1 R410A 50Hz GC201308 II ...
Страница 4: ...1 Air to Water Heat Pump Service Manual Versati II Series PRODUCT PRODUCT ...
Страница 13: ...10 Air to Water Heat Pump Service Manual Versati II Series CONTROL CONTROL ...
Страница 37: ...34 Air to Water Heat Pump Service Manual Versati II Series INSTALLATION INSTALLATION ...
Страница 62: ...59 Air to Water Heat Pump Service Manual Versati II Series MAINTENANCE MAINTENANCE ...
Страница 81: ...78 Air to Water Heat Pump Service Manual Versati II Series MAINTENANCE Fig 14 ...
Страница 97: ...JF00301971 ...