31
Rooftop Packaged
Service Manual
2 DRAIN PIPING WORK
2.1 INSTALLATION PROCEDURE
After the unit is installed, it is required to check the level of the whole unit. The unit must be placed
horizontally to ensure the unit in proper function.
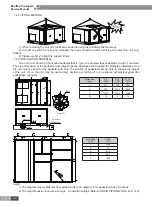
When shipped out from factory, both the condensate outlets are blocked by rubber plug. So before
installation, please take the rubber plug out. Condensate removal is performed by attaching a PVC pipe to the
drain pan and terminated in accordance with local or state Plumbing/HVAC codes.
The indoor coil condensate drain ends with a threaded 3/4”(NPT) stub tube. A trap must be built for proper
condensate drainage and to prevent debris from being drawn into the unit.
2.2 MATTERS OF ATTENTION
The condensate pipe shall be installed with an inclining angel of 5~10°,so as to facilitate the drainage of
condensate.
Do not connect this drain to a closed sewer line. Connection to a vented sewer line is allowed.
Do not use PVC cement to connect any drain piping. The drain line can them be easily separated for
future cleaning.
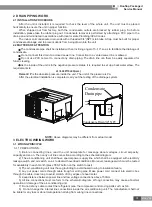
As the inside of the unit is in the negative pressure status, it is required to set up a backwater elbow. The
requirements is:
L1=L2≥P/10+20(mm)
Remark:
P
is the absolute pressure inside the unit. The unit of the pressure is Pa.
After the electrical installation is completed, carry out the testing of the drainage system.
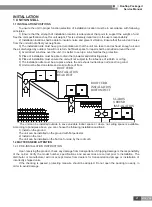
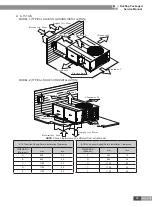
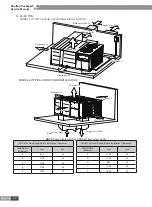
Condensate
Drainpipe
Condensate Drain3/4" NPT
NOTE:
Above diagrams may be different from actual model.
3 ELECTRIC WIRING WORK
3.1 WIRING PRINCIPLE
3.1.1 PRECAUTIONS:
1) Before connecting lines, read the unit nameplate for message about voltages, circuit ampacity,
capacity,and so on. Then carry out line connection according to the schematic diagram.
2) The air-conditioning unit shall have special power supply line which shall be equipped with electricity
leakage switch and air switch, so as to deal with overload conditions. Moreover, leakage switch must be tested
for availability in each month (press TEST button on the switch to test).
3) The air-conditioning unit must have grounding to avoid hazard owing to insulation failure.
4) Lay out power cords through cable trough or wiring pipe. Make power cord connect into electric box
through the cable-cross loop to avoid scratch of it by edges of sheet metal.
5) Keep distance between power line and low voltage connections above 150mm.
6) All line connections must conform to the schematic diagram. Wrong connection may cause abnormal
operation or damage of the air-conditioning unit.
7) Do not let any cable contact the refrigerant pipe, the compressor and moving parts such as fan.
8) Do not change the internal line connections inside the air-conditioning unit. The manufacturer shall not
be liable for any loss or abnormal operation arising from wrong line connections.
Содержание EJ51000061
Страница 1: ...ROOFTOP PACKAGED SERVICE MANUAL T3 R22 50 60Hz GC201205...
Страница 3: ...1 Rooftop Packaged Service Manual PRODUCT PRODUCT...
Страница 22: ...20 Rooftop Packaged Service Manual INSTALLATION...
Страница 38: ...36 Rooftop Packaged Service Manual MAINTENANCE...
Страница 44: ...42 Rooftop Packaged Service Manual 3 WIRING DIAGRAM Model GK C03TC1AD EJ51000160 COMP...
Страница 45: ...43 Rooftop Packaged Service Manual Model GK C03TC1AD EJ51000161...
Страница 46: ...44 Rooftop Packaged Service Manual Model GK C04TC1AD...
Страница 47: ...45 Rooftop Packaged Service Manual Model GK C04TC1AF...
Страница 48: ...46 Rooftop Packaged Service Manual Model GK C05TC1AF EJ51000190...
Страница 49: ...47 Rooftop Packaged Service Manual Model GK C05TC1AF EJ510001901...
Страница 50: ...48 Rooftop Packaged Service Manual Model GK C08TC1AF GK C10TC1AF P P...
Страница 51: ...49 Rooftop Packaged Service Manual Model GK C13TC1AF RD BU RD BU BK BK BK BK P P...
Страница 52: ...50 Rooftop Packaged Service Manual Model GK C15TC1AF EJ51000180 P P...
Страница 53: ...51 Rooftop Packaged Service Manual Model GK C15TC1AF EJ51000181 P P...
Страница 54: ...52 Rooftop Packaged Service Manual Model GK C20TC1AF GK C25TC1AF P P...
Страница 55: ...53 Rooftop Packaged Service Manual Model GK C03TC1AK COMP...
Страница 56: ...54 Rooftop Packaged Service Manual Model GK C04TC1AM...
Страница 57: ...55 Rooftop Packaged Service Manual Model GK C05TC1AM...
Страница 58: ...56 Rooftop Packaged Service Manual Model GK H05TC1AM...
Страница 59: ...57 Rooftop Packaged Service Manual Model GK C08TC1AM P P...
Страница 60: ...58 Rooftop Packaged Service Manual Model GK H08TC1AM XT1 N XT1 N...
Страница 61: ...59 Rooftop Packaged Service Manual Model GK C10TC1AM EJ51000242 P P...
Страница 62: ...60 Rooftop Packaged Service Manual Model GK C10TC1AM EJ51000240 P P...
Страница 63: ...61 Rooftop Packaged Service Manual Model GK H10TC1AM XT1 N...
Страница 64: ...62 Rooftop Packaged Service Manual Model GK C15TC1AM BU P P...
Страница 65: ...63 Rooftop Packaged Service Manual Model GK H15TC1AM XT1 N...
Страница 66: ...64 Rooftop Packaged Service Manual Model GK H20TC1AM XT1 N...
Страница 67: ...65 Rooftop Packaged Service Manual Model GK C20TC1AM GK C25TC1AM RD BU RD BK BK BK BK BK...
Страница 68: ...66 Rooftop Packaged Service Manual Model GK H25TH1AM XT1 N...
Страница 69: ...67 Rooftop Packaged Service Manual Model GK H30TH1AM XT1 N...
Страница 70: ...68 Rooftop Packaged Service Manual Model GK C30TC1AM P P...
Страница 88: ...86 Rooftop Packaged Service Manual 2 GK C03TC1AD Unit exploded views...
Страница 90: ...88 Rooftop Packaged Service Manual GK C04TC1AF Unit exploded views...
Страница 92: ...90 Rooftop Packaged Service Manual 3 GK C05TC1AF exploded views parts list Unit exploded views...
Страница 94: ...92 Rooftop Packaged Service Manual GK C05TC1AF Unit exploded views...
Страница 102: ...100 Rooftop Packaged Service Manual Model GK C03TC1AK exploded views parts list Unit exploded views...
Страница 104: ...102 Rooftop Packaged Service Manual Model GK C04TC1AM GK C05TC1AM views parts list Unit exploded views...
Страница 110: ...108 Rooftop Packaged Service Manual Model GK C15TC1AM views parts list Unit exploded views 9 6...
Страница 132: ...JF00300689...

