


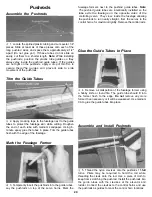


Canopy Installation
7. Glue the canopy in place on the fuselage. We have
had good luck using RC-56 glue when installing canopies.
It takes a few hours to dry, but it is very clear and looks
good in the end. To hide the canopy glue joint and to seal
out fuel residue, you can use 1/8"-1/4" wide striping tape
as a border around the canopy.
Control Throws
The following control throws are recommended for your
first flights. They are measured at the widest part of the
control surface.
Low Rate High Rate
ELEVATOR: 3/8"
9/16"
RUDDER: 1"
1-3/8"
AILERONS: 3/16"
5/16"
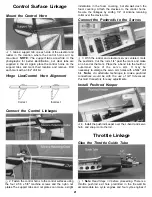
Final Checks
Balance the Airplane Laterally
SPECIAL NOTE: Do not confuse this procedure
with "checking the C.G." or "balancing the
airplane fore and aft." That very important step
will be covered next in the manual.
1. With the wing level, lift the model by the engine
propeller shaft and at the centerline of the fin (this may
require two people). Do this several times.
2. If one wing always drops when you lift, it means that
side is heavy. Balance the airplane by gluing weight to the
inside of the other wing tip. NOTE: An airplane that has
been laterally balanced will track better in loops and
other maneuvers.
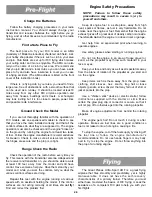
Balance Your Model
NOTE: This section is VERY important and
must not be omitted! A model that is not
properly balanced w i l l be unstable and
possibly unflyable.
RADIO SET-UP
FOUR CHANNEL TRANSMITTER
Transmitter
Stick Movements
Control Surface
Movements
Elevator moves UP
Riant aileron moves
UP and Left aileron
moves DOWN
Rudder moves LEFT
Carburetor Wide Open
1. Make sure the control surfaces move in the proper
direction as illustrated in the following sketches:
1. Accurately mark the balance point on the top of the
wing on both sides of the fairing. The balance point is
located approximately 4 inches back from the leading
edge. This is the balance point at which your model should
balance for your first flights. Later, you may wish to
experiment by shifting the balance up to 3/8" forward or
back to change the flying characteristics. Moving the
balance forward may improve the smoothness and
arrow-like tracking, but it may then require more speed for
takeoff and make it more difficult to slow down for landing.
Moving the balance aft makes the model more agile, with a
lighter and snappier "feel". If you move the balance aft, the
elevator will have more authority, possibly resulting in a
plane that is too maneuverable. If this happens, you should
reduce the maximum elevator throw slightly. In any case,
do not balance your model outside the recommended range.
2. Balance the airplane with the fuel tank empty. If it
balances outside the "balance range," you must either shift
the location of radio components or add weight to the nose
or tail until it balances within the range. NOTE: Nose
weight may be easily installed by using a "Spinner Weight"
(available in assorted weights, up to 2 ounces), or by
gluing strips of lead onto the front of the firewall. Tail
weight may be added by using "stick-on" lead weights.
25


