background image

5

KIT INSPECTION

Before starting to build, take an inventory of this kit to make sure it is complete, and inspect the parts to make sure they 
are of acceptable quality. If any parts are missing or are not of acceptable quality, or if you need assistance with assembly, 
contact Product Support. When reporting defective or missing parts, use the part names exactly as they are written in the 
Kit Contents list.

Great Planes Product Support

3002 N. Apollo Drive, Suite 1

Champaign, IL 61822

Telephone: (217) 398-8970, ext. 5

Fax: (217) 398-7721

E-mail: [email protected]

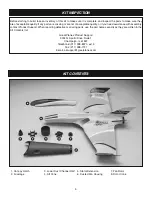
KIT CONTENTS

1. Canopy Hatch
2. Fuselage

3. Lower Duct Channel Half
4. Aft Cone

5. Stator Extension
6. Ducted Fan Housing

7. Fan Rotor
8. Rotor Cone

1

2

4

5

6

7

8

3

Содержание synapse arf

Страница 1: ...diately in new and unused condition to the place of purchase To make a warranty claim send the defective part or item to Hobby Services at the address below Hobby Services 3002 N Apollo Dr Suite 1 Cha...

Страница 2: ...ons to join is liability protection Coverage is not limited to flying at contests or on the club field It even applies to flying at public demonstrations and air shows Failure to comply with the Safet...

Страница 3: ...provided in parentheses Radio Equipment Electronics The Synapse ARF requires a transmitter that supports elevon mixing a micro receiver and two micro servos 9g or less If you already have a transmitt...

Страница 4: ...specified it is highly recommended that you use only 30 minute or 45 minute epoxy because you will need the working time and or the additional strength Photos and sketches are placed before the step...

Страница 5: ...sembly contact Product Support When reporting defective or missing parts use the part names exactly as they are written in the Kit Contents list Great Planes Product Support 3002 N Apollo Drive Suite...

Страница 6: ...9 5mm from the inside edge of the elevons at the leading edge just behind the bevel The slots should be 1 4 6mm long and approximately 1 32 0 8mm to 3 64 1 2mm wide and be perpendicular to the hinge...

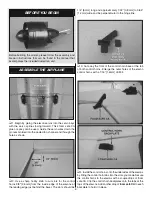
Страница 7: ...ainst the pushrod wires 8 Attach 2mm female to 3 5mm male bullet adapters not included to the leads on the brushless motor Mix up a small batch of 6 minute epoxy Brush on a thin coat of epoxy inside t...

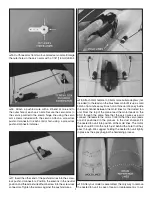
Страница 8: ...ct surfaces and press the piece into place aligning the front air intake edges with the underside of the fuselage Wipe away any excess glue with a dry paper towel 11 Glue the aft duct channel ring int...

Страница 9: ...s 1 Turn on the transmitter and receiver and center the trims 2 With the transmitter and receiver still on check all the control surfaces to see if they are centered If necessary adjust the pushrods b...

Страница 10: ...d will be unstable and possibly unflyable At this stage the model should be in ready to fly condition with all of the systems in place including the receiver ESC and battery pack 1 Use a felt tip pen...

Страница 11: ...it has been proven to be airworthy by having been previously successfully flight tested 2 I will not fly my model aircraft higher than approximately 400 feet within 3 miles of an airport without noti...

Страница 12: ...air with a slightly nose up attitude Be certain the model is being launched into the wind and be immediately ready to make corrections to keep the airplane flying straight level and into the wind When...

Отзывы: