BUILDING THE FUSELAGE
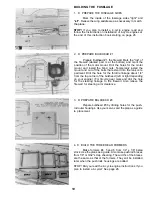
1. D PREPARE THE FUSELAGE SIDES
Mark the inside of the fuselage sides "right" and
"left". Relieve the wing saddle area as necessary to match
the plans.
STOP! If you plan to install a 4-cycle engine read and
follow the instructions on installation of 4-cycle engines at
the end of this instruction book starting on page 26.
2. D PREPARE BULKHEAD #1
Prepare Bulkhead #1, the firewall. Mark the "top" of
the firewall (slanted part is at the bottom) and mark the
position of the motor mount. Drill the holes for the motor
mount and install the blind nuts. Temporarily install the
mount and cut off the bolts that extend into the tank com-
partment. Drill the hole for the throttle linkage about 1/4"
from the top corner of the bulkhead (left or right depending
on your engine). (For tricycle gear mark and drill the hole
for the steering linkage in the firewall. Also relieve the
firewall for steering arm clearance.
3. D PREPARE BULKHEAD #3
Prepare bulkhead #3 by drilling holes for the push-
rod outer housings. Use your servos and the plan as a guide
to placement.
4. D BUILD THE THREE REAR FORMERS
Make formers #4, 5 and 6 from 1/4" x 1/8" balsa
stock. Use the plans as a guide. Also make pushrod braces
from 1/8" or 3/32" scrap sheeting. The widths of the braces
are the same as that of the formers. They will be installed
later when the pushrods housings are added.
STOP! Did you read the 4-cycle engine instructions if you
plan to install a 4-cycle? See page 26.
10
Содержание Super Sportster 20
Страница 33: ...33...
Страница 34: ...34...
Страница 35: ...35...
Страница 36: ...36...
Страница 37: ...37...
Страница 41: ...Use trim MonoKote and these letters to create your trim scheme on your Sportster 41...
Страница 43: ...PUSHROD LINKAGES 43...

