GREAT PLANES SopWith Camel Скачать руководство пользователя страница 8

8

Hook Up the Elevator & Rudder

❏ 

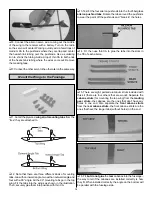
1. Test fi t the “Z-bend” of one of the two longest wire 

pushrods into the outer hole of one of the fi berglass control 
horns as shown in the photo. If necessary, spin the horn 
around the wire a few times to loosen the hole in the horn so 
the pushrod will move freely. 
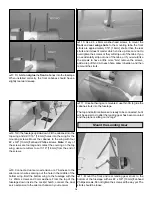
❏ 

2. With the horn attached to the pushrod, slide the pushrod 

into the rudder guide tube in the fuselage. Fit the horn into the 
slot in the rudder. Use a few drops of thin CA followed by a few 
drops of medium CA to securely glue the horn into position.

❏ 

3. Connect the elevator pushrod the same way.

❏ 

4. Temporarily connect the servos you will be using for the 

elevator and rudder to your receiver with a receiver battery, 

or with your ESC and the motor battery, so you can operate 
the servos with the transmitter. Center the trims on your 
transmitter and turn on the transmitter and receiver. Position 
the servo arm on each servo so the longer arms will be 
perpendicular to the servos. 
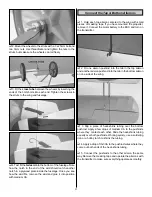
❏ 

5. Use a #56 (.046" [1.2mm]) drill or a hobby knife to 

enlarge the holes in the servo arms for the screw-lock pushrod 
connectors. Mount the screw-lock pushrod connectors to the 
servo arms with the nylon retainers.

Refer to this photo for the next four steps.

❏ 

6. Test fi t the elevator and rudder servos in the servo rails 

in the fuselage. If the rails are too far apart for the servos you 

8

Содержание SopWith Camel

Страница 1: ...of the final user assembled product By the act of using the user assembled product the user accepts all resulting liability If the buyer is not prepared to accept the liability associated with the use...

Страница 2: ...ge then select ARFs ELECTRIC Scroll down the page and click on EP Sopwith Camel ARF If there is new technical information or changes an Important TECH NOTICE box will appear in the upper left corner o...

Страница 3: ...and endpoint adjustments would ease set up and maximize flight performance For modelers who already have an advanced radio but still must purchase a mini receiver and micro servos separately followin...

Страница 4: ...the way your model will fly please expect slight deviations between your model and the published values ORDERING REPLACEMENT PARTS Replacement parts for the Great Planes EP Sopwith Camel ARF are avail...

Страница 5: ...nts list Great Planes Product Support 3002 N Apollo Drive Suite 1 Champaign IL 61822 Telephone 217 398 8970 ext 5 Fax 217 398 7721 E mail airsupport greatplanes com To convert inches to millimeters mu...

Страница 6: ...ghtened by carefully twisting them in the opposite direction then re shrinking the covering on the top and bottom Mount the Horizontal Vertical Stabilizers 1 Temporarily mount the bottom wing to the f...

Страница 7: ...ng the string until the stab is aligned 7 Holding the stab in position use thin CA to securely glue the stab to the fuselage 8 Insert a pin through the middle of the 1 4 x 1 2 6 x 13mm CA hinge the pi...

Страница 8: ...he same way 4 Temporarily connect the servos you will be using for the elevator and rudder to your receiver with a receiver battery or with your ESC and the motor battery so you can operate the servos...

Страница 9: ...ith a small drop of threadlocker and the small hex wrench that came with this model Secure the servo arms to the servos with the screws that came with the servos Mount the ESC Receiver 1 Fit but do no...

Страница 10: ...he front Install the Replica Engine 1 Use plastic cutting scissors or a hobby knife to cut away part of the ring around the replica engine as shown 2 Use a pin vise with a small drill or a hobby knife...

Страница 11: ...ning in the replica engine until it fits over the motor 8 While we re working on the front of the fuselage it will be easier to glue on the inspection panels now before the wings are mounted Add six o...

Страница 12: ...the battery plate 3 Apply the opposite side of Velcro to your battery note that the Velcro strip on the battery is only about 3 8 10mm wide It takes only a small amount ofVelcro to keep the battery f...

Страница 13: ...prefer to mount your servos with screws rather than gluing them in skip this step 4 Clean the sides of the aileron servos with denatured alcohol then use medium CA to glue them to the hatches with th...

Страница 14: ...leron pushrods into the outer hole in one of the fiberglass control horns Spin the horn around the pushrod several times to wear the paint off the wire and loosen the fit in the hole Refer to this pho...

Страница 15: ...Fit the tabs into the wings as shown in the illustration Then securely glue them into position with thin CA 3 Test fit the four aileron pushrods into the four fiberglass aileron pushrod tabs Rotate t...

Страница 16: ...to the aileron channel in your receiver 10 Use 2 6 x 8mm washer head screws to mount the front and rear wing struts to the mounting tabs the front struts are approximately 1 16 1 6mm shorter than the...

Страница 17: ...the wing with small pieces of masking tape If you have mounted the propeller remove it Connect the motor battery to the ESC and turn on the transmitter 2 Fit one aileron pushrod into the tab in the t...

Страница 18: ...e the throw according to the measurements provided below 5 Measure and set the up and down and left and right control throws for all of the control surfaces If your radio does not have dual rates we r...

Страница 19: ...or propeller motor battery ESC and the complete radio system 1 If using a Great Planes C G Machine to balance your EP Sopwith Camel ARF set the rulers to 2 7 8 73mm If not using a C G Machine use a fi...

Страница 20: ...be done for 15 hours using the slow charger that came with the radio system This will condition the batteries so that the next charge may be done using the fast charger of your choice If the initial c...

Страница 21: ...spectators Only personnel involved with flying the aircraft are allowed at or in the front of the flight line Intentional flying behind the flight line is prohibited 4 I will operate my model using on...

Страница 22: ...enough battery to land under power Takeoff The EP Sopwith Camel ARF will not take off from grass unless it is extremely short and smooth But taking off from a paved surface should be no problem as lo...

Страница 23: ...copy of this identification tag and put it on or inside your model OTHER ITEMS AVAILABLE FROM GREAT PLANES ElectriFly S E 5a WWI Park Flyer EP ARF by Great Planes On your next trip to the park or fly...

Страница 24: ...___ Where Purchased ____________________________ Date Construction Started _____________________ Date Construction Finished _______________________ Finished Weight _______________________________ Date...

Отзывы: