7
❏
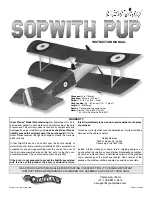
3. If you’ve mounted a 2.4GHz receiver as shown in the
photo, guide one of the antennas back through the fuselage.
The other antenna will be looped around the inside of the
cowl when it is mounted later. If you've mounted a 72MHz
receiver, guide the antenna down and out the bottom of the
fuselage. Tape the antenna to the bottom of the fuselage in a
few places so it will not get caught in the wheels or propeller
or drag on the ground.
❏
4. Test fi t the cowl to make sure none of the wiring or the
ESC or receiver interfere with the fi t.
Mount the Top Wing
and the Landing Gear
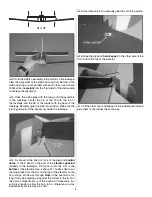
Refer to this picture while mounting the top wing.
TIGHTER CURVE
(FORWARD)
❏
1. Test fi t the cabanes into the fuselage so they are facing
the correct direction as illustrated—the part with the “tighter
curve” on the top goes forward. If necessary, trim the cutouts
in the thin, plastic fuselage top so the cabanes fi t easily, then
glue them into position.
❏
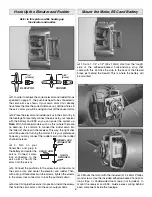
2. Test fi t the top wing to the cabanes by fi tting the tabs
of the cabanes into the notches in the wing. View the model
from the bottom to make certain top wing is parallel with the
bottom wing by “eyeballing” the leading edges. If necessary,
trim the notches for the cabanes in the top wing to get it
parallel with the bottom wing.
❏
3. Holding the top wing to the cabanes in alignment with the
bottom wing, glue the wing to the cabanes. Without adding
any twist to the wings, glue the wing struts into position.
❏
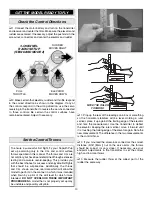
4. Wipe any residual oil or fi lm from the main landing gear
wire using a small paper towel scrap and denatured alcohol.
Roughen the gear with medium-grit sandpaper so glue will
adhere. Fit the gear into position. Note that it sweeps back.
Note:
The gear could be permanently glued into position,
but it should fi t tight enough so that no glue is required.
❏
5. Test fi t, then use CA to glue the plywood
landing gear
covers
onto the gear wire. If necessary, trim the slots in the
bottom wing to accommodate the braces.


