GREAT PLANES EDGE 540 T Performance Series Скачать руководство пользователя страница 14

14

❏ 

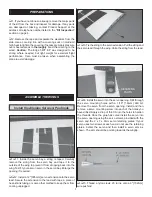
2. Cut the covering from over the two pull-pull exits at the 

aft end of the two servo openings, between the openings. 

❏ 

3. Cut the pull-pull string in half. Put a small drop of thin 

CA on one end of each piece of string. Allow the CA to cure 
and trim off any frayed thread. Insert the end into the pull-pull 
guide tubes in the fuselage. The string may be diffi cult to guide 
through the exit. Once the string will not go any further into 
the tube, use the point of a hobby knife to help pull the string 
through the exit. Tape the string to the side of the fuselage at 
the aft end to prevent it from being pulled through.

❏ 

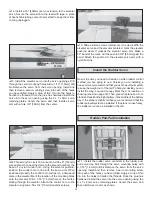
4. Measure up 3/4" [19mm] from the bottom of the rudder 

and make a mark. Measure in from the leading edge 1/4" 
[6.4mm] and make a mark. Drill a 3/32" [2.4mm] hole through 
the rudder, perpendicular to the centerline of the rudder. 

❏ 

5. Insert the 2mm threaded rudder control horn rod. Center 

the rod in the rudder with two 2mm fl at washers and 2mm 
nuts on each side. A drop of threadlocker on the threads will 
help prevent the nuts from coming loose.

❏ 

6. Thread a nylon torque rod horn onto each end of the 

control horn rod. Adjust the torque rod horn so that they are 
both equal distance from the rudder. 

❏ 

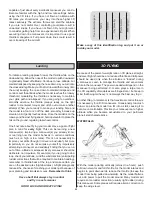
7. Thread 2-56 nuts onto four 2-56 rigging couplers. 

Slide a silicone clevis retainer over four threaded 2-56 metal 
clevises. Then, thread the clevises 10 turns onto the rigging 
couplers. Tighten the 2-56 nuts against the metal clevises. 

Содержание EDGE 540 T Performance Series

Страница 1: ...t Planes reserves the right to change or modify this warranty without notice In that Great Planes has no control over the final assembly or material used for final assembly no liability shall be assum...

Страница 2: ...d ARF The Great Planes Edge 540T EP ARF flies much like the giant size Edge s but in a much less expensive package Now you can practice for IMAC competition without risking your larger more expensive...

Страница 3: ...rs of which may cause eye skin and respiratory tract irritation Never blow into a part wheel pant cowl to remove fiberglass dust as the dust will blow back into your eyes Always wear safety goggles a...

Страница 4: ...discharge w balance plug GPMP0623 FlightPower EVO25 LiPo 2170mAh 11 1V 25C FPWP0327 FlightPower EVO25 LiPo 2500mAh 11 1V 25C FPWP0333 APC 13 x 8E Propeller APCQ3080 3D Setup Great Planes Power Series...

Страница 5: ...ERING REPLACEMENT PARTS Replacement parts for the Great Planes Edge 540T EP ARF are available using the order numbers in the Replacement Parts List that follows The fastest most economical service can...

Страница 6: ...the part names exactly as they are written in the Kit Contents list Great Planes Product Support 3002 N Apollo Drive Suite 1 Champaign IL 61822 Telephone 217 398 8970 ext 5 Fax 217 398 7721 E mail ai...

Страница 7: ...to the wing Test fit your aileron servo in the servo bay Enlarge the opening if required 2 Install a 12 305mm servo extension onto the servo lead Secure the extension to the lead with tape a piece of...

Страница 8: ...ne clevis retainer over the clevis With the aileron servo and the aileron centered mark the aileron pushrod where it crosses the aileron servo arm Make a 90 bend at the mark Cut the pushrod 3 8 9 5mm...

Страница 9: ...at steps 1 to 4 for the left main landing gear Install the Tail Gear 1 Glue the nylon tail gear bushing in the hole in the aft bottom of the fuselage 2 Insert the tail gear wire through the aluminum t...

Страница 10: ...humb screws Be careful putting pressure on the wing and fuselage The wings may be tight the first time they are slid on the tube 2 Center the horizontal stabilizer in the slot in the fuselage Stand ba...

Страница 11: ...uselage so that part of the bare wood is showing Apply 30 minute epoxy to the wood top and bottom Slide the stab through the fuselage so that approximately 1 2 12 7mm of bare wood is showing on the ot...

Страница 12: ...es with thin CA Install the Motor The Edge 540T EP has been designed to use the Great Planes RimFire 42 50 800 Out runner Brushless motor If you will be installing a different motor you may need to mo...

Страница 13: ...cone clevis retainer over the clevis With the elevator servo and the elevator centered mark the elevator pushrod where it crosses the elevator servo arm Make a 90 bend at the mark Cut the pushrod 3 8...

Страница 14: ...Measure up 3 4 19mm from the bottom of the rudder and make a mark Measure in from the leading edge 1 4 6 4mm and make a mark Drill a 3 32 2 4mm hole through the rudder perpendicular to the centerline...

Страница 15: ...tion in the Tail 1 Cut the covering away from the upper opening on the right side in the rear of the fuselage for the rudder servo 2 Install a 16 406mm servo extension on the rudder servo Secure the e...

Страница 16: ...slot on the other side of the tray 9 Attach a strip of sticky backed hook material to the center of the battery tray The loop material can be attached to the battery Apply the Decals The box photograp...

Страница 17: ...AILERONS 3 4 19mm 15 up 3 4 19mm 15 down LOW RATE ELEVATOR 1 2 13mm 8 up 1 2 13mm 8 down RUDDER 2 51mm 17 left 2 51mm 17 right AILERONS 1 2 13mm 10 up 1 2 13mm 10 down 3D RATE ELEVATOR 2 1 2 64mm 42 u...

Страница 18: ...t flights Later you may wish to experiment by shifting the C G up to 3 16 5mm forward or 3 16 5mm back to change the flying characteristics Moving the C G forward may improve the smoothness and stabil...

Страница 19: ...ay be flying with batteries that are only partially charged Balance Propellers Carefully balance your propeller and spare propellers before you fly An unbalanced prop can be the single most significan...

Страница 20: ...I will have completed a successful radio equipment ground check before the first flight of a new or repaired model 2 I will not fly my model aircraft in the presence of spectators until I become a qua...

Страница 21: ...e runway Hold up elevator to keep the tail wheel on the ground If necessary adjust the tail wheel so the model will roll straight down the runway If you need to calm your nerves before the maiden flig...

Страница 22: ...prove your skills though it is never a bad idea but more importantly so you do not surprise yourself by impulsively attempting a maneuver and suddenly finding that you ve run out of time altitude or a...

Страница 23: ...d a little bit of power back in You will have to adjust the throttle as needed but make your adjustments smooth Some right aileron may be needed to keep the model from torque rolling Use the rudder an...

Страница 24: ...ive housing optimizes cooling allowing RimFire motors to produce 50 more performance power than out runners of similar size Prop adapter motor mount and hardware are included The installed gold plated...

Отзывы: