background image

24

40 cm

160 

cm

CH1

PM

(9+9)

CH2

PM

PM

(9+9)

SG

15
cm

15cm

     7

TT

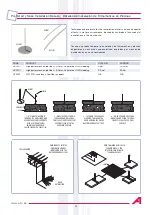
Vissage de la tôle (CH) au mur (M): Uniquement pour une piscine ovale.
Avec un serre-joint (SG) 

à l’extrémité du


mur, attacher la tôle contre sur le mur, à une distance de 15 cm de la partie supérieure ; 

à 15 cm de l’extrémité du mur poser la pièce passe murs 

(PM). Utiliser un foret pour métal ø 11-12 mm et un foret pour ciment de 

ø 8 mm pour percer la tôle et le mur. Il est recommandé d’appliquer une peinture anti-oxydant dans les trous avec un pinceau.

Mettre 9 pièces passe-murs sur toute la surface du mur, trois par trois et du haut en bas, avec une séparation de 40 cm entre elles 

de haut dans la hauteur et 160 cm dans la largeur. Les introduire à pression avec un marteau.

Très important

, après avoir posé la première colonne de passe-murs, bien étirer la tôle pour éviter les ondes, avant de poser la 

deuxième colonne de passe-murs, pour que la tôle soit bien plaquée contre le mur. Après avoir posé tous les passe-murs et étendu 

la première pièce de tôle, l’assembler à la deuxième pièce avec les vis de fixation de la tôle 

(TT).Prise de terre de la piscine (voir 

page 28).

Pour poser la deuxième pièce de tôle, suivre le même processus que celui décrit pour la première pièce. 

Après avoir assemblé tout le périmètre de la piscine, poser le profil d’extrusion dans sa partie supérieure. Posez d’abord ceux de 

la partie droite et ensuite ceux de la partie courbée. S’il reste des profils, il faudra couper le dernier à la dimension exacte.

REMARQUE : Il est recommandé de couvrir chaque passe murs posé avec un ruban adhésif pour protéger le liner pendant 

l’ins

tallation. Il faudra également couvrir les pièces trouées qui ne vont pas être utilisées. 


Atornillado de la chapa (CH) al muro (M): Solo para piscinas ovaladas.
Con la ayuda de un sargento (SG)  en el extremo del muro se sujeta la chapa al muro, a una distancia de 15 cm de la parte 
superior y a 15 cm del extremo del muro se coloca la pieza pasamuros (PM). Se utilizará una broca de metal ø 11-12 mm y otra 
de cemento ø 8 mm para taladrar la chapa y el muro. Se recomienda aplicar una pintura antióxido con un pincel en los agujeros. 
Se colocarán 9 piezas pasamuros en toda superficie del muro, de tres en tres y de arriba abajo, con separación de 40 cm entre 
ellos a lo alto y 160 cm a lo ancho. Introdúzcalos a presión con ayuda de un martillo.
Muy  importante, una vez colocada la primera columna de pasamuros, estirar bien la chapa para que no queden olas en la chapa 
antes de colocar la segunda columna de pasamuros, con el objeto de que la chapa quede bien pegada al muro. Una vez colocados 
todos los pasamuros y extendida la primera pieza de chapa, unir la misma a la segunda pieza con los tornillos de amarre de la 
chapa (TT).Toma de tierra de la piscina (ver pag. 28).
Para colocar la segunda pieza de chapa, seguir el proceso descrito  para la primera pieza.
Una vez  unido el perímetro total de la piscina se colocará el perfil de extrusión en la parte superior de la piscina.Coloque
primero los de la parte recta y últimos los curvos. Si ve que sobra perfil, deberá cortar el último al tamaño necesario.
NOTA: Se recomienda tapar cada pasamuro colocado con cinta adhesiva para proteger el liner a la hora de su instalación. 
Tambien debe tapar los troqueles que no vaya a utilizar.      
 

Fitting the wall plate (CH) to the wall (M):Only for oval pools.
Using a clamp (SG) hold the wall plate to the end of the wall and fit the bushing (PM) at a distance of 15 cm from the top and 15 
cm from the end of the wall. Use a metal bit with a diameter of 11-12 mm and a cement bit with a diameter of 8 mm to drill 
the wall 
plate and the wall. Apply rustproof paint in the holes using a brush.
Place 9 bushings along the entire wall surface in lines of three from top to bottom with a distance of 40 cm between them vertically 
and a distance of 160 cm horizontally. Fit them in place using a hammer.
Very important: once the first column of bushings have been fitted, stretch the wall plate to ensure that it is flush to the wall before 
fitting the second column of bushings. When all the bushings have been fitted and the first piece of wall plate is in position, fit it 
to the second piece of wall plate using the wall plate fastening screws (TT). Swimming pool earth connection (see page 28).
To fit the second piece of wall plate, proceed as indicated for the first piece. 
Once the entire perimeter of the swimming pool has been fitted, place the top extruded section pieces on the top of the wall plate. 
First fit the straight section pieces and then the curved section pieces. If the top track formed with the top section pieces 
is too 
long, cut the last top section piece down to the necessary size.
NOTE: We recommend you cover each bushing with adhesive tape to protect the liner during
installation. Also cover the perforation marks that are not to be used.

www.AufstellPools.de

Содержание KPEOV5027

Страница 1: ...LICH LA FOTOGRAFIA O IL DISEGNO SOLO A SCOPO ILLUSTRATIVO ED INFORMATIVO MADE IN BY FABRICADO POR FABRIQU PAR HERGESTELLT DURCH PRODOTTO DA GEPRODUCEERD DOOR FABRICADO POR MANUFACTURAS GRE S A ARITZ B...

Страница 2: ...NENTES ELEMENTS BESTANDTEILE COMPONENTI ONDERDELEN COMPONENTES Pag 16 40 INSTALLATION INSTALACI N INSTALLATION INSTALLATION INSTALLAZIONE INSTALLATIE INSTALA O Pag 41 48 MAINTENANCE AND USE WINTERING...

Страница 3: ...w w w A u f s t e l l P o o l s d e...

Страница 4: ...similaires sont des aides utiles mais ils ne remplacent pas la surveillance continue par un adulte comp tent quipements de s curit Il est recommand de garder du mat riel de sauvetage une bou e par exe...

Страница 5: ...ossono salvare una vita Spiegare agli utilizzatori della piscina anche ai bambini la procedura da seguire in caso di emergenza Non tuffarsi mai in piscine poco profonde in quanto ci pu provocare lesio...

Страница 6: ...E L T E R R E N O P R PA R AT I O N D U T E R R A I N V O R B E R E I T U N G D E S B O D E N S P R E PA R A Z I O N E D E L T E R R E N O B E R E I D I N G VA N H E T T E R R E I N P R E PA R A O D O...

Страница 7: ...OV8027 30 00 24 h 9 01 x 4 65 m PEOV9159 45 91 PEOV9127 35 45 24 h 5 09 x 3 00 m PEOV5059 16 01 PEOV5027 12 36 24 h 7 00 x 3 20 m PEOV7059 27 47 PEOV7027 21 21 24 h 6 00 x 3 20 m PEOV6059 23 12 PEOV60...

Страница 8: ...w w w A u f s t e l l P o o l s d e...

Страница 9: ...w w w A u f s t e l l P o o l s d e...

Страница 10: ...5 20 m 9 00 m 1 65 m 1 35 m 6 00 x 3 20 x 1 50 1 20 m 8 00 x 5 20 x 1 65 1 35 m 5 20 m 8 00 m 1 65 m 1 35 m 5 00 x 3 00 x 1 50 1 20 m 7 00 x 5 00 x 1 65 1 35 m 5 00 m 7 00 m 1 65 m 1 35 m 5 50 x 1 50...

Страница 11: ...8 x 4 m 10 x 6 m 8 x 4 m 10 x 6 m 8 x 4 m 10 x 6 m 8 x 4 m 10 x 6 m w w w A u f s t e l l P o o l s d e...

Страница 12: ...d as a que se frag e el hormig n Ubicaci n de los muros M de contenci n de la parte recta Solo para piscinas ovaladas Se debe realizar un dibujo con una tiza cal u otro tipo de marcaje para la ubicaci...

Страница 13: ...as Schwimmbad genau rechtwinklig steht Rundes Schwimmbecken Die Wand richtet sich auf wenn das Sxhwimmbecken voller Waser ist siehe Seite 27 Suolo fondo S Calcestruzzo Quando lo scavo sar livellato si...

Страница 14: ...between the walls must be 328 cm Build the wall with blocks with a thickness of 20 cm Lay the first row of blocks and mark the hollows of the blocks and then position the 10 mm rod Place the 10 mm iro...

Страница 15: ...t und die Blockhohlr ume markiert um sp ter die 10 mm Stange einzusetzen Die 10 mm Eisenstange V wird an dem Pool am n chsten liegenden Ende angebracht wie auf der Skizze dargestellt indem eine 15 cm...

Страница 16: ...ssembler aux tiges verticales avec du fil de fer Continuer poser les blocs Entre la quatri me et la cinqui me file il faudra mettre encore une tige transversale Le mur doit avoir une hauteur de moins...

Страница 17: ...ind kann mit der Auff llung mit Erdreich des bis zum Poolrand fortgefahren werden Wenn die Wand fertig ist warten Sie mindestens eine Woche damit der Beton trocknen kann COSTRUZIONE DEI MURI M DI CONT...

Страница 18: ...ore vedere le relative istruzioni per il montaggio La mancanza dei pezzi nel kit deve essere informata al servizio post vendita entro un massimo di 15 giorni dalla data dell acquisto della piscina in...

Страница 19: ...27 700 x 320 cm PEOV6027 600 x 320 cm PEOV5027 509 x 300 cm PE5527 550 PE4227 420 PE3527 350 PE5559 550 PE4259 420 PE3559 350 PEOV9159 901 x 465 cm PEOV8059 800 x 400 cm PEOV7059 700 x 320 cm PEOV6059...

Страница 20: ...TTP PF PIU 150 cm CH SKIMMER COMPONENTS COMPONENTES ELEMENTS BESTANDTEILE COMPONENTI ONDERDELEN COMPONENTES VL VR 18 PGTI PIG 600 X 320 350 901 X 465 800 X 400 700 X 320 509 X 300 420 550 9 w w w A u...

Страница 21: ...19 600 X 320 350 901 X 465 800 X 400 700 X 320 509 X 300 420 550 VL VR PF 9 w w w A u f s t e l l P o o l s d e...

Страница 22: ...TA L L AT I O N I N S TA L A C I O N I N S TA L L AT I O N I N S TA L L AT I O N I N S TA L L A Z I O N E I N S TA L L AT I E I N S TA L A O INSTRUCTIONS PA R T E 4 20 w w w A u f s t e l l P o o l s...

Страница 23: ...M Om het polystyreen te plaatsen wordt dubbelzijdig klevende tape gebruikt CDC de tape wordt eerst aan de muur gekleefd Wanneer het ge xpandeerd polystyreen geplaatst is op de twee muren wordt de mont...

Страница 24: ...hacia el skimmer Se deben colocar todos los perfiles de extrusi n de la parte inferior e introducir la chapa en su canal ranura ATENCION Si hay que acortar los perfiles inferiores la medida exacta a...

Страница 25: ...ZIONE 6 2 Montaggio della lamiera CH sul muro 1 pezzo PEOV7027 PEOV6027 PEOV5027 PEOV7059 PEOV6059 PEOV5059 In senso orario inserire la parte iniziale di modo che la punzonatura dello skimmer venga ce...

Страница 26: ...importante una vez colocada la primera columna de pasamuros estirar bien la chapa para que no queden olas en la chapa antes de colocar la segunda columna de pasamuros con el objeto de que la chapa qu...

Страница 27: ...rofil bersteht dieses auf die erforderliche Gr e abschneiden HINWEIS Wir empfehlen jedes Mauerdurchbruchteil mit einem Klebstreifen abzudecken als Schutz des berzugs vor dessen Verlegung Auch die nich...

Страница 28: ...iscina hacia el exterior para que la funda no se rasgue o se pinche Importante No utilizar los pasamuros PM para fijar la chapa a la pared nicamente para las piscinas ovaladas Importante Una vez la pi...

Страница 29: ...izza del nastro biadesivo Tutte le parti della lamiera devono risultare accessibili e non coperte da parti di muro Extrusieprofiel geleiding van het zwembad PGTI Als het beton droog is worden de gebog...

Страница 30: ...escalera Dibujo Se debe comprar una pica de toma de tierra y cable de 10 mm de secci n Contectar el cable a la clavilla aportada siguiendo el esquema adjunto NOTA En la instalaci n de la escalera se...

Страница 31: ...rt an die Klemme an HINWEIS Die Vorgehensweise wird im Rahmen der Installierung der Leiter beschrieben Presa terra della piscina TTP necessaria per proteggere la piscina da eventuali scariche elettric...

Страница 32: ...no va a instalar focos en su piscina tape los agujeros correspondientes de la chapa antes de poner el liner Puede usar un cart n fino y taparlo con cinta americana por dentro y fuera ver la localizaci...

Страница 33: ...tilizzare cartone sottile e chiuderlo con nastro adesivo telato all interno e all esterno vedi la posizione dei faretti nella pagina 38 Let op als u van plan bent om lichtspots in het zwembad te insta...

Страница 34: ...Estire y extienda el liner L a la sombra para que recupere su textura al menos 2 horas antes de su colocaci n No efectuar la instalaci n del liner a temperaturas ambiente bajas ni excesivamente altas...

Страница 35: ...ginnen Sie den Boden berzug zu entfalten folgen Sie dabei der Poolhauptachse und dr cken Sie die Seitenteile gegen das Blech Die Schwei naht die den Boden mit dem Seitenteil verbindet muss ber den ges...

Страница 36: ...dra plut t distribuer le mat riel entre la semi circonf rence l o il y a du mat riel est en plus ou en moins en v rifiant si les marques sont correctement situ es Lorsque tout le liner sera accroch il...

Страница 37: ...Wasserstand 3 4 cm bersteigt berwachen Sie das Einf llen von Wasser bis 4 cm unter den Stanzformen zum Einbau der R cklaufventile VR und des Bodenreinigers VL IMPORTANTE Verificare che i segni ML del...

Страница 38: ...and tighten the screws Then fit the trim Use a Stanley knife to make a cross shaped cut in the interior of the nozzle so that the water can flow through see sketch A Installation finale du clapet de...

Страница 39: ...a partie post rieure de P1 toujours sans tre coll et passer le cable du projec teur travers du trou et du presse toupe de P5 Coller P5 avec la partie post rieure de P1 Faire tourner le projecteur un d...

Страница 40: ...gate ai fuochi Posizionare il pezzo P1 con il giunto adesivo e avvitarlo con P2 Posizionare il liner l altro giunto adesivo e avvitare P3 Tagliare prestando la massima attenzione il liner attraverso i...

Страница 41: ...skimmer C IMPORTANT Mettre du t flon sur tous les filetages de branchement d eau POSE DU CADRE DU SKIMMER MS Il faudra s assurer que tous les trous sont bien en face l un de l autre joint pi ce trou e...

Страница 42: ...ILTERANLAGE verbunden werden FISSAGGIO CORPO SKIMMER S ALL ESTERNO DELLA PISCINA Seguire le istruzioni dello skimmer della depuratrice Unire la bocca B dello skimmer al corpo dello stesso S situando f...

Страница 43: ...ordt de randsteen ge nstalleerd Houd er rekening mee zones te laten voor de hantering van de kleppen en de skimmer Vervolgens met grond de ruimte opvullen tot een hoogte van 70 cm tussen de muur van h...

Страница 44: ...50 x 1 1 2 giunzione piatta 45x35x2 EPDM 80 2 unit T 90 D 50 3 unit gomito 90 ridotto D 50x50 40 NL 1 eenheid verbinding 3 stuks 3P M H D 50 x 1 1 2 2 eenheden verbinding 3 stuks 3P M H D 50 x 1 1 2...

Страница 45: ...VR VL VR F F SKIMMER 1 2 3 3 4 4 4 VR VL VR SKIMMER F F 1 2 3 3 4 4 4 PEOV9159 PEOV8059 PEOV9127 PEOV8027 PEOV7059 PEOV6059 PEOV5059 PEOV7027 PEOV6027 PEOV5027 w w w A u f s t e l l P o o l s d e...

Страница 46: ...on to incrust the plastic parts of the stairs Take into account that these should be installed with the stairs assembled for its later installation Connect the earth cable connected to the metal bar o...

Страница 47: ...15 45 w w w A u f s t e l l P o o l s d e...

Страница 48: ...CTIONS PA R T E 5 MAINTENANCE AND USE MANTENIMIENTO Y USO ENTRETIENT ET UTILISATION WARTUNG UND GEBRAUCH MANUTENZIONE E USO ONDERHOUD EN GEBRAUCH MANUTEN O E UTILIZA O 46 w w w A u f s t e l l P o o l...

Страница 49: ...lcance el final de su vida til debe ser desmontada segregar los distintos materiales pl stico y acero y llevarlos al punto limpio especificado por las autoridaes locales Lorsque votre piscine atteint...

Страница 50: ...ssen getrennt und zur Sammelstelle gebracht werden die von den rtlichen Beh rden bestimmt wird Quando la piscina giunge al termine della sua vita utile deve essere smontata i vari materiali plastica e...

Страница 51: ...en o a plastic en ijzer en ingeleverd op een door de plaatselijke gemeente aangewezen verzamelplaats Quando a piscina atingir o final da sua vida til dever ser desmontada e os distintos materiais pl s...

Страница 52: ...w w w A u f s t e l l P o o l s d e...

Страница 53: ...w w w A u f s t e l l P o o l s d e...

Страница 54: ...w w w A u f s t e l l P o o l s d e...

Страница 55: ...53 ACCESSORIES ACCESORIOS ACCESSOIRES ZUBEH R ACCESSORI ACCESSOIRES ACESS RIOS INSTRUCTIONS PA R T E 6 w w w A u f s t e l l P o o l s d e...

Страница 56: ...cambiatore di calore Cleaners Limpiafondos Aspirateurs Bodenreiniger Plusci Fundos Bodemreinigers Limpa Fundos Heat pumps Bombas de calor Pompes chaleur W rmepumpe Pompas de calore Warmtepomp Mombas d...

Страница 57: ...y 99 pure salt Clorador de piscina elevadas Sistema que desinfecta el agua de la piscina convirtiendo por electrolisis el cloruro s dico sal en iones de cloro F cil instalaci n Utilizar solo Cloruro s...

Страница 58: ...vicios t cnicos se encargan de la instalaci n de piscinas la venta de repuestos y accesorios y el mantenimiento de las depuradoras www gre es inicio servicios servicio t cnico Espa a S E R V I O S T E...

Страница 59: ...Reklamationen jeder Art ist uns unentbehrlich die Garantie Nummer mitzuteilen SEHR WICHTIG Lesen Sie sorgf ltig die Montage und Gebrauchsanweisung des soeben erworbenen Produkts um Schwierigkeiten be...

Страница 60: ...one o riparazione presso fabrica delle parti riconosciute difettose Non sono coperti dalla garanzia il deperimento del prodotto n gli incidenti dovuti a noncuranza installazione difettosa utilizzazion...

Отзывы: