Positioning the tumble dryer
The tumble dryer can be free-standing or in a
stack. Remember that the tumble dryer produces
heat and should therefore not be located in a room
that is too small. If the room is very small, drying
will take longer due to the limited quantity of air.
Caution!
•
Any electrical installation must be carried out
by qualified professionals.
•
The machine must not be installed behind a
lockable door, a sliding door or a door with
hinges on the opposite side to those of the
tumble dryer.
•
The tumble dryer's plinth ventilation must not
be blocked by a rug or the like.
Tip!
To improve ventilation, leave the door to the
room where the tumble dryer is located open.
Freestanding
The tumble dryer can be positioned beside the
washing machine. An air gap of at least 5 mm
must be left between the washing machine and
the tumble dryer.
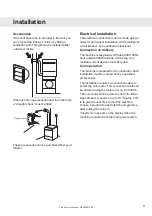
Stacking
The tumble dryer can be placed on top of a
washing machine. In this case you use the
stacking attachments (foot cups and anti-tilt
devices) that come with the machine. You will find
two foot cups in a bag in the drum and two anti-tilt
devices are attached to the bottom left corner at
the back of the machine. Extending plates can be
ordered from your local retailer.
How to assemble the stack:
1. Undo the anti-tilt device.
2. Undo the two screws indicated on the back of
the washing machine.
3. Secure the anti-tilt device using the screws as
shown in the picture.
4. Attach the plastic cups for fixing the tumble
dryer’s front feet to the washing machine’s top
cover. This is essential, as only when the
tumble dryer’s feet are resting in the plastic
cups can you be sure that the dryer is correctly
positioned on the washing machine.
Break off tag A on the cup fitted on the
right-hand side and tag B on the cup fitted on
the left-hand side. Then remove the paper from
the self-adhesive surface under the plastic
cups.
A
B
A
B
18
Installation
3DUWVHULD
Содержание DG6
Страница 2: ......
Страница 3: ...ITALIANO Part 1 serial number H0005202000 ...
Страница 22: ...3DUW VHULDO QXPEHU ...
Страница 26: ...ENGLISH Part 1 serial number H0005202000 ...
Страница 45: ...3DUW VHULDO QXPEHU ...
Страница 49: ...LANGUE FRANÇAISE Part 1 serial number H0005202000 ...
Страница 68: ...3DUW VHULDO QXPEHU ...
Страница 72: ...DEUTSCH Part 1 serial number H0005202000 ...
Страница 92: ...3DUW VHULDO QXPEHU ...
Страница 97: ...ESPAÑOL Part 1 serial number H0005202000 ...
Страница 116: ...3DUW VHULDO QXPEHU ...
Страница 120: ...ITALIANO Part 2 serial number H0005201999 ...
Страница 144: ...ENGLISH Part 2 serial number H0005201999 ...
Страница 151: ...1 2 3 4 5 Start 4 Main power switch 1 Stop 5 Programme selector 2 Display window 3 8 Front panel 3DUW VHULDO QXPEHU ...
Страница 168: ...LANGUE FRANÇAISE Part 2 serial number H0005201999 ...
Страница 192: ...DEUTSCH Part 2 serial number H0005201999 ...
Страница 200: ...1 2 3 4 5 Start 4 Hauptschalter 1 Stop 5 Programmwähler 2 Displayfenster 3 9 Bedienblende 3DUW VHULDO QXPEHU ...
Страница 218: ...ESPAÑOL Part 2 serial number H0005201999 ...


