background image

Startup

3A2818A

11

Startup

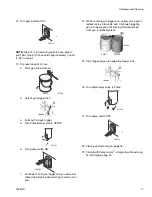
1.

Place suction tube and drain tube in grounded metal 
pail partially filled with flushing fluid. Attach ground 
wire to pail and to earth ground.

2.

Turn prime valve down. Turn pressure control 
clockwise to lowest pressure.

3.

Set pump switch OFF.

4.

Start engine.

a.

Move fuel valve to open.

b.

Move choke to closed.

c.

Set throttle to fast.

d.

Set engine switch to ON.

e.

Pull starter rope.

f.

After engine starts, move choke to open.

g.

Set throttle to desired setting.

PAINT

FLU

S

H

ti5955a

ti5789a

ti5971a

ti5248a

ti5249a

ti5

2

50a

ti5263a

ti5264a

ti5251a

Содержание Pro 270GS

Страница 1: ...nd coatings For professional use only 3000 psi 20 7 MPa 207 bar Maximum Working Pressure Important Safety Instructions Read all warnings and instructions in this manual and in the gasoline engine manual Save these instructions Related Manuals 3A2821 312830 312015 ti5944a Pro 270GS Model 262866 ...

Страница 2: ...not plug or unplug power cords or turn power or light switches on or off when flammable fumes are present Ground all equipment in the work area See Grounding instructions Use only grounded hoses Hold gun firmly to side of grounded pail when triggering into pail Do not use pail liners unless they are antistatic or conductive Stop operation immediately if static sparking occurs or you feel a shock D...

Страница 3: ... work area Comply with all applicable safety regulations PRESSURIZED ALUMINUM PARTS HAZARD Use of fluids that are incompatible with aluminum in pressurized equipment can cause serious chemical reaction and equipment rupture Failure to follow this warning can result in death serious injury or property damage Do not use 1 1 1 trichloroethane methylene chloride other halogenated hydrocarbon solvents ...

Страница 4: ...T Wear appropriate protective equipment when in the work area to help prevent serious injury including eye injury hearing loss inhalation of toxic fumes and burns This protective equipment includes but is not limited to Protective eyewear and hearing protection Respirators protective clothing and gloves as recommended by the fluid and solvent manufacturer WARNING ...

Страница 5: ...Component Identification 3A2818A 5 Component Identification OFF ON ON OFF A B C D E F G H J K L U V Q P M S R N T ti9667a ti16978a ...

Страница 6: ...to pump J Inlet screen Prevents debris from entering pump K Endurance Pump Pumps and pressurizes fluid and delivers it to paint hose L Prime tube with diffuser Drains fluid in system during priming and pressure relief M Paint hose Transports high pressure fluid from pump to spray gun N Airless Sprayer Dispenses Fluid P Tip guard Reduces risk of fluid injection injury Q Reversible spray tip Atomize...

Страница 7: ...rrupts grounding continuity Grounding a metal pail connect a ground wire to the pail by clamping one end to pail and other end to a true earth ground such as a water pipe To maintain grounding continuity when flushing or relieving pressure hold metal part of spray gun firmly to side of a grounded metal pail Then trigger gun This equipment must be grounded to reduce the risk of static sparking Stat...

Страница 8: ...hose is completely clogged or that pressure has not been fully relieved after follow ing these steps VERY SLOWLY loosen tip guard retain ing nut or hose end coupling to relieve pressure gradually then loosen completely Now clear tip or hose obstruction This equipment stays pressurized until pressure is manually relieved To help prevent serious injury from pressurized fluid such as skin injection s...

Страница 9: ...mbly from gun 4 Uncoil hose and connect one end to gun Use two wrenches to tighten securely 5 Connect other end of hose to sprayer NOTE If hose is already connected make sure connec tions are tight 6 Check inlet strainer for clogs and debris 7 Fill throat packing nut with TSL to prevent premature packing wear Do this each time you spray ti5971a ti5789a ti9714a ti9681a ti5946a Approximate Fill Leve...

Страница 10: ... should be clear and solvent free before you begin spraying the water based material To spray oil based materials after spraying water based materials flush the system thoroughly with mineral spirits or a compatible oil based flush ing solvent first The solvent flowing out of the prime tube should not contain any water When flushing with solvents ground pail and gun Read Grounding Requirements pag...

Страница 11: ...rime valve down Turn pressure control clockwise to lowest pressure 3 Set pump switch OFF 4 Start engine a Move fuel valve to open b Move choke to closed c Set throttle to fast d Set engine switch to ON e Pull starter rope f After engine starts move choke to open g Set throttle to desired setting PAINT FLUSH ti5955a ti5789a ti5971a ti5248a ti5249a ti5250a ti5263a ti5264a ti5251a ...

Страница 12: ...ressure slowly until pump runs smoothly Inspect fittings for leaks Do not stop leaks with your hand or a rag If leaks occur turn sprayer OFF immedi ately Perform Pressure Relief page 8 Tighten leaky fit tings Repeat Startup steps 1 5 If no leaks continue triggering the gun until system is thoroughly flushed Proceed to step 6 9 Place siphon tube in paint pail 10 Trigger gun again into flushing flui...

Страница 13: ...ern tip is too worn NOTE If tails persist when spraying at the highest pres sure a smaller tip is needed or the material may need to be thinned Adjust Spray Pressure This sprayer is set up for most airless spraying applica tions NOTE Motor only runs when gun is triggered Sprayer is designed to stop pumping when gun trigger is released Turning knob to right clockwise increases pres sure at gun Turn...

Страница 14: ... Spray Tip Occasionally debris from material can accumulate and clog the spray tip Perform the following steps to unclog the tip 1 To unclog tip obstruction engage trigger lock 2 Reverse spray tip to UNCLOG position NOTE Trapped pressure in the gun and paint hose may make the spray tip very difficult to turn If so perform the Pressure Relief Procedure page 8 before rotating spray tip 3 Aim gun at ...

Страница 15: ...ed you may have to repeat steps 1 5 and rotate the tip from SPRAY to UNCLOG several times To help reduce tip clogs strain the paint to remove debris repeat step 1 to relieve pressure remove and clean gun filter 7 If obstruction is cleared engage trigger lock and rotate arrow shaped handle back to SPRAY position ti11309a ti9714a ti11308a ti11309a ti9049a ...

Страница 16: ... from gun and place in flushing fluid 3 Lift suction tube and prime tube from paint pail Let them drain into paint pail for a while 4 Separate prime tube smaller from suction tube larger 5 Place empty waste and water or solvent pails side by side 6 Place prime tube in waste pail 7 Submerge suction tube in water or flushing solvent 8 Turn pressure control knob to minimum setting Verify that prime v...

Страница 17: ...igger until you see paint diluted with flushing fluid starting to come out of gun 14 While continuing to trigger gun quickly move gun to redirect spray into waste pail Continue triggering gun into waste pail until flushing fluid dispensed from gun is relatively clear 15 Stop triggering gun Engage the trigger lock 16 Turn prime spray valve to Prime 17 Turn pump switch OFF 18 Clean gun filter and gu...

Страница 18: ...rush every time you flush the system Replace gun filter if damaged Remove tip and guard and clean with water or flush ing solvent A soft brush can be used to loosen and remove dried on material if needed Wipe paint off outside of gun using a soft cloth moistened with water or flushing solvent ti9668a d ti9671a ...

Страница 19: ...move dried on material if needed 7 Wipe paint off outside of gun using a soft cloth moistened with water or flushing solvent Long Term Storage more than 2 days NOTE Always circulate Pump Armor storage fluid through system after cleaning Water left in sprayer will corrode and damage pump Follow Shutdown and Cleaning page 16 1 Place suction tube in Pump Armor storage fluid bot tle and prime tube in ...

Страница 20: ...ve it connected to sprayer Wrap hose around hose wrap bracket 3 Secure a plastic bag around suction tube to catch any drips 4 Store sprayer indoors ti5971a ti2712a NOTICE Before storing sprayer make sure all water is drained out of sprayer and hoses Do not allow water to freeze in sprayer or hose Do not store sprayer under pressure Engine fuel may deteriorate during storage espe cially at elevated...

Страница 21: ...s Tips Always clean tips with compatible solvent and brush after spraying Tips may require replacement after 15 gallons 57 liters or they may last through 60 gallons 227 liters depending on abrasiveness of paint Do not spray with worn tip Pump Packings When pump packings wear paint will begin to leak down outside of pump Replace pump packings at first sign of leaking or additional damage could occ...

Страница 22: ... Turn pressure adjusting knob clock wise to increase pressure Fluid filter is dirty Clean filter Tip or tip filter is clogged Clean tip or tip filter Displacement pump piston rod is stuck due to dried paint Repair pump Manual 312015 Connecting rod is worn or damaged Take sprayer to a Graco authorized service center Drive housing is worn or damaged Take sprayer to a Graco authorized service center ...

Страница 23: ...enter Suction tube is leaking Tighten suction tube connection Inspect for cracks or vacuum leaks Pump does not prime with fluid Remove suction tube from paint Prime pump with water or sol vent based flushing fluid Fluids are viscous or sticky Thin paint per manufacturers guide lines Engine speed is too high Decrease throttle setting before prim ing Pump cycles but does not build up pressure Pump i...

Страница 24: ...se engine throttle setting Spray gun fluid filter is clogged Clean or replace spray gun fluid filter page 18 Pump fluid filter is clogged Clean or replace pump fluid filter Inlet screen is clogged Clean debris off inlet screen Pump valves are worn or debris is clogging valve Check for worn pump valves a Prime sprayer with paint b Trigger gun momentarily When trigger is released pump should cycle m...

Страница 25: ...excessive pressure variation Take sprayer to Graco authorized service center Cannot trigger spray gun Spray gun trigger lock is locked Rotate trigger safety lever to unlock trigger lock page 8 Paint is coming out of pressure control switch Pressure control switch is worn Take sprayer to Graco authorized service center Prime Spray valve actuates automatically relieving pressure through prime tube S...

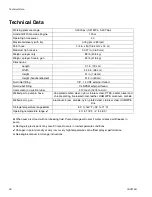
Страница 26: ...external thread Inlet screen on suction tube 12 mesh 1675 micron Wetted parts pump hose zinc plated carbon steel nylon stainless steel PTFE acetal nickel and chrome plating fluoroelastomer leather UHMWPE aluminum carbide Wetted parts gun aluminum brass carbide nylon plated steel stainless steel UHMWPE zinc Storage temperature range 30 to 160 F 35 to 71 C Operating temperature range 40 to 115 F 4 t...

Страница 27: ...Notes 3A2818A 27 Notes ...

Страница 28: ...If inspection of the equipment does not disclose any defect in material or workmanship repairs will be made at a reasonable charge which charges may include the costs of parts labor and transportation THIS WARRANTY IS EXCLUSIVE AND IS IN LIEU OF ANY OTHER WARRANTIES EXPRESS OR IMPLIED INCLUDING BUT NOT LIMITED TO WARRANTY OF MERCHANTABILITY OR WARRANTY OF FITNESS FOR A PARTICULAR PURPOSE Graco s s...

Отзывы: