background image

HOME FITNESS  |  Remise en forme à domicile

TREADMILL

TAPIS ROULANT

MAINTENANCE

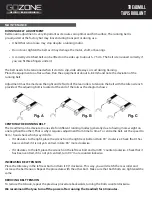
RUNNING BELT ADJUSTMENT

Belt tension adjustment is very important as it ensures an optimal and firm surface. The running belt is 

pre-adjusted at the factory but may loosen during transport or during use.

We recommend that you turn off the power after running the treadmill for 60 minutes.

The belt needs to be tensioned when it starts to slip, slide sideways, or curl during training. 

Place the equipment on a flat surface. Run the equipment at about 6–8 km/h and note the deviation of the 

running belt. 

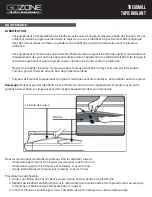
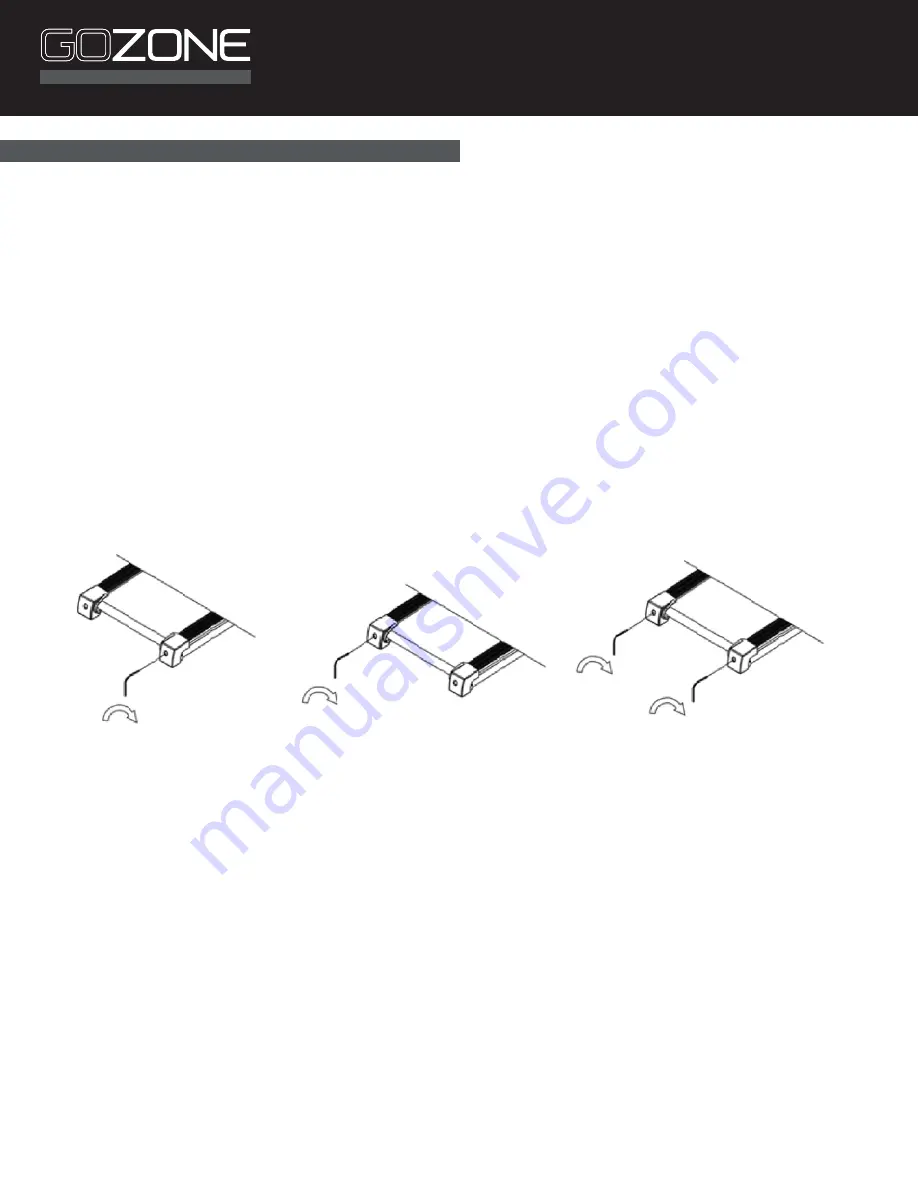
Adjustment must be made on the right and left side of the rear rollers to tension the belt with the Allen wrench 

provided. The adjusting bolt is located at the end of the rails as the diagram shows:

A belt that is too loose may stop despite a running motor. 

Do not over tighten the belt as it may damage the motor, shaft, or bearings. 

A correctly stretched belt can be lifted on the sides up to about 5–7.5 cm. The belt is tensioned correctly if 

you can fit three fingers under it.  

CENTRING THE RUNNING BELT

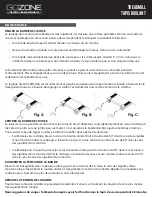
The treadmill can be deviate to one side for different running modes (generally due to having more weight on 

one leg than the other). That is why it requires adjustment from time to time. To centre the belt, set the speed to 

3km / h and check which way it drifts:

INCREASING BELT TENSION

Place the Allen key in the left rear bolt and turn it 90° clockwise. This way, you will stretch the rear roller and 

increase the belt tension. Repeat the procedure with the other bolt . Make sure that both bolts are tightened the 

same.

REDUCING BELT TENSION

To reduce the tension, repeat the previous procedure backwards, turning the bolts counterclockwise.

Fig. A

Fig. B

Fig. C

Fig. B

Fig. C

Fig. C

If it deviates to the right, place the wrench on the right rear bolt and turn 90 ° clockwise. Check that it has 

been centred; if it is not yet centred, rotate 90 ° more clockwise.

If it deviates to the left, place the wrench on the left rear bolt and turn 90 ° counterclockwise. Check that it 

has been centred; if it is not yet centred, turn 90 ° more counterclockwise.

Содержание GZE-2205

Страница 1: ...all the instructions in the manual carefully before assembling or using this product and keep instructions for future reference Veuillez lire attentivement toutes les instructions du manuel avant d as...

Страница 2: ...conditions heart disease or any electronic device implanted in the body should consult their doctor before using the equipment This equipment should not be used by pregnant women Never allow more than...

Страница 3: ...e the equipment running when is not being used The pulse sensor is not a medical device Various factors including your movement may affect the accuracy of heart rate readings and it is intended only t...

Страница 4: ...6 2 Pin 27 2 Rubber Pad 28 2 Tube Cap 29 4 DC Motor 30 2 Switch NO QTY DESCRIPTION 34 2 Right HP Wire 35 2 Computer Middle Wire 36 2 Safety Key 37 3 Bolt M8 X 50mm 38 2 Bolt M8 X 12mm 39 4 Bolt M8 X 1...

Страница 5: ...g Maximum continuous operation time 60 minutes per day HOME FITNESS Remise en forme domicile TREADMILL TAPIS ROULANT PARAMETERS ASSEMBLY INSTRUCTIONS PART No QTY DESCRIPTION 1 1 Main Assembly 36 1 Saf...

Страница 6: ...the main frame using a washer 56 and a hexagon bolt 42 as shown Use the Allen key 82 A B STEP 2 Connect the computer wire 60 with the middle computer wire 35 and make sure that the wires stay into th...

Страница 7: ...A with your hand and take it to the handlebar till you hear a light sound This means that the cylinder has hooked and the folding system has been locked Now you can carry the equipment Unfolding Hold...

Страница 8: ...he resistance has increased and the treadmill has started to rub against the belt table Do not over lubricate the board If this occurs the excess should be cleaned with a clean towel Always keep silic...

Страница 9: ...the sides up to about 5 7 5 cm The belt is tensioned correctly if you can fit three fingers under it CENTRING THE RUNNING BELT The treadmill can be deviate to one side for different running modes gene...

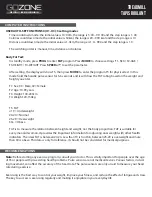
Страница 10: ...programs from P1 P12 manual mode is the default mode the default speed is 1 0 km h the max operating speed is 12km h MODE in standby mode press this key and you can set H 1 to H 3 different countdown...

Страница 11: ...F2 Age 10 99 years F3 Height 100 200cm F4 Weight 20 150kg F5 FAT 19 Underweight 20 24 Normal 25 29 Overweight 30 Obese FAT is to measure the relation between height and weight not the body proportion...

Страница 12: ...ple the time setting range is 5 00 99 00 to press when the time displayed is 99 00 5 00 will be displayed and so on and can be used for increase and decrease Countdown time countdown calories and coun...

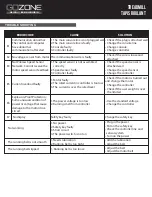
Страница 13: ...Change the controller Check if the motor is burned out and change the motor Change the controller Check if the user weight is over the limited Check if the wire is loose and attached 1 The main consol...

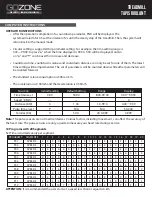
Страница 14: ...f the equipment is not used frequently perform maintenance every 30 days Warning The friction between the belt deck and the belt can play a very important role in the operation and life of the machine...

Страница 15: ...meurs malignes d affections pr existantes celles qui prennent un traitement qui souffrent d une maladie cardiaque ou qui ont un appareil lectronique implant dans le corps doivent consulter leur m deci...

Страница 16: ...acteurs y compris les mouvements de l utilisateur peuvent affecter la pr cision des lectures de la fr quence cardiaque Ces derni res sont uniquement destin es d terminer les tendances de l utilisateur...

Страница 17: ...elle 26 2 Goupille 27 2 Coussin en Caoutchouc 28 2 Bouchon de Tube 29 4 Moteur CC 30 2 Interrupteur NO QTY DESCRIPTION 34 2 C ble HP Droit 35 2 C ble du Milieu pour l Ordinateur 36 2 Cl de S curit 37...

Страница 18: ...ctionnement maximum en continu 60 minutes par jour HOME FITNESS Remise en forme domicile TREADMILL TAPIS ROULANT PARAM TRES INSTRUCTIONS POUR L ASSEMBLAGE No QT DESCRIPTION 1 1 Structure Principale 36...

Страница 19: ...e au cadre principal avec une rondelle 56 et un boulon hexagonal 42 comme illustr Utiliser la cl hexagonale 82 A B TAPE 2 Brancher le c ble pour l ordinateur 60 au c ble du milieu pour l ordinateur 35...

Страница 20: ...la bande A et l amener contre le guidon jusqu entendre un l ger son Cela signifie que le cylindre s est enclench et que le syst me de pliage a t verrouill L quipement peut d sormais tre transport D pl...

Страница 21: ...sistance augmente et que le tapis de course commence frotter contre la plateforme Ne pas trop lubrifier la bande Si cela se produit l exc dent doit tre nettoy avec une serviette propre Toujours garde...

Страница 22: ...rectement tendue s il est possible de passer trois doigts en dessous CENTRER LA BANDE DE COURSE Le tapis de course peut d vier d un c t selon la fa on dont l utilisateur court g n ralement en raison d...

Страница 23: ...manuel les programmes pr r gl s de P1 P12 Le mode manuel est le mode par d faut la vitesse par d faut est de 1 0 km h la vitesse de fonctionnement maximale est de 12 km h MODE en mode d attente appuye...

Страница 24: ...ion entre la taille et le poids et non les proportions du corps L indice de masse corporelle est pertinent aussi bien pour les hommes que pour les femmes Il donne des bases importantes pour ajuster so...

Страница 25: ...r glage de la dur e est de 5 00 99 00 Quand est appuy alors que la dur e affich e est 99 00 la dur e passe 5 00 et ainsi de suite et peuvent tre utilis s pour augmenter et diminuer la dur e Seul un s...

Страница 26: ...V rifier si le poids de l utilisateur d passe la limite V rifier que le c ble est desserr ou non et bien le fixer 1 Le c ble principal de la console n est pas bien branch 2 Le c ble principal de la co...

Страница 27: ...et la bande peut jouer un r le tr s important dans le fonctionnement et la dur e de vie de la machine et c est pourquoi nous recommandons de lubrifier constamment ce point de frottement pour prolonge...

Отзывы: