


OM-06099
S SERIES PUMPS
PAGE E - 9
MAINTENANCE AND REPAIR
wrap a small rag around the shaft to prevent for
eign material from entering the motor cavity.
Carefully inspect any O‐rings or gaskets before re
moval and cleaning to determine if a proper seal
and compression existed prior to disassembly. If
sealing was faulty or questionable, the cause must
be determined and corrected before reassembly.
Replace any parts as required.
Thoroughly clean all reuseable parts with a soft
cloth soaked in cleaning solvent. Remove all O‐
rings and gaskets, and clean the sealing surfaces
of dirt or gasket material. Be careful not to scratch
gasket surfaces.
Most cleaning solvents are toxic and
flammable. Use them only in a well ven
tilated area free from excessive heat,
sparks, and flame. Read and follow all
precautions printed on solvent contain
ers.
Inspect the rotor shaft (39) for damaged threads,
scoring, or nicks. Remove nicks and burrs with a
fine file or hand honing stone to restore original
contours. If the shaft is bent or severely damaged,
the rotor and shaft must be replaced as an assem
bly (see
MOTOR DISASSEMBLY
).
Neither of the shaft seal assemblies (3 or 4) should
be reused because wear patterns on the finished
faces cannot be realigned during reassembly. This
could result in premature failure. If necessary to re
use an old seal in an
emergency
,
carefully
wash
all metallic parts in fresh cleaning solvent and allow
to dry thoroughly.
Handle the seal parts with extreme care to prevent
damage. Be careful not to contaminate the preci
sion finished faces; even fingerprints on the faces
can shorten seal life. If necessary, clean the faces
with a non‐oil based solvent and a clean, lint‐free
tissue. Wipe
lightly
in a circular pattern to avoid
scratching the faces.
Inspect the seal components for wear, scoring,
grooves, and other damage that might cause leak
age. If any components are worn, replace the com
plete seal;
never mix old and new seal parts.
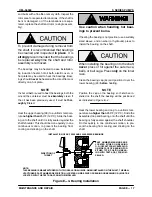
Install the shaft seals as illustrated in Figure E-3.