


Using the Clock and Timer
14
06
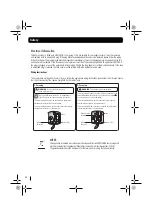
Setting the clock
DON’T FORGET!
This unit has its own digital
clock when in standby mode. The clock
displayed will be synchronized by the DAB
signal when the unit is in DAB mode.
To adjust the clock and set the timer, follow the
instructions below:(at STANDBY mode)
Press the
MEMORY/CLOCK
button for a
few seconds and select either 24 hour or
12 hour mode using the
>> / <<
buttons.
Press the
MEMORY/CLOCK
button to
confirm.
The hour digits will begin to flash. Adjust
the hours by pressing the
>> / <<
buttons.
Press the
MEMORY/CLOCK
button again,
and the minute digits will begin to flash.
Adjust the minutes by pressing the
>> / <<
buttons. Press the
MEMORY/CLOCK
buttom to confirm
DON’T FORGET!
The clock setting will be lost
if the power is disconnected.
1
2
3
4
5
6
Setting the sleep timer
DON’T FORGET!
You need to use the
remote control to use this function.
The Sleep Timer is a countdown timer for
switching the system to standby mode after a
specified time. It enables you to listen to the
radio or CD. The Sleep Timer can be set from 90
to 10 minutes.
Switch on the system by pressing the
STANDBY
button.
Select the desired source by pressing the
FUNCTION
button.
Press the
SLEEP
button to set the sleep
time. -
SLEEP
and
90
are shown in the
display. The system will now play for 90
minutes.
To decrease the sleep time , continually
press the
SLEEP
button until the
desired sleep time is shown.
To cancel the sleep timer, press the
SLEEP
button until the display returns to the previous
mode.
To switch off the system before the sleep
time has elapsed, press the
STANDBY
button.
1
2
3
4
5
6
Note: Pressing the
SLEEP
button at any time will show
the time remaining before the unit will switch off.
The clock of the unit is synchronized
when the unit is ON and at DAB mode.
Содержание MICRO1112DAB
Страница 21: ......


