background image

8

OPERATING THE TELEVISION  RECEIVER

Connect your TV aerial to the aerial input socket located on the back of the TV.
Push the Main Power Switch, Power Indicator will be illuminated.  After a few seconds the TV
screen will light up. Should white dots appear on the screen the TV will require tuning into the
available TV stations in your area.

Pre-setting the TV stations into the Memory
(Note: Preset tuning can only be carried out in TV Mode)

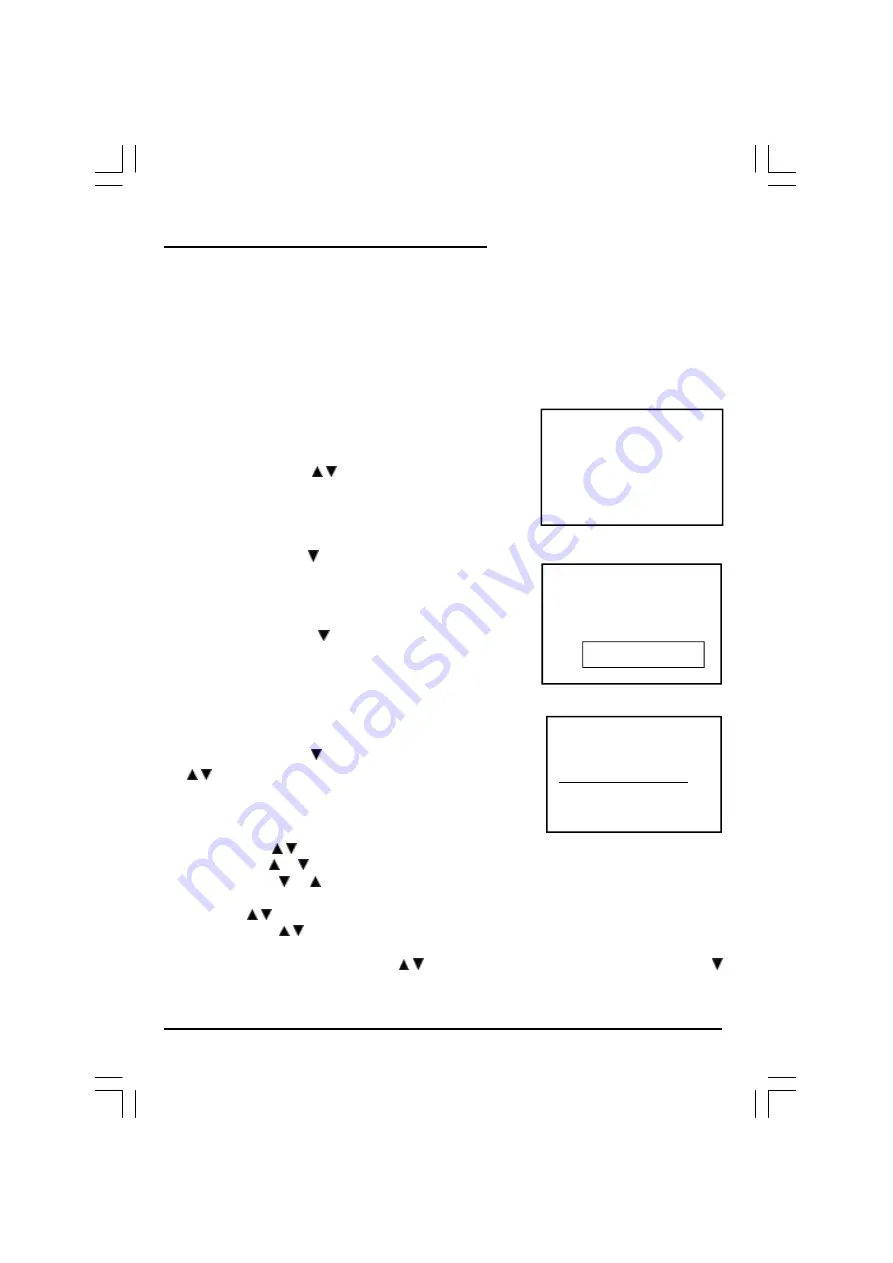
1.   Press MENU button to main MENU.

2.   Press the VOL button /    to select TUNE mode
      as shown in figure 1.

AUTO SEARCH

1.   Press the CH button    To select the AUTO SEARCH (auto
      memory store) mode as shown in figure 2.

2.   Press the VOL button    to start the automatic scanning
      processes, the on air stations will automatically store into
      memory as shown in figure 3.

 When scanning is completed. the set will tune to the first

      and show program number 1 on the screen.

 If want to stop auto search function, press menu button.

Press the CH button   to select the SKIP and press VOL

       /  to select on or off,This function use for delete some
      unwant channels.

 SEARCH  (manual)

1. Press MENU button.
2.   Press the VOL /  to select TUNE
3. Press the CH   or    button and select SEARCH.
4. Press the VOL   or    button to start searching up or down the frequency.
5. When a TV station is located, the station will show.
6. Press CH  /  button until Program shows.
7. Press the VOL  /   button and select which position.

To store the TV station i.e BBC1=1, BBC2=2 and so on.

8. To store the station, press the CH  /  button until Store shows.  Now press the VOL  

button to store the station.

Repeat 2 to 7 above and store the remaining TV channels in your area.

VHF - L
 | | |

FIG .3

STOP MENU

5

6

FIG .2

 AUTO SEARCH

PICTURE TIMER SETUP  TUNE

FIG .1

SMD-2716(Ph+Win-CT908)11761-00.p65

2004/4/15, 下午 04:54

8

Содержание GTV14T3DVD

Страница 1: ...1 OPERATION MANUAL HELPLINE PHONE NUMBER 08708 730080 GTV14T3DVD 14 34cm COLOUR TELEVISION WITH DVD PLAYER SMD 2716 Ph Win CT908 11761 00 p65 2004 4 15 下午 04 54 1 ...

Страница 2: ...REFITTED MAINS PLUGS 5 LOCATION OF CONTROLS 6 LOCATION OF REMOTE CONTROL UNIT 7 OPERATING THE TELEVISION RECEIVER 8 OPERATING WITH REMOTE CONTROL 11 DVD PLAYER OPERATION 14 SPECIFICATION 22 SMD 2716 Ph Win CT908 11761 00 p65 2004 4 15 下午 04 54 2 ...

Страница 3: ...s switch This circuit removes any residual magnetism in the metal parts of the picture tube and therefore ensures that each time the receiver is switched lifelike If the set is moved or faced in a different direction the mains switch must be switched off at least 10 minutes in order that the automatic degaussing circuit operates properly CAUTION TO REDUCE THE RISK OF ELECTRIC SHOCK DO NOT REMOVE C...

Страница 4: ...97 Dolby Laboratories lnc All rights reserved This product incorporates copyright protection technology that is protected by U S patents and other intellectual property rights Use of this copyright protection technology must be authorized by Macrovision and is intended for home and other limited viewing uses only unless otherwise authorized by Macrovision Reverse engineering or disassembly is proh...

Страница 5: ... around where children might see it WARNING To prevent fire or shock hazard do not expose this unit to rain or moisture CAUTION DANGEROUS VOLTAGES EXIST INSIDE THIS UNIT DO NOT REMOVE COVER OR BACK NO USER SERVICEABLE PARTS INSIDE REFER SERVICING TO QUALIFIED SERVICE PERSONNEL DISCONNECT FROM MAINS SUPPLY WHEN NOT IN USE This wires in this mains lead are coloured in accor dance with the following ...

Страница 6: ...er 8 Volume Buttons 9 MENU Button 10 Earphone Jack 11 Front Video Input 11 Front Audio L Input 13 Front Audio R Input 14 75 ohm Antenna 15 Scart connector 16 Audio digital Out Socket For DVD only 17 Audio out R for DVD 18 Audio out L for DVD 19 Video out for DVD 20 S Video out for DVD SMD 2716 Ph Win CT908 11761 00 p65 2004 4 15 下午 04 54 6 ...

Страница 7: ...H Button 20 ANGLE Button 21 Teletext Enlarge Button 22 Teletext Conceal Button 23 TV System Teletext Cancel Button 24 Teletext Time Display Button 25 DVD Button 26 OPEN CLOSE Button 27 PP TV Personal Preference Button 28 TV AV Button 29 10 Button 30 MENU DVD Button 31 MENU TV Button 32 VOLUME Buttons 33 Direction Right Button 34 DVD ENTER Button 35 NEXT Button 36 SCAN Forward Button 37 SCAN Backwa...

Страница 8: ...wn in figure 3 When scanning is completed the set will tune to the first and show program number 1 on the screen If want to stop auto search function press menu button Press the CH button to select the SKIP and press VOL to select on or off This function use for delete some unwant channels SEARCH manual 1 Press MENU button 2 Press the VOL to select TUNE 3 Press the CH or button and select SEARCH 4...

Страница 9: ...ime _ _ _ _ Press the CH button to select the minute _ _ _ _ Press the VOL to adjust the minute time _ _ _ _ 5 Press the CH and VOL button to set the ON TIME _ _ _ _ ON PROG OFF TIME _ _ _ _ To make the timer function operate The TV must set to standby mode After the process is completed SETUP 1 Press the MENU button to main MENU 2 Press the VOL button to select SETUP mode LANGUAGE 1 Press the CH ...

Страница 10: ...om lower Number to higher Number TV AV DVD Mode Button If video audio input socket are in use press AV TV Mode button AV will display on the top right corner of the screen Press TV AV DVD button to turn on DVD When DVD mode is selected please wait the screen will be dark as it will take a few seconds to show the DVD on the top right corner of the screen TV AV DVD 2 Press VOL to ADJUST sound level ...

Страница 11: ... for TV and DVD otherwise some keys on the remote hand set will not function OPERATING WITH THE REMOTE CONTROL TO SELECT A TV STATION USING THE PROGRAM NUMBERS Program Number Up and Down Press the CH or button to select a higher or lower program number 0 9 Digital Button To select TV stations using program numbers 0 9 selecting program number will be shown in the right corner of the top of screen ...

Страница 12: ...arches until the selected page number is located so that the required information is displayed on the screen 4 Program CH Press the Program button to set up to the next higher teletext page 5 Program CH Press the Program button to set up the next lower teletext page 6 Press the button to return the teletext page to page number 100 To Exit Teletext Press the TV Mode button the previously selected T...

Страница 13: ...ay the Time In TV Programme Mode Press button the current time is displayed in the top right corner of the screen e g 21 00 Press the button again to remove the time display Note The time can only be displayed when Teletext is available on the selected TV station To Select a Subcode Page Subcode pages are subsections of long Teletext pages that can only be displayed on the screen one section at a ...

Страница 14: ... Menu Title Page on the screen If it is a CD it will play the first track directly 4 Press the STOP Button if you want to stop the Disc playback You can resume playback by pressing the PLAY button and it will start at the location where you have pressed stopped Resume Play 5 Press the STOP Button twice to have the Disc really stopped PAUSE STEP This function is applicable for DVD and CD audio For ...

Страница 15: ...n then press the direction button to select the desired MENU language English Spanish French Portuguese German Italian AUDIO 1 Press direction button to highlight the AUDIO and press the ENTER button then press the direction button to select the desired AUDIO language English Spanish French Portuguese German Italian SUBTITLE 1 Press direction button to highlight the SUBTITLE and press the ENTER bu...

Страница 16: ...NESS NORMAL BRIGHT SOFT CONTRAST 3 2 1 0 1 2 3 AUDIO SETUP MENU In stop mode press SETUP button and highlightAUDIO setup then press ENTER button to confirm TO select the desired item by use the direction button DIGITALOUT SPDIF PCM SPDIF RAW CUSTOM SETUP In stop mode press SETUP button and highlight CUSTOM setup then press ENTER button to confirm TO select the desired item by use the direction but...

Страница 17: ...s setup button to directly withdraw form the operation PASSWORD OLD NEW VERIFY PASSWORD Move the cursor to the PASSWORD item and press ENTER button to confirm and then input the secret code 9922 After confirmation you are required to input new secret code and then press ENTER button to confirm And retreat to the Custom setup interface Warning Please remember the new secret code otherwise you will ...

Страница 18: ...at high speed Note Press PLAY Button at any stage will resume to normal speed PREV NEXT During playback press one of the PREV NEXT buttons PREVIOUS button and NEXT button When the PREV button is pressed once playback returns to the beginning of the PREVI OUS playing chapter or track When the NEXT button is pressed once playback starts at the beginning of next chapter or track Slow The Slow Forward...

Страница 19: ...anguage shown on the screen Note Number of subtitle available depends on the DVD disc Angle Some discs may have multiple viewing angles during production Use the ANGLE button to select the viewing angle shown on the screen Note The number of Angles of View depends on the Disc Search The user can access a specific location or a specific track by keying in the target time or the track number 1 Press...

Страница 20: ...of the 2 levels of zooming 2x and 4x NOTE Use the direction buttons to navigate within the image Program Mode This function is allow programming of track chapter title playback sequence according to your preference 1 Press the PROGRAM button The Program Se quence table will be shown on the screen 2 Enter the desired track numbers according to your preference using the Number keys 0 9 3 When the pr...

Страница 21: ...Digest Mode in which 15 pictures will be shown on the screen each time Press the PAUSE Button will freeze the screen so that the current picture can be held for a long time To resume the slide show mode press PLAY Button Press the NEXT Button on the remote controller to skip the next picture Press the PREVIOUS Button on the remote controller to repeat the current picture SMD 2716 Ph Win CT908 1176...

Страница 22: ...m NTSC Headphone Stereo in DVD mode Mono in TV mode GENERALSECTION AC Power Input 230V 50 Hz AC Power Consumption 74 W Speaker 3 x1 5 8ohm x 2 Audio Output 1 8 W 1 8 W Dimensions W390 x H420 x D411 mm Net Weight 13 5 Kg Region coding All DVD discs are coded by the sales territory Please note the player is factory set to region 2 coding UK and Europe and cannot be changed Therefore discs purchased ...

Отзывы: