background image

- 53 -

Video Out

Sets the video output system according to the country in which your camera used.
Press   or   button to choose one of the following options:
[NTSC]: NTSC system
[PAL]: PAL system

Press ENTER button to confirm the setting.

Quality

Set the size (number of pixels) and quality (compression ratio) of the image to
be photographed.
Change the setting according to how the image is to be used and the remaining
amount of space in the SD card.

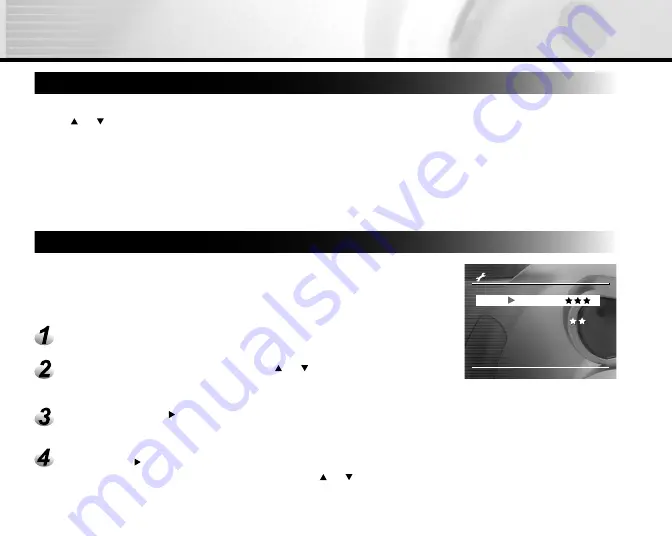
Press the Menu button.

To select Quality Menu, keep pressing   or   button until the
QUALITY is highlighted.

After pressing the    button while the QUALITY is highlighted, the

LCD shows the QUALITY menu.

By pressing   button, user can select size.

QUALITY

QUALITY

SIZE

MOVIE

OK

CANCEL

FULL

QUALITY

SIZE

STILL

MOVIE

OK

CANCEL

FULL

FULL

QUALITY

The size item is reversely display in white. Press   or   to select
the size setting user desired to set, and press ENTER button.

Содержание G-Shot 3021Z

Страница 1: ...ENGLISH ...

Страница 2: ...l not be honored if the camera has been mishandled or tampered with or altered by anyone other than the manufacturer Other than for the warranty herein we are not responsible for loss damage or inconvenience of any kind A defective camera being returned under warranty must be accompanied by a brief description of the difficulties encountered and also by a proof of purchase with the date of purchas...

Страница 3: ...o radio communications However there is no guarantee that interference will not occur in a particular installation If this equipment does cause harmful interference to radio or television reception detectable by turning the equipment in question off and on the user is encouraged to try to correct the interference by one or more of the following measures Reorient or relocate the receiving antenna I...

Страница 4: ...erference to the nearby radio and television reception Use only shielded I O cable incorporated with a ferrite core to connect this equipment to host computer and TV set Shielded AC power cable and shielded I O cables are required in order to meet the FCC emission limits It is essential that only the supplied power cord and I O cable s can be used ...

Страница 5: ...ock Do not use the camera if any foreign objects have entered the camera Turn the camera off and then disconnect the power source batteries or AC power adapter if you are using the AC power adapter unplug the adapter from the AC power outlet after you have disconnected the camera Then contact your dealer or your local authorized service facility Do not continue to use the camera as this may cause ...

Страница 6: ...ng This may cause an electrical shock Internal inspection maintenance and repairs should only be carried out by your dealer or local authorized service facility Avoid using this camera in the bathrooms Exposure to excessive moisture may cause a fire or an electrical shock Do not touch the power plug during a thunderstorm if you are using the AC power adapter This may cause an electrical shock Neve...

Страница 7: ...using the AC power adapter unplug the adapter from the AC power outlet after you have switched off the camera Ensure that any connector cords or cables to other devices are disconnected before moving the camera Failure to do so may damage the cords or cables and cause a fire or an electrical shock When handling the camera always unplug it from the power source batteries or AC power adapter for saf...

Страница 8: ...eaking and causing a fire injury or soiling of the battery compartment Remove the batteries if the camera will not be used for an extended period of time The batteries may leak and cause a fire injury or soiling of the battery compartment If the batteries leak clean and wipe the battery compartment carefully and install new batteries Wash your hands carefully if you touch the battery fluid ...

Страница 9: ...k Recording Selecting the Subject Modes Scene Mode Menu Focus Mode Setting Selecting the Flash Mode Self timer Photography Manual Recording Manual Setting Exposure Control Setting White Balance Setting Metering System Setting Single Continuous and AEB Mode Setting Focus Mode Setting Exposure Control Program Mode Aperture Priority Mode Shutter Speed Priority Mode Full Manual Mode Exposure Compensat...

Страница 10: ...uality Frame Number System Info Erase One Image Erase Images on a Folder All Folders Format SD Card LCD button In Playback Mode In Photography Mode Taking and Viewing Photo on TV Transferring Pictures to the Computer System Requirements Installing the Software Driver Image Application Connecting the Camera to Your Computer Downloading Pictures Setup Mode Playback Mode Auto Power Off Sound Time Dat...

Страница 11: ... at the back of the camera makes it easy to frame your subject when taking pictures It also displays a preview of the pictures you have taken Digital Zoom Use the digital zoom mode and get a larger closer view of the subject Macro Mode Take pictures of people portrait or objects at close range using Macro mode Flexible Flash Settings Change the flash setting according to your lighting environment ...

Страница 12: ...g the Camera This section introduces you to the digital camera Follow the instructions in this section to install batteries use the power adapter and install a memory card Getting to Know the Camera Names of Parts ...

Страница 13: ... 13 ...

Страница 14: ... 14 Dial Knob ...

Страница 15: ...the lens cover Insert the other end of the strap through the loop and pull it until the strap is securely attached to the camera Push inward until the loop comes out of the other side of the strap holder Insert the small loop at the end of the strap into one side of the camera s strap holder Preparing Power Supply Always turn off camera s power before changing power supply Loading Batteries To loa...

Страница 16: ... in the battery compartment Close the battery door and move the battery cover lock in the direction of the Lock arrow Unlock the battery cover lock Make sure they are loaded in their polarity as shown inside the battery compartment Make sure that the battery cover is firmly closed ...

Страница 17: ...atteries can be used Rechargeable batteries cannot be charged in the camera Using the Power Adapter Simply connect the power adapter into the adapter port on the camera and then plug the power adapter to a wall socket Notes Always be sure to use the AC adapter which comes with the camera or optional from the manufacturer Any other adapter may cause damage to the camera which is not covered under t...

Страница 18: ... the camera before you start taking pictures To insert a SD card into the camera Firmly insert the SD card as far as it can go with the SD card electrodes metal contacts facing the front of the camera Close the battery door and move the battery cover lock in the direction of the Lock arrow Slide the POWER switch to OFF position to turn the power off Unlock the battery cover lock Pull open the batt...

Страница 19: ...will diminish with extended use It may be necessary to purchase a new card periodically To remove a SD card from the camera Slide the POWER switch to OFF position to turn the power off Unlock the battery cover lock Push the SD card in as far as it can go and pull it out with your fingers Close the battery door and move the battery cover lock in the direction of the Lock arrow Pull open the battery...

Страница 20: ...roper use of the SD card may cause data loss or damage It is recommended to make a back up copy of any important data in another storage media such as hard disk CD ROM etc Keep away foreign objects from the terminal section Keep away from static electricity and electromagnetic fields Do not bend drop or apply excessive force Keep away from heat moisture and direct sunlight while using and for stor...

Страница 21: ... the desired mode In the photography modes or the lens extends from the camera body When the camera is turned ON the Auto Power OFF function starts to work Slide the POWER switch to OFF position to turn off the power The power is turned off and the lens returns to its original position in the body Close the lens by sliding the lens cover switch to close position Note If LENS COVER message popped o...

Страница 22: ...tions by pressing the shutter button halfway Repeated zoom operations Extensive of the LCD monitor in the Playback mode Communication with a PC Battery Life Indicator Full Battery Power Medium Battery Power Low Battery Power No Battery Power Note It is recommended that you do not use the Flash or Auto Flash features while battery power is low Turning the LCD Monitor On and Off To turn the LCD moni...

Страница 23: ...ber use or button to select EXECUTE and press ENTER button SD Card Full If you have taken many pictures and your SD card is full the LCD display will show a CARD FULL message If this happens you must erase pictures from the SD card or replace it with a brand new SD card Before erasing pictures make sure you transfer them first from the SD card to your computer WARNING If the SD card contains pictu...

Страница 24: ...to ON position to turn on the power Set the dial knob to Look at the image on the LCD monitor or viewfinder to compose the picture Press the shutter button down half way 1 and press it down fully 2 Slide the lens cover switch to open direction beforehand Press the zoom key to set the subject size and image composition Pressing the shutter button down half way adjusts the exposure and pressing the ...

Страница 25: ...ded subject and the capacity of the memory card or if there are files other than images or when recording is made while switching the picture quality resolution Zoom Control This camera features two types of zooming optical zooming and digital zooming Optical Zoom Press the zoom key towards W the subject will move the lens towards to the wide angle position meaning zoom away from your subject Pres...

Страница 26: ...recording aim at the subject using the entire viewfinder area To focus position the subject within the auto focus frame located at the center of the viewfinder If the subject to record is not in the center of the viewfinder position the subject so that it falls within the focus frame and lightly press the shutter button halfway While continuing to hold the shutter button lightly halfway re positio...

Страница 27: ...or button Automatically adjusts the focus and exposure mode The camera automatically adjusts the focus and exposure settings to take photographs Portrait mode Optimized to reproduce soft skin tones and a slight defocusing of the background Most portraits look best a telephoto setting the longer focal length does not exaggerate facial features and the shallower depth of field softens the background...

Страница 28: ...ously at 0 13 second intervals 7 5 frames second The 16 photographed images are saved as one image FULL size 2048 x 1536 pixels This mode is effective for continuously photographing moving subjects Notes Though zoom playback is not possible playback of multi image pictures is possible Digital zoom photography is not possible Photographs cannot be taken at HALF size or SMALL size When HALF size or ...

Страница 29: ... Off mode Used when recording in a place where flash photography is prohibited or when utilizing the night view or indoor lightning for recording The flash will always be off during recording Under low light conditions the shutter speed will become slow Since this may result in the image becoming blurred use of a tripod is recommended A F 1m 3m The camera will focus on subjects in a distance of in...

Страница 30: ...ng the recording can be included in the image The self timer button can select the capturing mode between Normal default and Self timer 2 or 10 seconds The photograph is then taken after the preset time 2 or 10 seconds When photographs are taken using the LCD monitor the count down is displayed To cancel photography midway press button Notes Burst photography is not possible In movie mode press th...

Страница 31: ... B White balance A E Metering system S C Single continuous or AEB mode Focus Focus mode Exposure Control EXP Setting By pressing button when EXP icon is highlighted Exposure Control setting options as follows PRG program mode Av aperture priority mode Tv shutter speed priority mode M full manual mode White Balance W B Setting The camera determines the white balance by averaging the various kinds o...

Страница 32: ...tography Mode S C Setting 1 shot mode can be set default Burst mode can be set In this mode photographs are taken continuously at a maximum speed of 0 8 second intervals The maximum number of photographs that can be taken continuously is 3 photographs Images are not recorded directly to storage media but are stored temporarily within the buffer memory After photography is finished check the images...

Страница 33: ... By pressing or button a user can set the aperture value Also the aperture value and shutter corresponding to that value displayed on the LCD monitor The setting range is as follows F8 F6 8 F5 6 F4 8 F4 0 F3 4 F2 9 Note The larger the F value the smaller the aperture size become and vice versa Exposure compensation using or button to change exposure value A F 1m 3m The camera will focus on subject...

Страница 34: ...utter speed are displayed on the LCD monitor If the appropriate combination cannot be set even if the aperture is adjusted to its limit the aperture value is displayed in red Full Manual Mode In this mode can set the aperture value and shutter speed values separately The aperture value is as follows By pressing or button a user can set the aperture value The setting range is as follows F8 F6 8 F5 ...

Страница 35: ...ally lighten or darken the entire image Use this setting when the optimum brightness exposure cannot be obtained for example when the brightness between the subject and the background is not balanced or when the subject to photograph occupies only an extremely small part of the screen By pressing button the EV value can be reduced to 2 0EV By pressing button the EV value can be increased to 2 0EV ...

Страница 36: ...s ENTER button Press or button to select S C Press button to display option menu press or button to select AEB and press ENTER button Press ENTER button Compose the picture press the shutter button fully The manual setting values are displayed on the left of the LCD monitor screen The manual setting items are displayed The camera is ready to take photographs The camera will automatically take a pi...

Страница 37: ...on the left of the LCD monitor screen Press ENTER button Press or button to select S C Press button to display option menu press or button to select and press ENTER button Press ENTER button The camera is ready for burst photography Compose the picture press the shutter button down fully The manual setting items are displayed If you release the shutter button before the camera captures three image...

Страница 38: ...el selection of the image press ENTER button again Use button to select and press ENTER button Note Self timer photography and flash photography are not possible This setting is for saving all images Press ENTER button All images are selected and all images with turns into a red This item cannot be selected if there is not enough space on the SD card This setting is for erasing all images Press EN...

Страница 39: ...ss the shutter button down fully again Note Flash photography is not possible The image size displayed on the LCD monitor becomes FULL 320 x 240 or HALF 160 x 120 The movie made in FULL size is displayed on the entire LCD monitor and that made in HALF size is displayed in the center of the screen The maximum photography time seconds appears on the LCD monitor If you do not do this photography is a...

Страница 40: ... pressing ENTER button this setting is saved Preview Set to display a photographed image on LCD monitor immediately after you have taken the shot OFF Do not display preview ON Display preview A photographed image is displayed on the LCD monitor for two seconds By lightly pressing shutter button preview is canceled The three images that you took are displayed for about two seconds each in the AEB p...

Страница 41: ...ensitive photography equivalent to color ISO400 In the mode During 2X the ISO will be automatically set between ISO100 and ISO200 During 4X ISO will be automatically set between ISO100 and ISO400 In the mode During 2X the ISO will be automatically set to ISO200 During 4X ISO will be automatically set to ISO400 In the mode ISO will be automatically set between ISO100 and ISO400 regardless of its se...

Страница 42: ... the image and the LCD control mode are displayed Press button to darken the LCD monitor or button to lighten the LCD monitor The LCD monitor can be adjusted within the range 5 to 5 The default value is 0 Quality Set the size number of pixels and quality compression ratio of the image to be photographed Change the setting according to how the image is to be used and the remaining amount of space i...

Страница 43: ...while STILL MOVIE OK CANCEL is fully highlighted After pressing ENTER button while OK is highlighted these combinations are set and the LCD monitor display returns to previous photography mode The size item is reversely display in white Press or button to select the size setting user desired to set and press ENTER button Press or button to select the quality setting and press ENTER button ...

Страница 44: ...isplayed The picture number displayed on the LCD is the number of which is currently assigned to It may be moved over after some images During this mode and buttons have the function to backward and forward the displayed image on the LCD monitor along the picture number Holding down and buttons move forward or reverse continuously B y p r e s s i n g b u t t o n r o t a t e d a n i m a g e counter...

Страница 45: ...HALF size are displayed in the center of the screen A user can control playback movie file as the following table During playback During pause During stopping fbutton 2x speed playback 1 frame feed ebutton Reverse play back 2x speed playback Reverse 1 frame feed cbutton Pause Canceling pause Play back dbutton Playback returns to the start of the movie ENTER button The display returns to thumbnail ...

Страница 46: ...image is extended when the user presses the zoom key towards T To return to normal magnification press the zoom key towards W Extended image area can scroll by pressing or button By pressing ENTER button while playback digital zoom mode normal playback image is displayed The image is displayed enlarged and frames are displayed on the LCD monitor These frames indicates the entire images and the loc...

Страница 47: ...towards T during image selection the image is displayed to fit the entire screen To redisplay the original image a user presses the zoom key towards W By pressing or button select EXECUTE and press ENTER button to set image size Then the screen indicating that the image is being resized appears When resize end the screen returns to PLAYBACK MENU This function is changes FULL size images to HALF si...

Страница 48: ...en indicating that the image is being compressed appears When compression end the screen returns to PLAYBACK MENU Note It is possible to compress an image and decrease quality It is not possible to uncompress an image to increase quality or to restore an image after it has been compressed Protected This feature prevents images from being erased After pressing the ENTER button while the PROTECT is ...

Страница 49: ...sses the zoom key towards W After pressing the button while the DPOF is highlighted the camera enters into DPOF menu Use or button to choose one of options Choose SELECT IMAGE to select image Use or button to select SELECT or ALL and press ENTER button DPOF DPOF SELECT ALL ALL Note A user selects CONFIRM user can confirm the settings If a user select CLEAR ALL all settings are cleared By selecting...

Страница 50: ... pressing the zoom key towards T during image selection the image is displayed to fit the entire screen To redisplay the original image a user presses the zoom key towards W After finish this setting press ENTER button Press or button to select YES or NO and press ENTER button If you want to print the date select YES and press ENTER button If you don t want to print the date select NO and press EN...

Страница 51: ...Auto Power Off If no operation is carried out for a fixed amount of time default about one minute power consumption is set to its minimum state power almost turned off to prevent battery wear This is called the Auto Power OFF This setting allows you to set the time when the camera turns off automatically To return to the normal state after the Auto Power OFF has been executed press the POWER butto...

Страница 52: ...lect the item to set and press or button to set the value for each item Afterward pressing ENTER button when OK is highlighted date time data is updated and return to the previous main menu To quit setting select CANCEL and press ENTER button OSD Language Set the display language of menus displayed on the LCD monitor Press or button to choose one of the following languages to set as OSD language E...

Страница 53: ...g according to how the image is to be used and the remaining amount of space in the SD card Press the Menu button To select Quality Menu keep pressing or button until the QUALITY is highlighted After pressing the button while the QUALITY is highlighted the LCD shows the QUALITY menu By pressing button user can select size QUALITY QUALITY SIZE MOVIE OK CANCEL FULL QUALITY SIZE STILL MOVIE OK CANCEL...

Страница 54: ...D monitor display returns to previous SETUP MENU Frame Number Sets whether or not to reset the image number when you take photographs When the frame number is selected the message RESET FRAME NUMBER is displayed Press ENTER button while EXECUTE item is highlighted the camera can reset the frame number Default reset folder number is 100 and file number is 0001 Resetting of images is supported only ...

Страница 55: ...he original factory settings TIME DATE and OSD LANGUAGE will not be reset Press or button to choose one of the following options CARD INFO Displays the SD card information RESET Returns to their default settings CANCEL Keeps current setting Press ENTER button to confirm the setting ...

Страница 56: ...F write protection Erase Images on a Folder All Folders In case of pressing ERASE button for two seconds last image data and erase menu appears on the LCD monitor Use or button to select or and press ENTER Erases images in the currently selected folder and folders Erases all folders recorded on the SD card The images or folders are erased and the camera returns to the respective mode To cancel era...

Страница 57: ... button for two seconds last image data and erase menu appears on the LCD monitor To format the SD card use or button to select and press ENTER button To cancel formatting select and press ENTER button To reset the image number when the SD card formatted use or button to select EXECUTE and press ENTER button To cancel resetting of image numbers select CANCEL 102 0009 102 0009 102 0009 102 0009 ERA...

Страница 58: ... aperture etc or you can display histograms etc Press or button to select the image and press the LCD button Each press of the LCD button switches the display format as follows DISP 2001 08 01 10 53 AM 102 0009 102 0009 102 0009 RESOLUTION 2400 x160 QUALITY SHUTTER SPEED APERTURE 1 500 F2 3 1 0 100 OFF 480 ISO STROBE FILE SIZE KB RESOLUTION 2400 x160 QUALITY SHUTTER SPEED APERTURE 1 500 F2 3 1 0 1...

Страница 59: ... is off the monitor displays the alteration on the screen for two seconds When the LCD monitor is off the digital zoom function is forcibly canceled In the movie mode or macro photography mode the LCD monitor can not be turned off When the LCD monitor is off any setting for manual exposure compensation aperture value shutter speed value or focus is not possible 0003 2001 08 01 10 53 AM OSD Full Di...

Страница 60: ...g one end of the video cable to the PC VIDEO port of the digital camera and connect the other end of the cable to the video in port on the television Select the appropriate video mode either NTSC or PAL depending on what TV standard you are using Turn on the camera and television Take photographs or play them back Taking and Viewing Photograph on a TV Monitor Details of operation are the same as t...

Страница 61: ...tosh Users Color monitor 800x600 24 bit or higher recommended Available USB port CD ROM drive 80 MB available hard disk space At least 32 MB RAM Installing the Software Driver Image Application Insert your camera s Installation CD into your CD ROM drive The installation program starts Follow the on screen instructions to complete the camera software installation Restart your computer Connecting th...

Страница 62: ...ected the camera to your computer you are now ready to transfer pictures Note While the camera is connected to your computer the camera will not allow you to take pictures You will also not be able to view pictures on the camera If you are using Windows double click My Computer on the desktop You will then see a drive labeled Removable disk Click that drive letter If you are using Macintosh double...

Страница 63: ... 63 Camera Specifications Design and Specifications are subject to change without notice ...

Отзывы: