background image

English

GREAT BRITAIN
customer service


tel:

 020 8247 9300 

e-mail:

 [email protected] 

internet:

 www.clasohlson.co.uk

Ver

. 20150107

USB to HDMI adaptor

Art.no  38-4614 

Model  AN2820

Please read the entire instruction manual before using the product and 
then save it for future reference. We reserve the right for any errors in 
text or images and any necessary changes made to technical data.  
In the event of technical problems or other queries, please contact our 
Customer Services.

Product description

Functions as an external graphics card which converts a computer 
USB port into an HDMI output allowing for direct display onto an additional 
monitor. Can be used to mirror your screen image or to double your work 
area (increase Windows desktop). Audio signals are also transmitted 
through the adaptor. 
Connect an HDMI cable (sold separately) the between the USB to 
HDMI adaptor and the additional monitor. 
Supports resolutions of up to 1920 × 1080 pixels. 

Package contents

•  USB to HDMI adaptor
•  Instruction manual
•  USB cable

Installation

Compatible operating systems:  
Windows 7 (32/64-bit), 8 (32/64-bit), Vista and XP (SP3). 

Note:

 It is very important that your graphics card drivers are updated 

before beginning installation. 

Example installation on Windows 7 (English version)

1.  Connect the adaptor to an USB port (version 2.0 or later) on your 

computer.

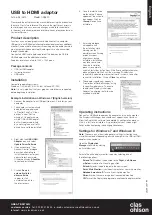
2.  The adaptor will automatically 

be detected and displayed 
in “Control Panel” in “Other 
devices” under “Device 
manager”. Its display name 
will be “USB HDMI Adapter”, 
but it will be marked initially 
by a warning icon as all of its 
drivers have yet to be installed.

3.  Right click the 

USB HDMI 

Adapter

 icon and select 

Update Driver Software

.

4.  If you encounter a “User 

Account Control” dialogue 
box when attempting to 
install the drivers, enter your 
administrator’s password. 
Otherwise click on 

Allow/Yes


to continue installation.

5.  Click on 

Search 

automatically for 
driver software


in order to start 
an Internet search for 
the latest drivers.

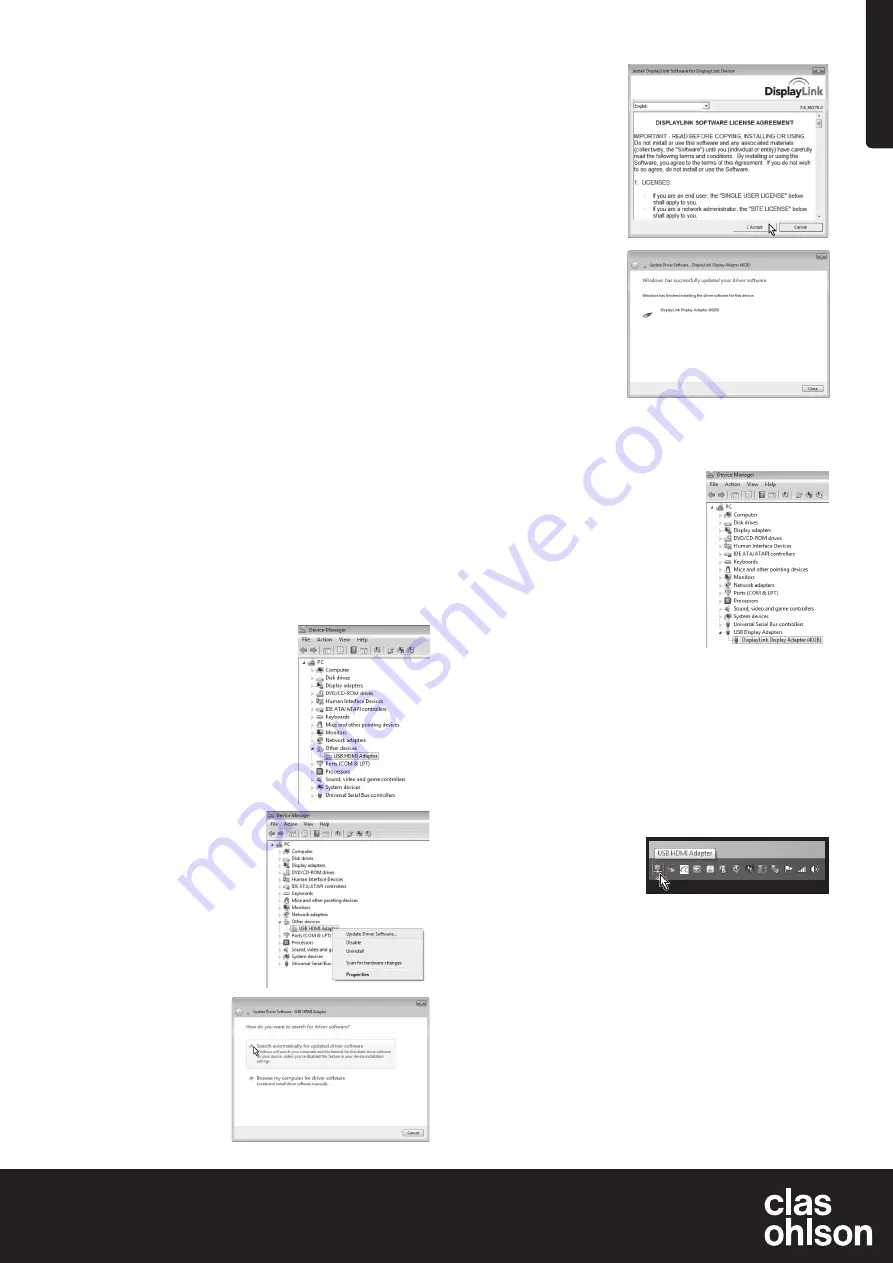
6.  Once the latest drivers 

are found the “Licence 
agreement” box should 
then appear. Click on 

I Accept

 to continue 

installation. 

7.  A warning dialogue 

will appear once 
the installation starts, 
warning you that 
possible screen flashing 
or black screens 
might occur during 
installation. Installation 
may take some time. 
Allow the installation 
process to complete 

and wait for further instructions. All software configuration takes 
place automatically. Wait until the message “Windows has 
successfully updated your driver software” is shown, to confirm 
successful installation. Click on 

Close

 to continue.

8.  The adaptor should now appear in 

“Control panel/Device Manager” using 
its specific model name. The name 
should read “Display Link display 
Adapter”, confirming that all drivers 
have been installed.

Operating instructions

Connect an HDMI cable between the adaptor and the extra monitor. 
The DisplayLink Manager icon should now appear in your taskbar.
Allow the DisplayLink software to complete its configuration process,  
if this is a first time installation. It is possible that your screen might 
flicker or blackout during the configuration process.

Settings for Windows 7 and Windows 8

Note:

 These are only meant to be general settings instructions and 

may differ somewhat depending on which computer the USB to HDMI 
adaptor is connected to. 

Open the 

DisplayLink 

Manager

 software by clicking 

on its taskbar icon.

Activate the extra display monitor/screen by selecting one of 
the following options:
 

Extend To:

 Stretches the desktop to the 

Right

 , 

Left

Above


or 

Below

 in relation to its existing position.


Extend:

 Extends the desktop onto the new screen.


Set as Main Monitor:

 Uses the extra monitor as your main monitor. 


Notebook-monitor off:

 Turns off your laptop monitor.


Mirror:

 Mirrors the same image on all connected monitors.


Off:

 Turns off the DisplayLink programme and the extra display monitor.

Содержание AN2820

Страница 1: ... Allow Yes to continue installation 5 Click on Search automatically for driver software in order to start an Internet search for the latest drivers 6 Once the latest drivers are found the Licence agreement box should then appear Click on I Accept to continue installation 7 A warning dialogue will appear once the installation starts warning you that possible screen flashing or black screens might o...

Страница 2: ...at of the primary monitor Set the same resolution for both monitors I don t receive any audio from my connected TV Make sure that your computer is set to the correct sound output Enter the Audio Devices settings in Control Panel Make sure that USB HDMI Adapter is chosen as the default audio device otherwise right click on it and then select Use as default device The picture becomes erratic when pl...

Страница 3: ...ta installationen om inte lösenordet behövs 5 Klicka på Search automatically for driver software för att starta Internet sökningen efter de senaste drivrutinerna 6 En ruta för License agreement godkännande av licenstexten visas Klicka på I Accept för att fortsätta installationen 7 När installationen börjar visas en ruta som upplyser om att skärmen kan blinka eller bli helt svart under installation...

Страница 4: ...ftast på för låg inställning för uppdateringsfrekvensen I läge mirror spegling öka uppdaterings frekvensen för primärskärmen I läge extended mode utökad skärm öka uppdateringsfrekvensen för sekundärskärmen I läge extended mode utökad skärm kan den sekundära skärmen ha en svart kant runt skrivbordet Detta händer om upplösningen för sekundär skärmen är högre än upplösningen för primärskärmen Ställ i...

Страница 5: ...assordet eller klikk på Allow Yes for å fortsette installasjonen hvis du ikke trenger passordet 5 Klikk på Search automatically for driver software for å starte Internettsøket etter de seneste driverne 6 En dialogboks for Licence agreement godkjenning av lisensteksten vises Klikk på I Accept for å fortsette installasjonen 7 Når installasjonen starter vises en rute som opplyser om at skjermen kan b...

Страница 6: ...ill inn samme oppløsning på begge skjermene Det kommer ingen lyd i TV apparatet som er koblet til adapteren Kontroller at datamaskinen er stilt inn på riktig lydutgang Gå inn på lydinnstillinger i kontrollpanelet Kontroller at USB HDMI Adapter står som standard lydenhet Hvis ikke må man høyreklippe på den enheten og velge Oppgi som standardenhet Når jeg spiller av video i fullskjerm modus får bild...

Страница 7: ...ontrol syötä järjestelmän ylläpitäjän salasana tai jatka asennusta napsauttamalla Allow Yes jos salasanaa ei tarvita 5 Aloita uusimpien ajureiden internet haku napsauttamalla Search automatically for driver software 6 Näytölle ilmestyy lisenssitekstin hyväksymisruutu License agreement Jatka asennusta napsauttamalla I Accept 7 Asennuksen alkaessa näytölle ilmestyy ruutu jossa ilmoitetaan että näytt...

Страница 8: ...tä televisiosta ei kuulu ääntä Varmista että tietokoneesta on valittu oikea äänilähtö Siirry ohjauspaneelin kohtaan äääni liitännät Varmista että oletusääniyksiköksi on valittu USB HDMI Adapter Napsauta yksikköä tarvittaessa hiiren oikealla painikkeella ja valitse Valitse oletusyksiköksi Kuva nykii kun tois tan videoita täyden näytön tilassa Kokeile seuraavaa Vähennä tarkkuudeksi 640 480 tai 800 6...

Страница 9: ...matisch nach aktueller Treibersoftware suchen klicken um einen Onlinesuche nach den neuesten Treibern zu starten 6 Es erscheint ein Fenster über die Lizenzvereinbarung Akzeptieren des Lizenztextes Auf Annehmen klicken um mit der Installation fortzufahren 7 Zu Beginn der Installation wird der Benutzer darüber informiert dass der Bildschirm während der Installation blinken oder schwarz werden kann D...

Страница 10: ... Für beide Bildschirme die gleiche Auflösung einstellen Es gibt keinen Ton im TV Gerät das an den Adapter angeschlossen ist Sicherstellen dass am PC der richtige Audioaus gang eingestellt wurde In der System steuerung die Audioeinstellungen öffnen Sicherstellen dass der USB auf HDMI Adapter als Standard Audioeinheit markiert ist Ansonsten auf die Einheit rechtsklicken und Als Standard gerät auswäh...

Отзывы: