LED
MENU
TEST
LED
MENU
TEST
LED
MODE
FLASH
MODE
LED
MENU
TEST
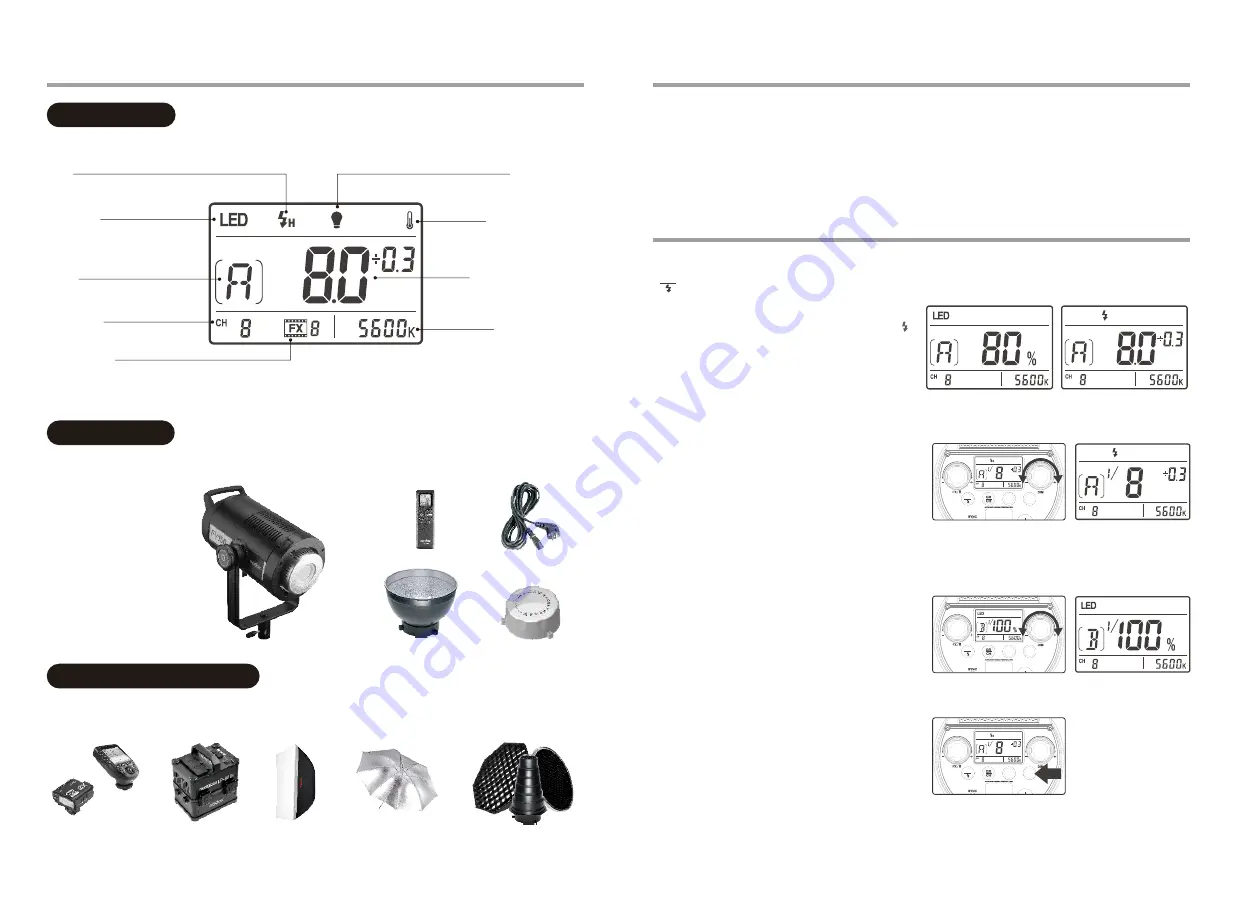
LCD Panel
LCD Panel
Group
LCD Panel
Flash
Color Temperature
Modeling Lamp
Heat Protection Icon
Power/Light Brightness
1. Flash video light 2. RC-A6
Remote control 3. Power cord 4. Standard reflector 5. Lamp cover
Included Items
Channel/ID
Special Effect
Separately Sold Accessories
The product can be used in combination with the following accessories sold separately, so as to achieve best
photography effects: XPro, X2 or XT32 remote control, Power Inverter, Softbox, Photographic Umbrella, Light
Stand, Barndoor, Snoot, etc.
Power Connection
Use the power cord to connect the flash to an AC power source and turn on the power switch.
Flash Setting
Button
This button can be pressed to switch LED mode or flash
mode. Short press the button and LED will be displayed,
which means the light can be used as an LED. When
is
displayed, the light can be used as a flash.
Power Adjustment
In flash mode, the flash power can be adjusted by light
brightness adjustment button from 1/16 to 1/1 or 6.0 to 10.
And the power output will be clearly displayed on the LCD
Panel. “OF” on the display indicates that the flash triggering
function is turned off. Press the Test button to discharge
power when the flash output is adjusted from high to low.
Light Brightness Adjustment
In LED mode, the light brightness of LED light can be
adjusted by light brightness adjustment button from 0% to
100%. And the light brightness will be clearly displayed on
the LCD Panel.
Test Button
To fire the flash without taking a picture, press the test
button. It can also help adjust the flash output and light
brightness when combined with the light brightness
adjustment button. Hold down the light brightness and turn
on the light, the version will be displayed on the LCD panel
and this operation can also be used to restore factory
setting.
LED
- 11 -
- 12 -
Operation
1
2
3
4
5


