10
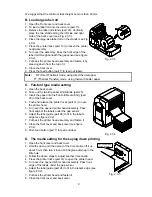
9. Push feed button (part 7) to feed out label.
10. Lay the printer downs with the front cover up, on the table
and start it to print.
2-4. To Connect the Printer to an Interface
1. Be sure the power switch of the printer is off.
2. Plug the power adapter into the printer power jack.
3. Connect the printer to an interface (parallel or serial port).
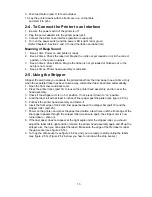
4. Turn on the power switch, and the power LED is light red or green.
(Refer Chapter 2, Section 2 and 3, to load the ribbon and label roll.)
Meaning of Beep Sound
1. Beep 1 time: Power on and printer is ready
2. Beep 2 times: Check the label roll. Maybe the roll is not yet loaded or not in the correct
position, or there are no labels.
3. Beep 3 times: Check ribbon. Maybe the ribbon is not yet loaded or finished out, or the
setup is not correct.
4. Beep 4 times: Printer head assembly is unlocked.
2-5. Using the Stripper
Stripper (Peeler) helps you separate the printed label from the liner paper one at a time. Only
when the separated label has been taken away, will another label be printed automatically.
1. Open the front cover and back cover.
2. Press the printer locks (part 14) to loosen the printer head assembly, and turn over the
head assembly.
3. Check if the stripper arm is on “on” position. If not, press it down to “on” position.
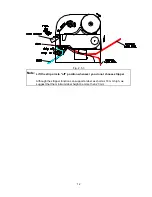
4. Load the label roll with at least 4 inches of liner paper past the platen (see figure 2.5.1a).
5. Put back the printer head assembly and fasten it.
6. Insert the front edge of the 4-inch liner paper between the stripper bar (part 19) and the
stripper roller (part 20).
7. Power on the printer, and press the paper feed button a few times until the front edge of the
liner paper appears through the stripper roller (make sure again: the stripper arm is now
turned down -- strip on).
8. If the liner paper does not appear at the right angle under the stripper roller, you should
adjust the label roll to right position (Loosen the printer head assembly again and lift up the
stripper arm, then you can adjust the label). Make sure the edge of the first label is under
the gap sensor (see figure 2.5.1b).
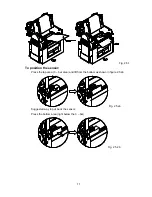
9. Turn up the strip sensor (see figure 2.5.2a), and you are ready to start printing the labels
(see figure 2.5.3). (Figure 2.5.2b show you how to turn down the strip sensor.)
Содержание EZ-2P
Страница 1: ...EZ 4TT 4TK 2P 4P User s Manual ...


