Emulzní disk
1. Mísu a držák příslušenství instalujte, jak je uvedeno výše
(obr. 2, 3, 6).
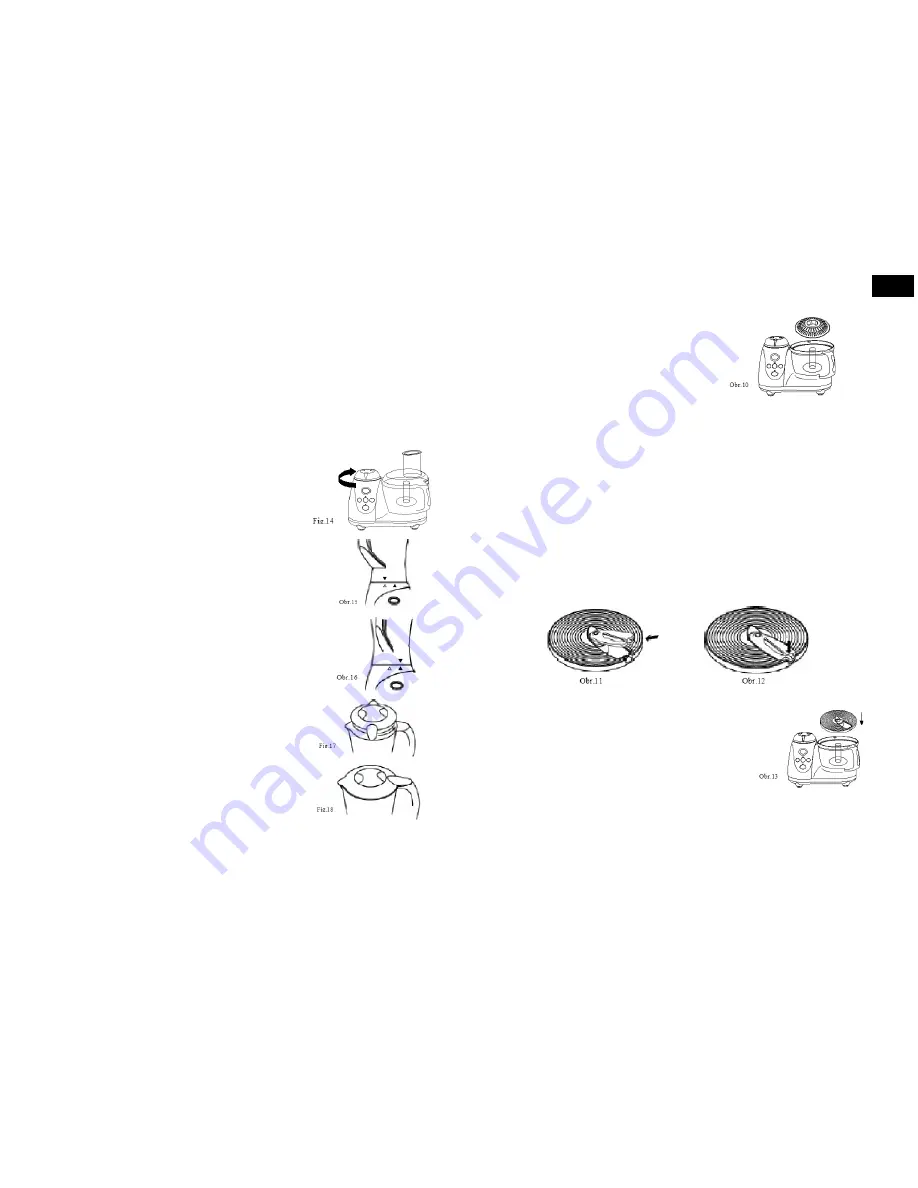
2. Na držák příslušenství nasa te emulzní disk a pevně
zatlačte na místo (obr. 10).
3. Vložte přísady do mísy.
* Disk používejte ke tření a šlehání.
* Nikdy disk nepoužívejte k hnětení těsta. Při šlehání smetany a přípravě jemných omáček
používejte nižší rychlosti.
* Můžete takto připravit domácí majonézu, omáčky, ušlehat vaječné bílky, pusinky a připravit
šlehačku.
4. Na mísu nasa te víko a do plnicího otvoru vložte pěchovátko.
Poznámka:
Vršek držáku příslušenství zapadne zespodu do víka mísy.
5. Napájecí kabel zapojte do vhodné zásuvky a robot zapněte vypínačem.
6. Zvolte požadovanou rychlost.
7. Po dokončení zpracování robot vypněte a napájecí kabel odpojte od zdroje energie,
z mísy před vyjmutím zpracovaných přísad odstraňte držák příslušenství a emulzní disk.
Nože na krájení, sekání, strouhání a krouhání
1. Do držáku nožů vložte požadovaný krouhací nebo krájecí nůž a nasa te na držák
příslušenství. Nůž přidržte za držák nožů a jemně zatlačte konec nože do klipu držáku, až
zapadne na své místo (obr. 11, 12). Nůž by měl být v jedné rovině s držákem. Nůž je
v držáku přidržován dvěma malými pojistkami.
Poznámka:
Všechny kovové disky mají ostré hrany, proto při manipulaci s nimi a jejich
instalaci a snímání dbejte zvýšené opatrnosti.
2. Mísu a držák příslušenství instalujte, jak je uvedeno výše
(obr. 2, 3, 6).
3. Držák nožů nasa te na držák příslušenství a pevně
zatlačte na místo (obr. 13). Držák nožů by měl být v jedné
rovině s okrajem hnětací mísy.
4. Na mísu nasa te víko a do plnicího otvoru vložte pěchovátko.
Poznámka:
Vršek držáku příslušenství zapadne zespodu do víka mísy.
5. Plug the power cord into a suitable power outlet and turn the power ‘ON’.
6. Select the required speed.
7. Remove the pusher from the feed tube. To use the grating/slicing discs insert the
ingredients into the feeding tube and use the pusher to guide them through the tube. Never
use fingers or other utensils to push down the feed tube as sharp blades are located inside
the disc.
* The lower and middle settings are recommended. The highest settings can be used if
needed.
* Use the blades to slice potatoes, cucumber and grate cabbage,potatoes and large carrots.
* When slicing/chipping potatoes lower them solwly down the feed tube with the pusher feed
tube.
8. When processing is complete, switch off and unplug the food processor, remove the
blade holding disc and tool holder from the bowl before removing the processed food.
Blender
1. Remove the screw cap from the food processor body.
Simply twist the safety cover clockwise snd remove (fig.14).
2. Position the blender onto the processor body above the speed
control dial with the handle to the left. The solid gray arrow under
the handle of the blending jar should align with the gray arrow
on the food processor body (fig.15).
3. To lock the blender into place, simply hold the handle of the jar
and turn it to the right. The solid arrow on the blender jar should
now be aligned with the solid arrow on the food processor
body (fig.16).
4.Place ingredients into the jar.
Note:
Do not exceed the maximum indicated level - 1.5 litres.
Always ensure that the lid is blender.
5. Position the lid onto the blender jar so that the long holding
lip is facing towards you (fig.17).
6Turn the holding lip to the right, the holding lip should be aligned
with the top of the jar handle (fig.18).
7. Fit the processor bowl and lid as detailed previously.
Note:
The blender will not operate if the blender jar, lid and the
processor lid are not all correctly locked in place.
8. Plug the power cord into a suitable power outlet and turn the power ‘ON’.
9 Select the required blending speed 1-10 or PULSE.
Tip:
Further ingredients can be added while blending by pouring through the lid hold once
the measuring cup has been removed. The blender can be used for liquidizing, pureeing and
mixing.
CZ - 9
ENG - 36
CZ


