background image


to  source  of  power  supply,  namely  12  V  lighter  socket,  it  is  especially  important  during  longer 

trips. 

The picture on page 8 shows how to install the navigation system on the front windscreen of the 

car.  Remember  that  the  power  cord  should  not  obstruct  y our  view  on  important  indicators  and 

settings. 

11. 

 SWITCHING 


12. SETTINGS 


Firstly

, the Goclever logo screen is displayed. Remember: You don't have to go into the settings menu  


before running the navigation program. 

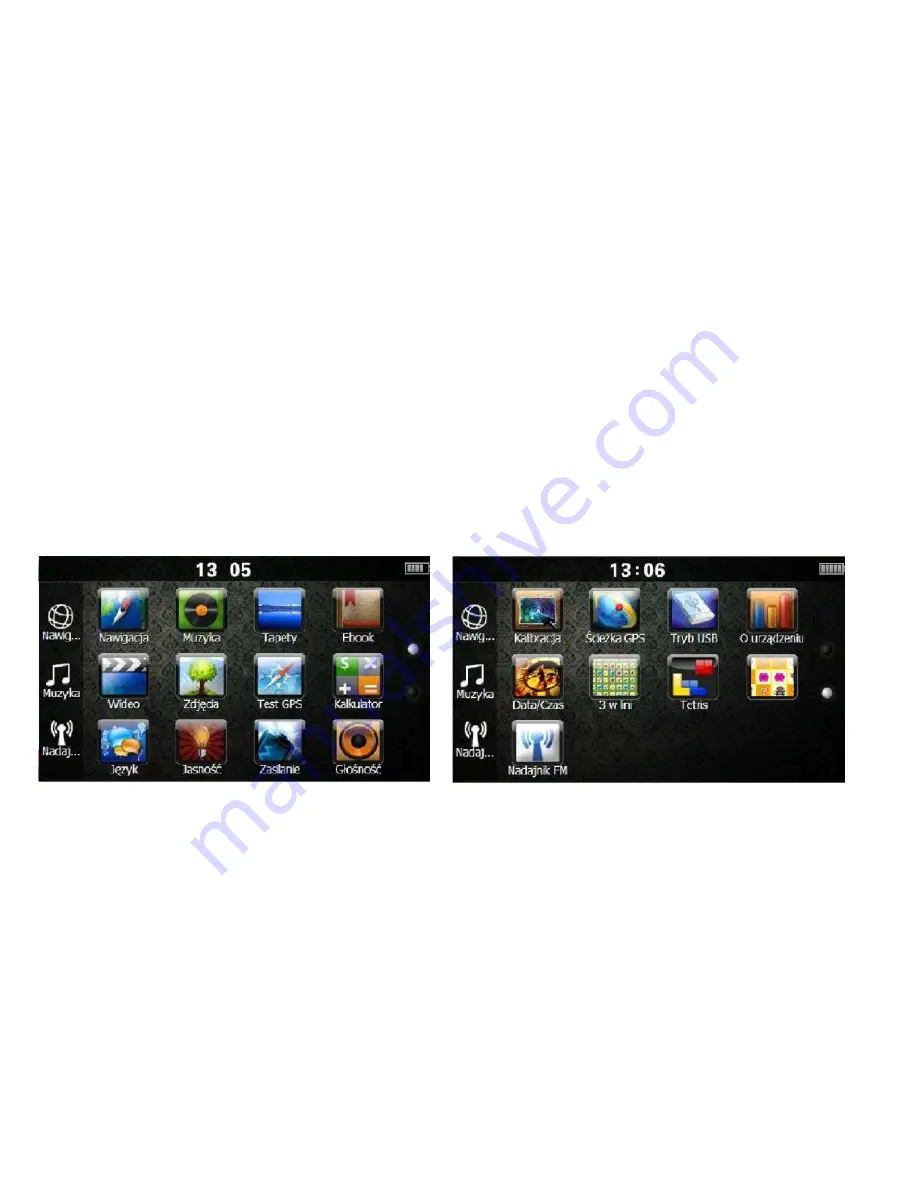
Then, the start screen is shown                             By clicking the icons, you can customize, e.g. things, the wallpaper, 

of the navigation system with access to the basic 


language, brightness, volume, USB mode. If you click on  

device features: Navigation system, GPS Test, 

a given icon, the detailed menu will be displayed. 

Settings. 


Содержание NAVIO 520

Страница 1: ...1 OPERATION MANUAL...

Страница 2: ...Transmitter 10 1 1 16 Multimedia 10 2 Calibration 11 3 About the device 11 3 1 1 GPS signal 11 3 1 2 NAVIO 520 technical parameters table 12 3 1 3 Caring for Your Goclever 13 3 1 4 Preparation for th...

Страница 3: ...onal fees NOTE GOCLEVER set is intended to help in navigation not for precise measurement of distance height position or time Planned routes should be treated only as a convenience priority should alw...

Страница 4: ...may result in the acid leakage burns explosion or cause injury or damage of other kind If you came into contact with leaked battery acid rinse this place thoroughly and contact your doctor The lithium...

Страница 5: ...ecure the important data making copies on different media etc The guarantor shall not be liable for the loss of any data caused by the malfunction or damage of the device Important data should be arch...

Страница 6: ...kage contents The navigation device with maps in the NAND Flash memory Strap with stylus pen Car charger Car holder with suction cup USB cable for PC connection User manual Strap connector between the...

Страница 7: ...igation system can also be charged by means of computer USB port but we do not recommend it since it lengthens the charging time However if you want to charge the device from your computer connect the...

Страница 8: ...ct it with suction cup holder or hinder the operation of vehicle airbags Place the Goclever in a place that provides the best GPS signal reception GPS signal interference can be caused by the vicinity...

Страница 9: ...ators and settings 11 SWITCHING 12 SETTINGS Firstly the Goclever logo screen is displayed Remember You don t have to go into the settings menu before running the navigation program Then the start scre...

Страница 10: ...yed on the device is 480p 640 480 14 FM TRANSMITTER FM transmitter allows you to transfer music from your device to any FM radio receiver e g car radio The device has to be connected to the charger wh...

Страница 11: ...umber of visible satellites and the strength of their signal This screen shows your current position in degrees of latitude longitude and altitude The compass shows the image of satellites whose signa...

Страница 12: ...Mstar MSB2531 800 MHz Cortex A7 CPU Display 5 0 480x272 Operating system Windows CE 6 0 Expansions slot Support for microSD HC cards with a capacity of up to 8 GB GPS antenna Internal ceramic antenna...

Страница 13: ...agents or corrosive substances If the Goclever Navio 520 gets wet wipe it with a soft cloth Under no circumstances should you open the housing of the GOCLEVER NAVIO 520 It may be dangerous and will v...

Страница 14: ...RT UP In order to run GOCLEVER Maps turn on the device and select in the main menu the Navigation icon 21 1 BASIC INFORMATION When you start the program you will see the map You can move the map by ho...

Страница 15: ...igation button the corner marked with blue colour indicates the direction of north When you touch its menu button Map moving button Map angle and rotation button Change the view to 3D Change the view...

Страница 16: ...p and after double touching its menu Auto zoom default view of the 3D map when navigating in cities in undeveloped areas it automatically changes to 2D view Close view displaying names of streets 3D V...

Страница 17: ...including three which can be modified It is not possible to change the Auto zoom view After setting the desired map view to save it it is necessary to unfold the enlarge button menu then press and hol...

Страница 18: ...n system is leading to a set point In Goclever Maps this task is performed as follows Clock and enter the name of the town in the right field and the street and house num ber in the left field you can...

Страница 19: ...the result Then select from the menu to automatically set the route and launch the navigation proces After selecting w the search result will be displayed on the map TIP This window displays POI phone...

Страница 20: ...ations After pressing this field you may select the option to set the detour to this point after pressing the detour it can be cancelled IMPORTANT The software will automatically calculate the route i...

Страница 21: ...speed GPS signal quality and position accuracy in metres Compass Altitude above sea level Distance to the next manoeuvre Geographical coordinates of the current position By selecting you will display...

Страница 22: ...rent route you can display the route on the map Change the end point to the starting point Save the route as Favourite Remove the current route By selecting you will display the manoeuvre list By sele...

Страница 23: ...he search window Search the desired object like when selecting location in item 21 2 of the manual and select the desired location address and you will see the screen for selecting the destination thu...

Страница 24: ...ng point in the menu then after selecting the destination select select The device will automatically calculate the route To launch the simulation in the Menu select Trasa Route in the window Aktualna...

Страница 25: ...option then change the upper left corner of the screen to Searching for POIs is done without the need to specify the categories of searching for an object For instance if you enter Neste the search e...

Страница 26: ...e will call all POIs with this phrase in a given city The application automatically displays the notification on the most important POIs when navigating see point 21 4 of the manual After finding a lo...

Страница 27: ...27 The map has automatic searching activated By pressing and selecting we can choose from the list one category several selected ones or use to select all categories anew...

Страница 28: ...28 After selecting POI category press to display POI search results...

Страница 29: ...automatically saves the route trace Route traces are saved for 30 days Traces older than 30 days are automatically deleted To view the route traces select Menu then Historia History in Za pami tane T...

Страница 30: ...possible to lock the trace against deletion by pressing the icon it will change to The trace can be exported to kml file using the icon After the file is generated correctly the following message will...

Страница 31: ...etting DZIENNY DAYTIME or NOCNY NIGHTTIME or set the AUTOMATIC mode in which the software will switch the display mode itself by using the internal clock of the device mode switching time depending on...

Страница 32: ...ate of the map of Poland installed in the device Goclever Maps for 12 months upon purchase Updates are usually released once a quarter To make the update the user must first register his her device at...

Страница 33: ...riod for GOCLEVER navigation devices is 24 months counting from the date of equipment sale but no longer than 27 months from the production date placed on the Product 5 The mode of accepting damaged p...

Страница 34: ...ompletion of repair is forfeited for the benefit of the maintenance service 13 In the case of unjustified complaint complaint about a functional device or if the damage has been caused by the customer...

Страница 35: ...device s defects 20 The Warrantor does not bear liability for damage caused by loss of data on magnetic and semi conductor carriers We also inform that the maps will be restored to their factory condi...

Страница 36: ...Note This device is marked in accordance with European Directive 2002 96 EC and the Polish Act on waste electric and electronic equipment with a symbol of a crossed waste container Such a label infor...

Страница 37: ...porter GOCLEVER Sp z o o ul Sk rzewska 35 Wysogotowo Pozna 62 081 Prze mierowo POLAND EU www goclever com Helpline Technical assistance phone no 48 618488767 fax 48 616417422 serwis goclever com s s e...

Отзывы: