GO-ANYWHERE COMMODE 'n SHOWER CHAIR Скачать руководство пользователя страница 9


Depress the spring pin button on each caster leg and insert them 
into the open ends of the two remaining leg sockets on the 

rolling 

frame / seat assembly

 (front or rear).  Once the spring pin button 

is inside the tube, turn the caster leg slightly in either direction until 
the  spring  pin  button  pops  through  the  center  hole  in  the  upper 
leg. 

(Note:  there  are  score  lines  on  each  of  the  legs  to  help  you 

line up the spring pin buttons with the holes.)  
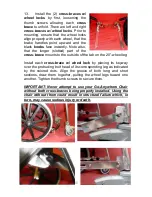
9.  Remove  the 

rolling  frame  /


seat  assembly

  from  the  travel 

case  by  grabbing  the  seat  frame,  turning  it  right-side-up  and 
placing it on all four wheels.    


10. 

Remove both through-pins 

(with  pull-rings  attached  to  the 
frame with nylon cables) securing 
the  seat  back  in  its  folded 
position.  Raise  the  seat  back  up 
fully,  allowing  it  to  drop  into  its 
support  sockets.    Push  down 

firmly  on  the  top  of  the 
backrest  until  it  snaps  into 
place.  Lock  the  backrest  into 
place  using  the  two  through-
pins.    Ensure  that  the  pins, 
when  inserted  through  the 
diameter  of  the  tubes,  extend 
entirely through the tubes and 
lock firmly into place.   

Содержание COMMODE 'n SHOWER CHAIR

Страница 1: ...OWNER S MANUAL THE GO ANYWHERE COMMODE n SHOWER CHAIR SP...

Страница 2: ...to use of your Go Anywhere Chair We would also appreciate receiving any feedback and comments that you may have to offer so that we may continue to monitor and improve our customers quality of life W...

Страница 3: ...follow the step by step unpacking assembly operating and disassembly instructions as specified below For additional assistance please view the corresponding videos at www GoesAnywhere com PRODUCT OVER...

Страница 4: ...1 2 23 if you remove the wheel hubs the Go Anywhere SP may even pass through narrow doorways Both the seat and footrest heights are adjustable to suit the needs of each individual By shortening or len...

Страница 5: ...Both are attached to the chair frame with Velcro rendering them easily removable for cleaning or replacement PRACTICE MAKES PERFECT PLEASE do not become discouraged if you have problems either with t...

Страница 6: ...cushion pre assembled w seat assembly 1 seat cushion pre assembled w seat assembly 2 push handles 2 legs w swivel casters 2 20 diameter wheel assemblies 2 cross braces w wheel locks 2 footrest support...

Страница 7: ...adjustment holes and color coded to identify their respective leg sockets Both front and rear legs are prepared to accept the 20 diameter wheel assemblies They are interchangeable and may be placed on...

Страница 8: ...diameter wheel assembly removed from the case in step 1 by depressing the spring pin button on the leg extension of the 20 diameter wheel assembly and lowering the leg extension down and into any one...

Страница 9: ...s with the holes 9 Remove the rolling frame seat assembly from the travel case by grabbing the seat frame turning it right side up and placing it on all four wheels 10 Remove both through pins with pu...

Страница 10: ...the spring pin buttons and adjustment holes in the telescoping legs adjust the height of the rolling frame so that the occupant may safely and comfortably transfer to the Go Anywhere Chair This may in...

Страница 11: ...ace mounts to the outside of the tab on the 20 wheel leg Install each cross brace w wheel lock by placing its keyway over the protruding bolt head of its corresponding leg as indicated by the colored...

Страница 12: ...shion to the front of the chair first then lower it on to Velcro located at the top of the aluminum seat pan from front to back as you stretch the cushion toward the rear of the seat The seat and back...

Страница 13: ...th 3 The armrests are constructed of double thick walled aluminum tubing for the purpose of supporting the weight of users who wish to use them to push up on Please be advised however that the armrest...

Страница 14: ...the through pins locking both armrests into their vertical position 6 Remove the upholstered foam divider from the travel case and place it on top of the seat cushion Failure to do so may result in pe...

Страница 15: ...castered legs and remove both legs w casters Store both legs w casters inside the accessory pouch and seal the pouch 12 Place the sealed accessory pouch on top and inside of the rolling frame seat ass...

Страница 16: ...time remove the seat and seatback cushions and dry both the aluminum base and the backs of the cushions to prevent the growth of any mold or mildew Make sure to peel the cushions off only when they ar...

Страница 17: ...a hassle and can be embarrassing and downright uncomfortable Following the steps in the aforementioned process will not change this fact unfortunately though it will make it a little less miserable A...

Страница 18: ...de the seat assembly on to its nylon rollers located on the underside of the rolling frame The retractable spring lock located on the front of the seat assembly should automatically lock when the seat...

Страница 19: ...ions product GO Mobility Solutions warrants to the holder of a valid proof of purchase Consumer or you that the product and all accessories provided by GO Mobility Solutions in sales package Product a...

Страница 20: ...n damaged due to repair alteration or modification by anyone other than an authorized service representative of GO Mobility Solutions or 3 Product whose warranty quality stickers Product serial number...

Страница 21: ...Mobility Solutions will notify you and will request that you authorize the cost of repair and return shipping costs for the repair of Products that not covered by this limited warranty What must you...

Страница 22: ...etween you and GO Mobility Solutions It supersedes all other written or oral communications related to this product GO Mobility Solutions provides no other warranties for this product The warranty exc...

Отзывы: