TX6600PRO
INSTRUCTION MANUAL
35
ADDING AND REMOVING SCAN CHANNELS
To ADD or REMOVE channels in a Scan Group:
1.
Check that the radio is not already scanning. If it is, briefly press the
SCAN
OS/GS
key to stop the scan.
2.
Press
MENU
F
then
SCAN
OS/GS
to cycle to the desired Scan Group (
OPEN1,
OPEN2, GROUP
or
NETWK
will be displayed briefly).
3.
Select the desired channel by rotating the
Channel
knob or press the
keys.
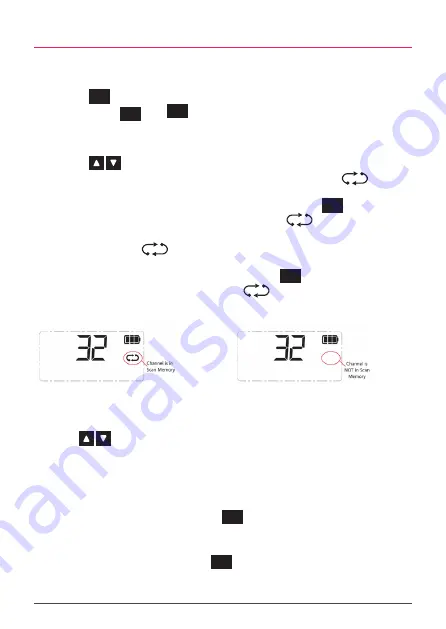
i.
If the selected channel is in the scan memory the
icon will
be visible.
To
REMOVE
the channel, press and hold the
SCAN
OS/GS
key. ‘
SCANCH
OFF
’ will be displayed briefly and the
icon will disappear
indicating the channel is no longer in memory.
ii.
If the
icon is not visible, the selected channel is not in the
scan memory.
To
ADD
the channel, press hold the
SCAN
OS/GS
key. ‘
SCANCH ON
’ will
be displayed briefly and the
icon will appear to confirm the
channel is now in memory.
Repeat step 3 to add or remove further channels to/from the scan memory.
2.
Press
then
to cycle to the desired Scan Group (
OPEN1, OPEN2, GROUP or
NETWK will be displayed briefly).
3.
Briefly press the
key.
F will be displayed.
4.
Rotate the
Channel knob or press the
keys to step through the channels. Only
channels that are stored in the selected scan group will be displayed.
5.
When finished, press the
key to exit.
ADDING AND REMOVING SCAN CHANNELS
To ADD or REMOVE channels in a Scan Group
1.
Check that the radio is not already scanning. If it is, briefly press the
key to stop the
scan.
2.
Press
then
to cycle to the desired Scan Group (
OPEN1, OPEN2, GROUP or
NETWK will be displayed briefly).
3.
Select the desired channel by rotating the
Channel knob or pressing the
keys.
i.
If the selected channel is in the scan memory the
icon will be visible.
To REMOVE the channel, press and hold the
key. ‘SCANCH OFF’ will be displayed
briefly and the
icon will disappear indicating the channel is no longer in memory.
ii.
If the
icon is not visible, the selected channel is not in the scan memory.
To ADD the channel, press hold the
key. ‘SCANCH ON’ will be displayed briefly and
the
icon will appear to confirm the channel is now in memory.
Repeat step 3 to add or remove further channels to/from the scan memory.
Channe
l in
Scan
Memor
y
Channe
l not in
Scan
Memor
y
Using Auto Skip
When scanning, if the scan constantly pauses on the same busy channel, briefly press the
or
keys to skip over that channel and temporarily remove it from the scan group for 30 seconds.
The scan will then continue from the next channel in the sequence. After 30 seconds the skipped
channel will be reinstated in the scan sequence.
If the unwanted busy channel continues to interrupt the scan even after the 30 second skip period
has elapsed, hold the
key while the radio is paused on that channel. The ‘nuisance’ channel
will be completely removed from the scan group for the duration of that scan session. To restore
Channel
in Scan
Memory
Channel
not in
Scan
Memory
Using Auto Skip
When scanning, if the scan constantly pauses on the same busy channel, briefly
press the
keys
to skip over that channel and temporarily remove it from
the scan group for 30 seconds. The scan will then continue from the next channel
in the sequence. After 30 seconds the skipped channel will be reinstated in the
scan sequence.
If the unwanted busy channel continues to interrupt the scan even after the 30
second skip period has elapsed, hold the
SCAN
OS/GS
key while the radio is paused on
that channel. The ‘nuisance’ channel will be completely removed from the scan
group for the duration of that scan session. To restore the channel, simply stop
and restart the scan session using the
SCAN
OS/GS
key. Turning the radio Off then On
again will also restore the channel.