


12
C.
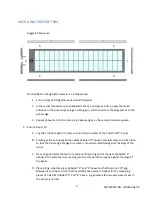
Repeat above process for panel edge #3 and#4, being sure to
i.
Bu
tt
the edge of each piece against the already-placed pieces AND
ii.
Ensure that the outer edge of the new piece matches the outer edge of the
ex
isti
ng piece [See above sketch].
3.
The system should be allowed to cure a minimum of one hour prior to moving the vehicle. It may
be driven
afte
r six hours but, will not be fully cured un
til
24 hours.
SPECIAL ROOF TYPES
RVs with older rubber roo
ft
ops may not be able to achieve
suffi
cient bonding using only the
adhesive due to “chalking” or severe oxid
ati
on.
o
In these cases, it is recommended that screws be used to secure the rubber edge trim
components to the roof, especially on the upwind edge of the panel.
o
The edge trim parts are marked with a small dimple ind
icati
ng where screws should be
placed. Using these pre-marked lo
cati
ons will ensure that the screw will not go through
the solar panel.
o
Use #8 x 1” stainless steel pan or truss head sheet metal screws.
RVs constructed with a metal skin, such as most Airstream travel trailers, should use pop rivets or
through-bolts in add
iti
on to the adhesive moun
ti
ng system. These fasteners must be located in
the pre-marked dimples on the rubber edge trim components to avoid damaging the panel.
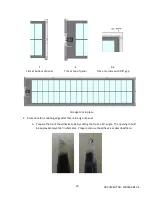
LOCATING THE SOLAR CHARGE CONTROLLER
The solar charge controller is designed to be
fl
ush mounted in an interior wall of the RV. Choose a
lo
cati
on that is convenient for rou
ti
ng the cable and for viewing. Flush moun
ti
ng the controller will
requ
ire cuttin
g a hole in the wall or cabinet that is 4-11/16” wide by 3-11/16” tall.
DOCUMENT NO. 1000564 REV. E


