


11
B.
Starti
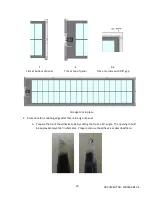
ng with the edge trim piece labeled in the sketch above as #1,
i.
Apply the liquid adhesive to the panel edge, leaving a bead approximately 3/16”
wide. The trim piece must be placed within 10 minutes of dispensing the
adhesive.
Adhesive bead along the edge of the solar panel (Normally transparent; Shown as black for clarity)
Proper
fit
of edge trim to solar panel
ii.
For the associated edge trim piece, remove the prote
cti
ve liner to expose the
adhesive.
iii.
Adhere the edge trim piece to the panel edge by carefully placing it so that the
inner edge of edge trim piece is gently bu
tt
ed against the edge of the panel like
was done in the trail run.
iv.
Apply even pressure to ensure edge trim piece is uniformly secured
v.
Repeat above process for panel edge #2 using the 2 separate edging pieces.
Apply a 3/16” wide bead of adhesive to the bo
tt
om surface of the edge trim
piece that extends over the panel.
Solar Panel
Edge Trim
EternaBond
Tape
EternaBond
Tape
Liquid
Adhesive
DOCUMENT NO. 1000564 REV. E


