BEFORE installing your
Cablemaster
, consider the following three points:
L
OCATION FOR
P
OWER
U
NIT
& C
ABLE
:
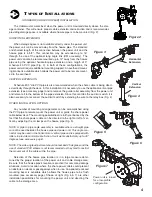
Perhaps the prime consideration in determining the best location for mounting
your
Glendinning Cablemaster
is to remember that the key to a good installation is allowing enough room for the shore
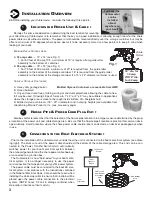
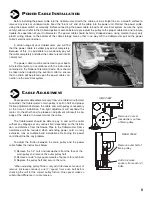
power cable to coil without restriction. The power unit should be mounted
directly over the storage container
, but may be
offset a maximum of 20 degrees where space deems it to be necessary. Here are a few pointers to keep in mind when
looking at your boat.
M
INIMUM
C
ABLE
S
TORAGE
A
REA
:
A.
30 amp cable
— 14” x 14” (see Fig. 1)
1. For 50 feet of 30 amp 10/3, a minimum of 15” is required from guide roller
assembly to the bottom of container.
B.
50 amp cable
— 18” x 18” (see Fig. 1)
1. For 75 feet of 50 amp 6/4, a minimum of 23” is required from the guide roller
assembly to the bottom of the storage container. 18” is required from the guide roller
assembly to the bottom of the storage container if a 15” x 22” diameter container is used.
S
UITABLE
S
TORAGE
C
ONTAINERS
:
A.
Heavy duty garbage barrel
B.
Round baitwell
C.
Any enclosed area free of
tubing, wiring or structural projections allowing the cable to free-
fall may be used. (Glueing strips of
formica
to 1” x 2” or 2” x 2” may be suitable in applications
where the storage area is close to the rough inside surface of a fiberglass hull)
D.
Molded styrene containers
(18” - 22” in diameter and in varying heights) are available from
Glendinning Marine Products, Inc. (see accessory page)
H
AWSE
P
IPE
& P
OWER
C
ORD
P
LUG
E
XIT
:
Also be careful to remember that the selection of the hawse pipe location is in a large measure determined by the prop-
er location of the power unit and cable storage area. Be sure that the hawse pipe’s location is practical for common dock-
age situations. Avoid a location where the shore power cable could present an obstacle on decks or passageways when
in use.
C
ONNECTION TO THE
B
OAT
E
LECTRICAL
S
YSTEM
:
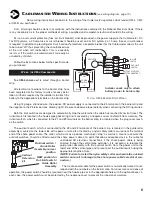
Prior to the installation of the
Cablemaster,
consider how the unit is connected to the boat’s electrical system (see draw-
ing right). The blunt cut end of the power cable should exit the bottom of the cable storage area. This end can be con-
nected to the Power Transfer Switch which
automatically
switches power for your boat’s electrical system between
the on-board generator and the shore power cable hook-up,
or connected to a junction box.
The
Cablemaster
is now “hard-wired” to your boat’s elec-
trical system. It is no longer necessary to use the power
cord connection that was part of your yacht’s power system.
The power cable must be connected to the boat AC elec-
trical system in accordance with the instructions contained
in the National Electrical Code. Care should be taken when
installing the white stop collar to ensure that no strain will be
placed upon the power cable connection to the electrical
system. (NOTE: Leave 1/2 coil in storage container when
stop collar activates out limit switch.)
3
I
NSTALLATION
O
VERVIEW
A
1
2
3
Typically, the
Cablemaster
can be
installed
almost
anywhere on
your boat!
16
Power
Transfer
Swtich
Cable exits
from bottom
of storage
area
From
Generator
To Yacht AC
System
W
ARRANTY
PRODUCT COVERED BY THIS LIMITED WARRANTY: CABLEMASTER
1.
GLENDINNING MARINE PRODUCTS, INC.
warrants to the original consumer purchaser that the
Cablemaster
will be
free from defects in material and workmanship under normal use and service for a period of one (1) year from the date of pur-
chase.
2.
This LIMITED WARRANTY applies to
defects in material and workmanship. It does not apply to chromeplated or anodized
finish or to power cable damage caused by inadequate cable storage area or installation not in accordance with GLENDIN-
NING MARINE PRODUCTS, INC. specifications.
3.
This LIMITED WARRANTY is void
if the product has been damaged by accident or unreasonable use, neglect, improper
installation, or other causes not arising out of defects in material or workmanship.
4.
To obtain performance of this LIMITED WARRANTY
obligation the original purchaser should contact GLENDINNING
MARINE PRODUCTS, INC. for instructions concerning removal and shipping of the defective component. Upon compliance of
the foregoing procedure all warranted defects will be repaired, or at GLENDINNING MARINE PRODUCTS, INC. option, the
complete unit replaced and returned to the consumer, shipping charges prepaid.
5.
GLENDINNING MARINE PRODUCTS, INC.
does not assume the costs of removal and/or installation of the product or any
other incidental costs which may arise as a result of any defect in materials or workmanship.
THIS WARRANTY IS IN LIEU OF ALL OTHER EXPRESS WARRANTIES. ANY WARRANTY IMPLIED BY LAW INCLUDING WAR-
RANTIES OF MERCHANTABILITY OR FITNESS, IS IN EFFECT ONLY FOR THE DURATION OF THE EXPRESS WARRANTIES
SET FORTH IN THE FIRST PARAGRAPH ABOVE. NO REPRESENTATIVE OR PERSON IS AUTHORIZED TO GIVE ANY OTHER
WARRANTY OR TO ASSUME FOR GLENDINNING MARINE PRODUCTS, INC. ANY OTHER LIABILITY IN CONNECTION WITH
THE SALE OF IT’S PRODUCTS. GLENDINNING MARINE PRODUCTS, INC. WILL NOT BE LIABLE FOR ANY CONSEQUEN-
TIAL DAMAGES RESULTING FROM THE USE OR INSTALLATION OF IT’S PRODUCTS.
14” dia. for
30 amp
OR 18” dia.
for 50 amp
Fig. 1
Molded Styrene Containers are available from GMP
Guide
Roller
Cable storage
area

