Glen Dimplex 900gr Скачать руководство пользователя страница 6

Gas & Electrical connection

Please refer to installation instructions
for the Gas & Electrical Safety Regulations
and the Ventilation Requirements.
The information below is crucial to
installing this appliance correctly and
safely.

Failure to install appliances 
correctly is dangerous and could
lead to prosecution.

Disconnection of gas and electric
appliances should always be carried
out by competent persons.

Warning: 

This appliance must be

earthed.

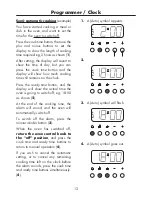
In the event of a power cut

1. Switch off the electricity to the

appliance at the socket.

2. When the power returns, see the

‘Programmer / Clock’ section to
‘Set the time of day’.

Note: operating the control knobs

You may find that the control knobs on your
new appliance operate or p e r f o r m

d i f f e r e n t l y to those you are used to.
The controls are part of the unique electronic
operating system of the appliance and are
designed to be extremely responsive and
easy to turn.

Condensation

When hot and cold air meet,
condensation forms.  The outer door is
air cooled and the inner door gets hot,
so some condensation might form; this
is normal and will disappear within
10 - 15 minutes.
During operation, a metallic click may
be heard occasionally.  This is caused
by the gas valve operating and is
quite normal.

Ventilation

The use of a gas cooking appliance
results in the production of heat and
moisture in the room in which it is
installed.  Ensure that the kitchen is well
ventilated; keep natural ventilation holes
open or install a mechanical ventilation
device (mechanical extractor hood).  
Prolonged intensive use of the
appliance may call for additional
ventilation, for example opening of a
window, or more effective ventilation,
for example increasing the level of
mechanical ventilation where present.
This appliance is not connected to a
products evacuation device.  
It should be installed and connected in
accordance with current installation
regulations.  Particular attention should
be given to the relevant requirements
regarding ventilation.

4

INTRODUCTION

Gas Safety (Installation & Use)

Regulations 

This appliance must by an authorised
person in accordance with the
Australian Gas Installation Standard
AS5601 the manufacturers installation
instructions, local gas fitting regulations,
and any other relevant statutory 
regulations.  
Particular attention should be given to
relevant requirements regarding ventila-
tion.

Содержание 900gr

Страница 1: ......

Страница 2: ...extended warranty please fill in the details on the leaflet and post this off to Glen Dimplex Australia Unit 2 205 Abbotts Road Dandenong South Victoria 3175 Australia If your appliance is covered by...

Страница 3: ...en 9 Using the Ovens 10 Using the Main Oven 11 Programmer Clock 12 Cleaning 17 Micro computer Operation 20 Installation Instructions 21 Fault Finding 29 Technical Data 36 Customer Care 38 Please keep...

Страница 4: ...display Timer buttons Top oven function Grill function Main oven function Temperature selectors 2 900GR oven detail For fascia detail see above Grill Top Oven door handle Grill Top Oven glass door Ma...

Страница 5: ...year guarantee To fulfil the conditions of your guarantee this appliance must be correctly installed and operated in accordance with these instructions and only be used for normal domestic purposes B...

Страница 6: ...normal and will disappear within 10 15 minutes During operation a metallic click may be heard occasionally This is caused by the gas valve operating and is quite normal Ventilation The use of a gas c...

Страница 7: ...ashing refer to Micro computer Operation section Cooling fan When you switch on the ovens or grill you will hear the cooling fan start This fan provides air for the burners and keeps the exterior of t...

Страница 8: ...not use spray aerosols in the vicinity of the appliance while it s in operation Do not use aluminium foil to cover the grill pan or put items wrapped in foil under the grill as this creates a fire ha...

Страница 9: ...n Never cover the grill pan or trivet with cooking foil or allow fat to build up in the grill pan as this creates a fire hazard Preheating For best cooked results the grill should be preheated until t...

Страница 10: ...emoved from the pan during grilling to prevent overheating The handle is designed for removing inserting the grill pan under the grill when grilling If cleaning the grill pan when it is hot use oven g...

Страница 11: ...p pressure The top oven burner will not come on unless the oven door is closed To turn off return the control knob to the off position Please ensure that the oven is fully switched off when not in use...

Страница 12: ...ing the control off then on again to the required setting The oven cannot be used manually when the programmer is set for automatic cooking if A AUTO is showing on the programmer display press the coo...

Страница 13: ...allow for circulation of heat Baking tray and roasting tins For best cooked results and even browning the maximum size baking trays and roasting tins that should be used are as follows Baking tray 35...

Страница 14: ...he programmer to manual operation at any time cancelling any automatic setting press the cook time and ready time buttons simultaneously The programmer must be set to manual before the appliance can b...

Страница 15: ...ll show how much cooking time still remains on the clock Press the ready time button and the display will show the actual time the oven is going to switch off eg 18 00 as shown 2 At the end of the coo...

Страница 16: ...mode Press the cook time button then use the plus and minus buttons to set the display to show the length of cooking time required eg 2 hours as shown 5 Press the ready time button and the present rea...

Страница 17: ...itched off return the oven control knob to the off position and press the cook time and ready time buttons simultaneously 11 If you wish to cancel the automatic setting before cooking has started and...

Страница 18: ...nd uncooked food are thoroughly thawed before placing them in the oven Cover dishes with lids or foil as they may be left standing in the oven for some time before cook ing Do not Never place warm foo...

Страница 19: ...nly use a clean cloth wrung out in hot soapy water Chrome plated parts OVEN SHELVES OVEN SHELF RUNNERS GRILL PAN TRIVET Do not use abrasives or polishes Use a moist soap pad These items may also be cl...

Страница 20: ...door stop position about 30 open hold the top and bottom edges of the panel and slide out Note that if the door is opened fully when removing the inner door glass panel the door may spring shut Import...

Страница 21: ...xtra care should be taken when cooking food in salted water Some foods are corrosive eg vinegar fruit juices and especially salt they can mark or damage stainless steel if they are left on the surface...

Страница 22: ...essary to reset the micro computer by turning the electricity supply off at the mains plug when first bringing the appliance into operation Opening oven doors whilst the micro computer is running thro...

Страница 23: ...rrectly is dangerous and could lead to prosecution Ventilation Requirements Ventilation must be as specified by AS 5601 Installation code The room conatin ing the appliance should have an air sup ply...

Страница 24: ...ed near to a corner where the adjacent cabinets run at right angles forward of the appliance there must be a gap of at least 90mm between the appliance and the cabinets to prevent overheat ing of the...

Страница 25: ...INSTALLATION INSTRUCTIONS 23 The appliance is designed to fit into a standard 600 mm wide housing unit with minimum internal dimensions as shown...

Страница 26: ...600mm wide housing unit with minimum internal dimensions as shown Note All sizes are nominal some variation is to be expected 24 888 mm min 560mm 20mm min 880 mm min 890 mm min 6mm 550mm min 595m m 5...

Страница 27: ...ntifying the terminals in your plug proceed as follows 1 The wire which is coloured green and yellow must be connected to the terminal marked E Earth or coloured Green 2 The wire which is coloured blu...

Страница 28: ...than 70 C 6 Make sure all connections are gas sound Important ensure that you route all mains and electrical cables and flexible tubing well clear of any adjacent heat source such as an oven grill or...

Страница 29: ...he fixing screws provided are driven through the edging strips into the cabinet the seal will straighten up and sit flush to the cabinet when the screws are fully home Step 5 Secure appliance into hou...

Страница 30: ...automatic ignition will continue to spark for a short time after the burner flame has lit until the flame is established Grill 1 The door must be open for the grill burner to ignite 2 Turn the Top Ov...

Страница 31: ...akes a series of checks of the air flow and flame detector before allowing start up Electrical faults These may be either component failure or wiring connector faults Should any disconnections be made...

Страница 32: ...circuit spark electrode sparks correctly electrode note both grill and oven electrodes must be connected 2 Faulty solenoid valve 3 Gas not at appliance 4 Blocked injector jet Oven goes out before set...

Страница 33: ...n lamp lights Oven fan does not start Component failure on main board lamps do not light Cooling fan fails to start 1 Faulty fan ON LED fails to light 2 Faulty programmer cooling fan fails to start 3...

Страница 34: ...R R W Bu Bu Bu Bu Bu Bu Bu Bn Bn Bn Bn Bn Bn Bu Bu FIT LINK WIRE HERE A1 Main oven fan A2 Top oven fan A3 Cooling fan B Transformer C1 Solenoids grill C2 Solenoids main oven C3 Solenoids top oven D E...

Страница 35: ...hinge arms to stop the door from springing up when you remove the outer glass panel b Slide out the inner glass panel c Remove 2 plastic inner glass stops at bottom of door extrusion d The door foot...

Страница 36: ...s to rear compartment 5 c Disconnect the fan leads from the terminal block d Unscrew the 4 screws which secure the fan mounting bracket e Remove the 4 screws which secure the fan to the mounting brack...

Страница 37: ...s onto the oven cavity f Do not stretch the seal g Make sure the seal is fitted correctly as shown and cut to fit h Re tighten the screws in the flue cover 17 Solenoid Block a Remove appliance from ho...

Страница 38: ...Oven Grill Light s 4 x 25W 2 in each oven Electrical supply 220 240V 50Hz 230W Grill Burner Surface combustion Spark gap 3 4mm Top Oven Burner Rotary surface combustion Spark gap 3 4mm Main Oven Burne...

Страница 39: ...rial number in the space below Where are my model and serial numbers Freestanding HL appliances base of storage drawer Freestanding appliances front frame near oven cavity Built in oven front frame ne...

Страница 40: ...of purchase Important note Service work is to be conducted by authorised persons only It is also adviseable that your cooker is checked regularly and maintained in good condition An annual mainte nanc...

Отзывы: