15. Programmer / clock
a. Remove appliance from housing.
b. Remove top & facia panels (1).
c.
The programmer is fixed to the facia
panel with high temperature double
sided adhesive tape.
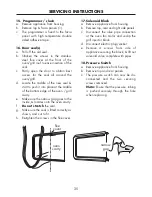
16. Door seal(s)
a. Pull off the old seal.
b. Slacken the screws in the stainless
steel flue cover at the front of the
oven/grill roof to ease insertion of the
seal.
c.
Partly open the door to obtain best
access for the seal all around the
oven/grill.
d. Locate the middle of the new seal &
start to push it into place at the middle
of the bottom edge of the oven / grill
cavity.
e. Make sure the narrow gap goes to the
inside, & locates onto the oven cavity.
f.
Do not stretch
the seal.
g. Make sure the seal is fitted correctly as
shown, and cut to fit.
h. Re-tighten the screws in the flue cover.
17. Solenoid Block
a. Remove appliance from housing.
b. Remove top, rear and right side panels.
c.
Disconnect the olive pipe connection
at the oven fan motor and unclip the
grill injector block.
d. Disconnect electric plug/socket.
e. Remove 4 screws from side of
appliance securing the block, & lift out
solenoid valve complete with pipes.
18. Pressure Switch
a. Remove appliance from housing.
b. Remove top and rear panels.
c.
The pressure switch can now be dis-
connected and the two securing
screws removed.
Note:
Ensure that the pressure tubing
is pushed securely through the hole
when replacing.
SERVICING INSTRUCTIONS
35
narrow
gap
flue
cover
oven
cavity
Содержание 900gr
Страница 1: ......


