


18
DOK41 HOIAO WxDEN · FD 9912
www.gdts.one
English
Air-to-water heat pump 4 - 6 kW
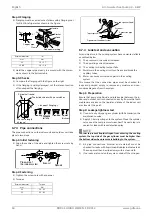
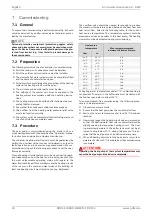
Step 4: Flanging
Flanging must be carried out as follows with a flanging tool
for R-410A refrigerant as shown in the figure.
Hold the copper pipe steady in a mould with the dimen-
sions shown in the bottom table.
Step 5: Checks
Compare the flanging with the figure on the right.
If the flanging is visibly damaged, cut the relevant section
off and repeat the flanging.
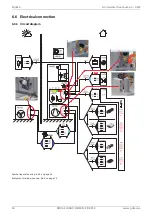
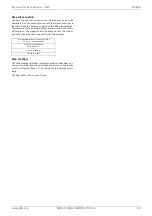
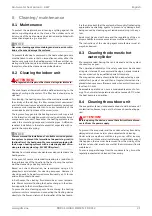
6.7.3 Pipe connections
The pipe connections on the indoor unit and outdoor unit take
place in two steps.
Step 1: Initial fastening
Align the centre of the pipe and tighten the screw nuts by
hand.
Step 2: Fastening
Tighten the screw nuts with a spanner.
Torques
6.7.4 Leak test and evacuation
Air and moisture in the cooling system have unwanted effects
as outlined below.
1) The pressure in the system increases.
2) The operating current increases.
3) The cooling (or heating) output falls.
4) Moisture in the cooling circuit can freeze and block the
capillary tubes.
5) Water can cause corrosion on parts in the cooling
system.
This means that the connection pipes must be checked for
leaks and pumped empty to remove any moisture and non-
condensable gases from the system.
Step 1: Preparation
Ensure that every pipe (liquid and intake side) between the in-
door and outdoor unit is connected correctly. Ensure that both
maintenance valves on the liquid and intake of the indoor unit
are closed at this point.
Step 2: Leakage tightness test
Connect a dry nitrogen gas cylinder (with Schrader) on the
maintenance valve.
Apply 40 bar dry nitrogen to the system. Close the cylinder
valve once the test pressure is reached. The next step is to
search for leaks with leak detection spray.
HINWEIS
ºº
º
ºº
º
NOTE
In order to prevent liquid nitrogen from entering the cooling
system, the top side of the gas cylinder must be higher than
the bottom side when pressure is building in the system.
1) All pipe connections (internal and external) must be
checked for leaks with liquid soap. Bubbles indicate a leak.
The soap must then be wiped away with a clean cloth.
2) If no leaks are found on the system, drain off the nitrogen.
External diameter
"A"
mm
mm
10
1.5 ~ 1.7
15.88
1.6 ~ 1.8
External diameter
Torque
mm
Nm
10
34 - 42
12
65 - 81
Rail
Copper pipe
Clamp
Red arrow marking
Cone
Bracket
Handle
Rail
"A"
Slanting
The inside shines with no scratches
Smooth all round
The same length
all round
Damaged
surface
Cracked
Uneven
thickness
= Incorrect flanging =
Pipework of
the indoor system
Screw nut
Pipework
Torque spanners
Pipework of the indoor system
Open-end spanner (fixed)
Connection pipe
Screw nut
Содержание 041HOIAOW2
Страница 2: ......
Страница 37: ...www gdts one DOK41 HOIAO WxDEN FD 9912 35 Air to water heat pump 4 6 kW English...
Страница 38: ...36 DOK41 HOIAO WxDEN FD 9912 www gdts one English Air to water heat pump 4 6 kW...
Страница 39: ...www gdts one DOK41 HOIAO WxDEN FD 9912 37 Air to water heat pump 4 6 kW English...